outboard maintenance
If you live in a colder climate or if your boating plans include an extended hiatus, you’ll want to put your outboard engine to bed at some point. Prepping your kicker for a layup is relatively easy, and if it’s done properly, will not only lighten your workload when it’s time to get going again but will also help your engine last longer and remain free of trouble.
**
Begin with the fuel.** Whether your engine is a two-stroke or four-stroke model, the impact of ethanol-blended fuel that’s been sitting around for much longer than 90 days can be quite profound. So Step One is to treat fresh fuel with an approved fuel stabilizer. Engine manufacturers have their own branded conditioners and stabilizers, and many general brands exist. The debate, of course, is which one is best. I’ve used STA-BIL with good results, and the manufacturer claims it works for up to 12 months. Still, I’m sticking to my 90-day limit to be on the safe side because I’ve experienced problems even with stabilized fuels that were older than that.
Add the stabilizer to your fuel tank according to the directed ratio on the label. Then you can perform two important winterizing functions simultaneously. Most small outboards today have a water flush port integrated into the lower unit. Remove the screw-in plug and insert a hose adaptor, available from your engine manufacturer. If your engine doesn’t have a flush port, pick up an engine flusher (it looks like a pair of ear muffs) at any marine-supply store and slide those over the water-intake ports on the bottom of your engine with a hose attached.
Then run the engine with the stabilizer in the fuel and the flush hose turned on. For safety’s sake, remove the propeller first. I run the engine for at least 15 to 20 minutes to ensure that the engine comes up to operating temperature and its thermostat opens, allowing water to flow through the entire cooling system to flush out any salt deposits that, over time, can be damaging. This also lets stabilized fuel circulate through the entire fuel system.
A third reason for following this procedure in this sequence is that in the case of four-stroke outboards, this will completely warm up the engine oil, which must be changed as a part of the winterizing regimen. (See “Four-Stroke Engine-Oil Maintenance,” below.)
Most manufacturers recommend that you change the lower-unit gear-case oil every 100 hours. On a small kicker engine, that could equate to years of engine operation; you be the judge, based on use. Whether changed as part of winterization or not, the oil level should at least be checked.
With the engine upright, remove the top gear-case plug. You should see gear oil slowly seep from the access hole. If not, the level may still be adequate if it’s just below the screw hole. To check, I use a matchstick or pipe cleaner inserted into the hole and tilted slightly. I’m also looking for any signs of water that’s mixed with the gear oil; it will show as a milky-white color and indicates a lower-unit seal leak that must be attended to immediately by a qualified mechanic.
If you’re going to change the oil, remember that the gear case is refilled in a rather nonintuitive way. There are two access screws to your engine’s lower unit, an upper (see photo above) and a lower. The lower access screw is found on the forward, lower end of the gear case, which is the bulbous section of the lower unit. To refill the gear case, use the manufacturer’s recommended gear oil, which can be purchased in squeeze tubes with a nozzle-type top. Insert the nozzle into the lower access hole and squeeze until oil seeps out of the upper screw hole. Next, insert and tighten the upper access screw. Then remove the nozzle from the lower screw hole and insert and tighten that screw. Make sure that both screws have O-rings on them; if the rings look crushed or worn, they should be replaced.
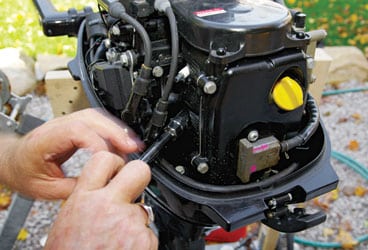
The next step is to lubricate the engine tilt and steering points. To do this properly can be a bit messy, so have a good supply of rags or paper towels on hand. You’re going to need them.
Water migrates into both the engine tilt and steering tubes, and you need to get it all out. With a grease gun and the appropriate fitting, pump grease into the grease fittings until all of the old grease is pushed out and all you can see is clean, new grease seeping from the pivot points. Here’s where the rags come in: Wipe off all the old grease and properly dispose of the rags.
One point needs to be made here related to the grease fittings: Some engine makers use traditional zerk fittings (see photo above; the fitting is on a typical steering-tube lubrication point), and the nozzle that comes with your grease gun will work just fine with them. Other engine makers (notably Yamaha) use a fitting that requires a needle-type device for your grease gun. These are available at just about any automotive parts store.
Also note the small wire bonding straps coming from the fitting to a bolt on the engine’s lower section. If broken—and the wire will corrode and break—they should be replaced. These help to ensure that the engine anodes are protecting the entire motor from corrosion.
With the fuel, cooling, and lubrication systems taken care of, it’s time to **think about engine corrosion** a bit more.
All small engines have sacrificial anodes mounted on the lower gear case and sometimes on the lower section of the engine-mounting bracket. These should be inspected and, if they’re depleted by 50 percent or more, replaced. (The photo at right shows a mounted anode that’s still serviceable for at least another season.) The best material to use for the replacement anodes is a specialized aluminum anode, not zinc. The aluminum provides the best service in salt, brackish, and even fresh water. Zinc only performs at its best in a saltwater environment.
It’s now time to fog the cylinders.
Engine fogging oil is available at all automotive-and marine-supply outlets. With two-stroke engines, it used to be considered best to remove the carburetor air-intake cowling and run the engine while simultaneously spraying the fogging oil into the respective carburetors until the engine sputtered to a stop. Over the years, though, I’ve found this method to be messy. And problematic: I say this because the oil can cause the carburetors to get gummed up inside, a problem you’ll discover when you take the engine out of storage.
Since two-strokes get their lubrication from the oil in the gasoline, as long as the oil/gas mix ratio is correct, I don’t worry about the engine’s internal components getting a fresh coating of lubrication; it happens naturally when the motor is running. Some engine mechanics recommend adding a slightly richer mix of oil and gas for the final run before the engine gets put to bed for the winter. Fair enough, and no harm done; just don’t overdo it. For example, a 25-to-1 ratio vs. a 50-to-1 ratio of gas and oil really won’t hurt anything and won’t gum up the carburetors.
But there is a use for fogging oil in both two- and four-stroke engines. Remove the spark plugs and spray the fogging oil into each cylinder for a few seconds, preferably while turning the engine over with the pull-start cord. This will provide a nice corrosion-inhibiting oil film to protect the engine cylinder walls. Replace the spark plugs if needed. I usually get several years out of a set, and even then they would probably last longer, I just replace them to ensure reliability.
Do you recall that we removed the propeller when we began? Now’s the time to inspect the propeller for dings or dents and to replace it if needed. Also, it’s time to inspect the prop shaft for any fishing line that may now be wrapped around it; it should all be removed. Left unattended, line will destroy the shaft seals and allow water to migrate into the gear case or oil to leak out of the gear case. Either way, expensive damage can be the end result of leaving line there.
It’s a good idea to wipe the old grease off the propeller shaft and apply some fresh grease to the shaft before you reinstall the propeller.
Finally, after I’ve attended to all of these tasks, every one of my engines gets a good wax job with a cleaner wax before I lay it up.
So there you have it. Follow these steps and recommendations so your kicker can rest comfortably over the winter months while you’re enjoying other
pastimes. It’ll be ready to run strong next spring when you’re back on the water.
Ed Sherman, a frequent CW_ contributor, develops curriculum for the American Boat & Yacht Council._
Four-Stroke Engine-Oil Maintenance
If you have a four-stroke engine, never leave old oil in the crankcase. One of the tasks that your engine oil performs is to help clean the inside of your engine and absorb by-products of combustion. These by-products can be quite corrosive and, if left sitting in an engine for extended periods, can actually induce corrosion and rusting of such things as crankshafts and cylinder walls. The best way to counter this is to leave an engine stored with fresh, clean oil in it and circulated through it.
When draining the oil, I’ve found that since the drain plug for the crankcase is typically located rather far up on the center section of the engine, tilting the engine to its uppermost position with an appropriately sized drain pan under the drain hole makes for the least amount of mess and catches all of the drain oil. Be sure to change the engine oil filter as well. When refilling, be sure to use the manufacturer’s recommended engine oil and be very careful not to overfill. These engines take relatively small amounts of oil to fill. Make sure the engine is in the vertical position when you’re refilling and when checking the level with the dipstick.
Next it’s time to start the engine up again and run it for a few more minutes to be sure the new engine oil thoroughly circulates. Shut the engine down and check the engine crankcase oil level a final time.
Paint Done Right
It’s hard to avoid an occasional grounding with a dinghy engine, and
eventually this will scrape the paint of its skeg. Over time, other areas of
the engine and mounting bracket will also get scraped down to bare metal. If
used in salt water, these surfaces must be salt neutralized before any new
primer or paint is applied to ensure proper adhesion of the new coating.
Most marine supply houses sell salt-neutralizers and these should be used to
properly wash the surface before sanding or painting the bare metal. Once
the salt is washed away and a light sanding to the surfaces is done, you can
wipe away any dust and prime with a primer recommended for aluminum. Then
pick the appropriate color and apply several coats of engine paint, which is
available at most marine stores.