Painting Topsides
When we decided to paint Momo, the Mason 43 that’s been our home for five and a half years, it wasn’t purely a cosmetic thing. Nearly 30 years old, she’d never been painted, and her gelcoat was in dire need of some T.L.C. My husband, Bernie, and I had been keeping an eye now for a couple of years on those troubling bubbling spots at the waterline. When we arrived in New Zealand in December 2008, tending to Momo‘s topsides was high on our project list. We briefly discussed having the job done professionally, but since we’re budget sailors, the idea of paying the equivalent of US$2,000 or so for someone else’s labor was quickly discarded. Besides, we’d painted our previous boat ourselves, and we enjoy a challenge; more often than not, we’ve discovered, they turn out to be bonding experiences.
Choosing a Color
Picking the color was easy. But the responses we got were really a surprise: “Yellow! Why?” “Was that the only color in the shop?” “Was it on sale?” And “It’s a strange color for a boat!”
So, why yellow? No, it wasn’t the only color available. And it wasn’t on sale. What yellow was, in fact, was simply our choice: yellow like the sunshine that our daughters sing about, like the center of a gorgeous runny egg, like Toad’s canary-yellow cart in The Wind in the Willows.
Yellow because, well, we like it.
We’d gotten some practice with bright colors on our previous boat, when we updated the traditional navy-blue hull and its gold trim—it was an Annapolis boat, after all—with bright-green topsides and yellow and red wood trim both inside and out. Years later, when it was time to do something about the peeling varnish on Momo’s hatches, we created our own world of colorful chaos when we let our two young daughters choose the paint. We knew what we were getting into when we walked into the paint store in La Paz, Mexico, and our hatches and dorades soon became a marvelous medley of gold and turquoise and purple and red.
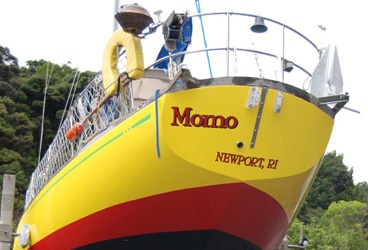
And now Momo has gone the way of our previous boat—less traditional, perhaps, but easier to find in an anchorage. She’s not only yellow; that would be too yellow. There’s black bottom paint peeking out just above the waterline, with a fat red stripe above that. But since the yellow-black-red combo looked a bit too much like a large German flag, we chose tree-frog green for the sheer stripe, and then, when there was extra paint in the can, painted our new hard dodger the same bright green.
Reworking the Waterline
To tackle Momo‘s makeover, we hauled out for four weeks at Doug’s Opua Boatyard, in Opua, on New Zealand’s Bay of Islands. We devoted Week One to power-sanding and grinding out crazing, bubbles, and cracks, then to fairing (with CRC vinylester marine filler, a local product recommended by several Kiwi acquaintances) and to sanding. The gelcoat was already looking happier after a week’s worth of attention. We kicked off Week Two by adding one layer each of Altex No. 1 epoxy paint and Altex No. 3 epoxy paint at the waterline, where Momo‘s original boot stripe had been, to protect and strengthen this vulnerable area. We sealed that with one coat of Altex No. 5 ablative bottom paint to cure it all together, then taped off the waterline and worked our way up.
The next layer we painted was the new, wide, red stripe measuring 9 inches at the centerline and about 12 inches at the bow; it’s even wider back under the stern. Like all liveaboards, we’ve raised our waterline once already. But we by no means intend to raise it all the way to the top of this stripe: there’s no way we have that much junk. The wide swath of color looks good, but it’s more than an aesthetic choice. We chose red Pettit Vivid bottom paint to provide greater protection against those resilient critters that have befouled our white hull for years. You know the ones I mean: those tiny, scummy guys that creep up well above the waterline, even at anchor as calm wavelets lap at your boat’s sides. The disadvantage of extending bottom paint above the waterline is that some of the paint will inevitably rub off on the dinghy. But for us, the advantages outweigh the inconvenience of a little red on our dinghy. Moreover, on our previous boat, the one-part paint also rubbed off on the dinghy, one of the problems of any “softer” paint. Dinghy chafe is inevitable, and touching up the red just above the waterline stripe when the time comes will be a far easier task than repainting the entire topsides. And so, unorthodox as it seems, we applied one layer of Altex Epoxy primer (made for use both above and below the waterline) and three layers of red Pettit Vivid to keep some of the creeping scum away.
**
Prepping the Topsides**
By Day 10, we were ready to start on the topside paint. We chose the one-part Brightside system from International Paint, which is marketed in the United States as Interlux. The company recommend a primer, then a Pre-kote (which you mix with 5 percent of the topcoat, to make a better transition to the final color), then the topcoat. We followed the manufacturer’s directions. We painted for another week (and this was the prep work), perfecting our technique and enjoying the learning curve (most of the time) as we applied three layers of primer and two of Pre-kote. Sometime during that week, we overheard Doug, the yard owner, refer to us as some of the “fussiest” painters he’d ever seen, and we wondered whether that meant we were just plain cranky. We chose to believe that he was complimenting our dedication. One thing’s for sure: There’s a real joy in putting on the paint yourself and getting to watch the layers add up to the final coat. And you get better at it with each day. Even on that first afternoon, we noted an exact moment when we figured out what we were doing as we rolled and tipped our way for the first time down the starboard side, changing it from white gelcoat to gray primer. You could see that moment in the brushstrokes, when the paint started going on more smoothly: Yes, it had a lot to do with remembering to start the brush in the dry area, then pull it into the wet paint, not the other way around.
And so it was that for six days, Bernie and I followed a fairly exact routine to prepare the boat for the topcoat: Wake up, brush teeth, drink coffee, feed kids, sand with 220-grit paper, shower (because the paint dust goes everywhere), find painting clothes from yesterday (they grew stiffer and more colorful each day), wash dust off topsides with soap and water, wipe down with turpentine, check tape and reapply where needed, roll and tip paint, drink beer and watch paint dry, field commentary from passing peanut gallery. Occasionally, we stopped for 10 minutes while a cloud let loose on us, and sometimes we had to remember to be parents.
**
The Final Touches**
Whether it was because of the quality of the paint we were using or because we’d found our stride—I mean, let’s face it: If you don’t know what you’re doing after two weeks of this, you’re never gonna get the job done!—applying the topcoat was the easiest task. The first layer went on shiny and smooth. No turning back now: Momo was yellow. Yard strollers who stopped by confirmed this with their astute observations: “Wow, that’s very yellow!” You had to really study their faces to see if they were smiling approvingly or shielding their eyes from the glare. But we didn’t have time to care: We were on a roll, so to speak, moving fore to aft and keeping the wet edge flowing. Two days of rolling and tipping the yellow topcoat, then two days of green sheer stripe, and we were done. After we spent a few more days performing bottom-paint and other minor out-of-water tasks, Momo was finally ready to splash.
There were glitches, sure—like when the green paint on our sheer stripe bled under the tape and we had to spend an evening scraping off the drying drips with a combination of turpentine and diminishing thumbnails. There were days of tension, too. I worry, for example, about the quantity of trauma that we might have inflicted upon that mild-mannered British couple working on their boat next to us on the day that we struggled with the new vinyl letters on Momo‘s transom. “Momo” wasn’t the only colorful four-letter word that went flying about that morning.
But taping and sticker issues are minor. Our wallets are happy because the 2008 U.S. dollar/New Zealand dollar exchange rate worked to our benefit. (See below) Our children are happy now that they’re back swinging on the halyards once more—not being able to swing is, for them, the greatest sacrifice about life on the hard. And Momo‘s future is—what else?—bright.
Michelle Elvy, a liveaboard since 2002, is sailing and writing her way around the Pacific on Momo_ (http://svmomo.blogspot.com). One of Elvy’s stories was a 2010 Pushcart nominee for short fiction._
Five Tips for Rolling and Tipping
There’s no question that there are many schools of thought regarding correct and proper and better painting technique, brushes, rollers, and the uses of Flood’s Penetrol. My husband, Bernie, and I are by no means experts, but here’s what worked for us.
1 Thin the paint for easy flow to keep the wet edge wet for smooth application. Thick paint makes a bumpy ridge between the beginning edge of brushstrokes and the trailing edge. On the other hand, don’t thin too much: The paint will run and drip, and it won’t cover.
2 Use a quality roller that won’t leave fibers in the paint, and invest in one good brush that won’t shed bristles or leave excessive brushstrokes. Mohair rollers are excellent; foam disintegrates. A badger brush is best, but one with quality polyester/nylon bristles does the job just fine.
3 Roll on paint from top to bottom. Start rolling at the top, but when you get to the bottom half of the topsides, reverse things and start rolling from the bottom up. This way, you avoid pushing paint down with the roller and causing it to drip. In our case, this would’ve been into an already painted bootstripe.
4 Tip paint from side to side, starting in the dry area and pulling the new paint into the wet paint, thinning and smoothing as you go. Longer brushstrokes are better.
5 Apply Flood’s Penetrol to paint (but only if you’re using a standard one-part paint; Penetrol doesn’t work with two-part paint polyurethanes or latex). It allows the paint to stick and flow smoother, virtually eliminating
the brushstrokes.
Painting Supplies and Costs for Momo’s New Zealand Makeover
Item Amount Cost*
International** Brightside polyurethane 2 liters $55
topcoat, yellow
International Yacht primer 4 liters $340
International Pre-kote 1 liter $23
Pettit Vivid, red 4 liters $360
Resene Supergloss enamel paint, 1 liter $31
tree-frog green
Altex No. 5 ablative anti-fouling paint 18 liters $231
Altex Epoxy No. 1 and No. 3 paint 1 liter of each $38
CRC marine vinylester filler 1 can $14
International thinner 3 liters $45
Penetrol by Flood 1 liter $13
Turpentine 2 liters $6
Rollers, brushes, paint trays NA $49
3M Delicate green masking tape 4 rolls $18
Latex gloves 1 box $18
Rags 1 bag $6
Total cost for the project $1,247
* In estimated U.S. dollars
** Marketed in the United States as Interlux