Silverheels‘ new Schaefer System 3100 jib furler arrived in two big boxes full of unfamiliar parts, with a manual depicting 46 assembly steps. My first thought was, “I’ll never be able to do this. I’d better call a rigger.” After 32 years, the bearings in Silverheels’ old jib furler were so worn it took a sheet winch to reef in a blow. It was high time for a new furler, and here it was. At first glance the instructions were intimidating, but I already had two strikes against hiring a pro to assemble it for me: budget and pride. Curiosity was the third — wanting to see how it all worked. So I took a deep breath, reminded myself of the old maxim “The way to succeed at anything is to begin and continue,” and reopened the manual to page one.
There I found more sage advice: “Read these instructions several times prior to assembly to familiarize yourself with the components and procedures.” So I did. By the second reading, it began to make sense; after the third, the part names, functions and sequence seemed downright familiar. Like most boat projects, it was actually pretty simple once broken down into baby steps — even if there were 46 of them.
Out with the Old
With my mindset in place, I began the physical process by marking the old unit’s turnbuckle threads before loosening it to take it down. This way I could reset it on the ground and measure the headstay’s working length, clevis-pin center to clevis-pin center, to know how long the new assembly needed to be.
The old furler’s lower section had shipped a lot of sea salt over the years, and many of its fasteners refused to unscrew. So my second baby step was to squirt a little PB Blaster penetrating lubricant onto each nut, bolt and screw several times a day for a couple of days, meanwhile attending to other boat chores. This process reinforced my belief in using some kind of anti-seize or anti-corrosion goop on seagoing fasteners, especially in dissimilar metal assemblies. Given time and salty air, aluminum corrosion around stainless-steel screws will virtually weld them in place, making them difficult or impossible to take apart later. When I’d last reassembled this old furler base eight years ago, I had used Never-Seez. Yet it still took a couple of days of lubricating, and ultimately some sharp whacks with a 3-pound sledge on an impact driver, to break the tougher ones loose. Without any anti-seizing goop on the screws, I would have had to drill out every one, or else cut the headstay.
I soon had the old furler freed up, lowered down and lying on blocks on the pier, with Silverheels’ mainmast now supported forward by the jib halyard and staysail stay. Next I had to decide whether to reuse the 3⁄8-inch-diameter headstay wire. It was eight years old — not new, but apparently still sound. To get a professional opinion, I called Rigging Only owner Tom Bigsby, whom I knew from the last time I’d rerigged my boat. Tom said: “For furler installations we generally recommend replacing the wire if it’s 10 years old or older, just because it’s covered up and nobody ever checks it after that. The tropics are particularly hard on rigging.
We figure the safe life span of ¼-inch wire swaged top and bottom is about eight years. Double that if mechanicals [such as Sta-Lok or Norseman fittings] are used on the lower ends. Larger-diameter wire lasts longer, as does standing rigging used in northern climates.” He also suggested sight-checking old wire by opening a few of the mechanical end fittings and inspecting for corrosion. If you don’t disturb the nut part, you can add just a little fresh sealant and Loctite Threadlocker Blue and screw them back together. According to Tom’s criteria, and with periodic inspection, my headstay should serve at least another 10 years, when all the standing rigging will be due for renewal. So I reused it. Tom also advised reading the manual at least twice through, adding, “Don’t be overconfident. A little fear will help you pay attention.”
On Silverheels, I had an extra factor to consider that the manual didn’t specifically mention: The shanks of my big bow anchors tilt up sharply as they pass over the bow rollers, and in the past they’d routinely banged against the bottom of the old furler’s drum each time I lowered and weighed them. This time I intended to set the drum high enough to avoid that problem, so I measured the height of the angled shanks at their apex and found they needed a full foot of clearance above the stemhead chainplate pin — more than my new furler provided. Fortunately, Schaefer Marine makes an optional toggle extension for this not uncommon situation, and I ordered it.
Measure Thrice, Cut Once
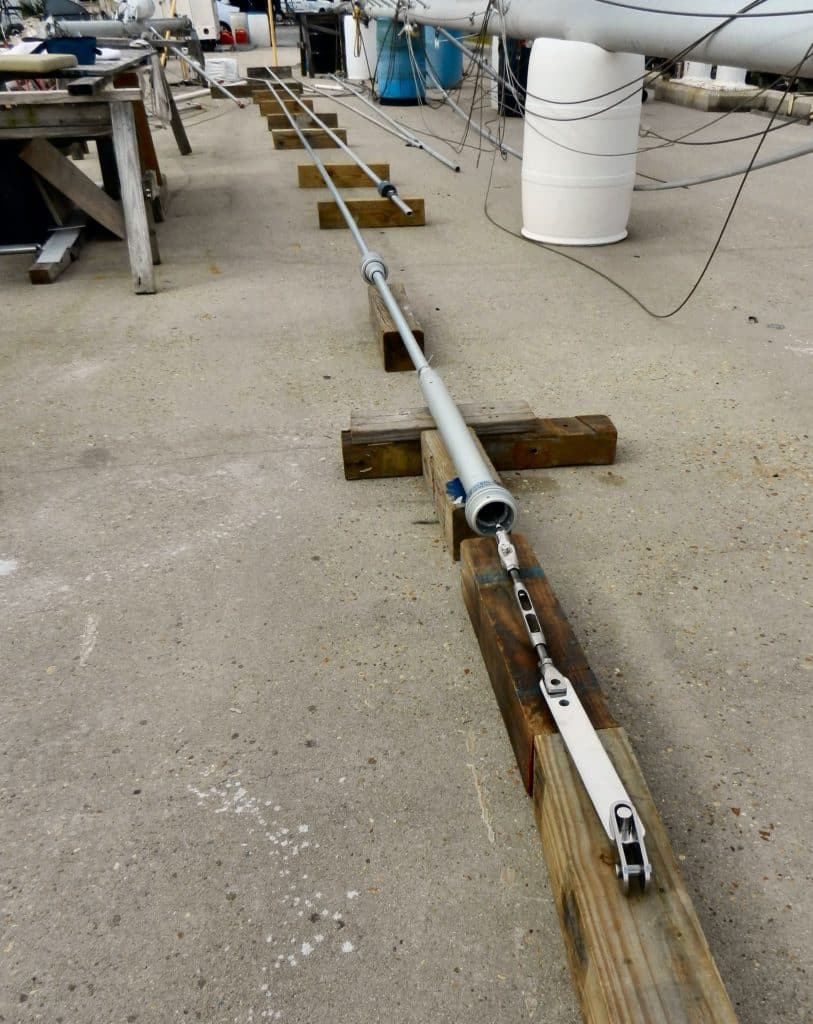
The assembly went smoothly, or so it seemed. Each step made sense by the time I got to it. Per the instructions, I did a dry run first — actually, three dry runs — putting all the parts together but not securing them permanently. This let me triple-check everything, especially the all-important overall length, which had to match the old furler’s with the turnbuckle about two-thirds closed. (Had I used new wire, I’d have set the turnbuckle only half closed to allow for stretch.) At last, all seemed right, and I made the final connections, pleased at how much easier it had been than I had first feared.
In preparation for raising my beautiful new jib furler, I wrapped the lower section in old towels to protect the finish in case of an accidental bump or scrape along the way. A helper and I laid the foil-encased headstay at the edge of the pier, stretched out ahead of the boat with its head just forward of the mainmast. I secured the spinnaker halyard to it with a rolling hitch, just below the swage so the clevis-pin hole was clear, and tied a control line to the foot so it could be fed gently onto the boat when the furler was hoisted.
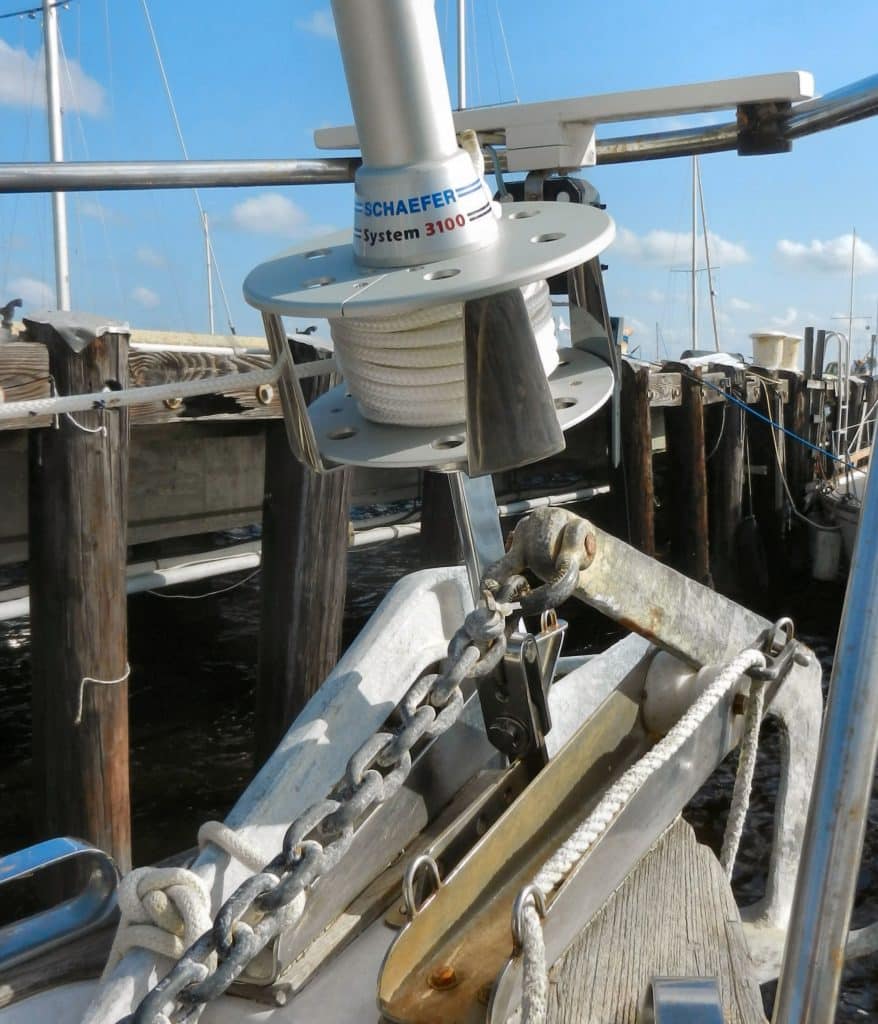
As I hoisted the furler with the halyard, my helper walked the lower end along the dock toward the boat. He then switched his grip to the control line and fed it out while another friend guided the lower end over the bow pulpit, setting it down by the stemhead chainplate. I pinned the top and bottom of the headstay, tightened the turnbuckle and finished assembling the furler’s lower unit. Done!
I’m glad I overcame my initial fear of tackling this project. Even though I made a couple of mistakes, the assembly wasn’t all that difficult once I broke it down into small steps. Besides, a bluewater skipper needs to know his boat’s equipment inside out to maintain it, diagnose problems and effect repairs. I now know every pin and rivet in Silverheels’ jib-furler system — intimately.
Replacing the Headstay
Not all projects go smoothly, including this one. With the furler reinstalled, the foil ended up being 2 inches too short at the top, and the toggle extension at the unit’s base was 2 inches longer than needed. I now needed to install a longer foil section, which required removing and then replacing the headstay. This is essentially the same process you would use if you were installing a new headstay. Here’s what I did:
First I removed the Sta-Lok rigging terminal from the base of the wire. I used xylene, which breaks down most bedding compounds, and a wire brush and old toothbrush to clean out the Boat Life bedding compound that I had just put in the week before. It took a little patience, but it worked.
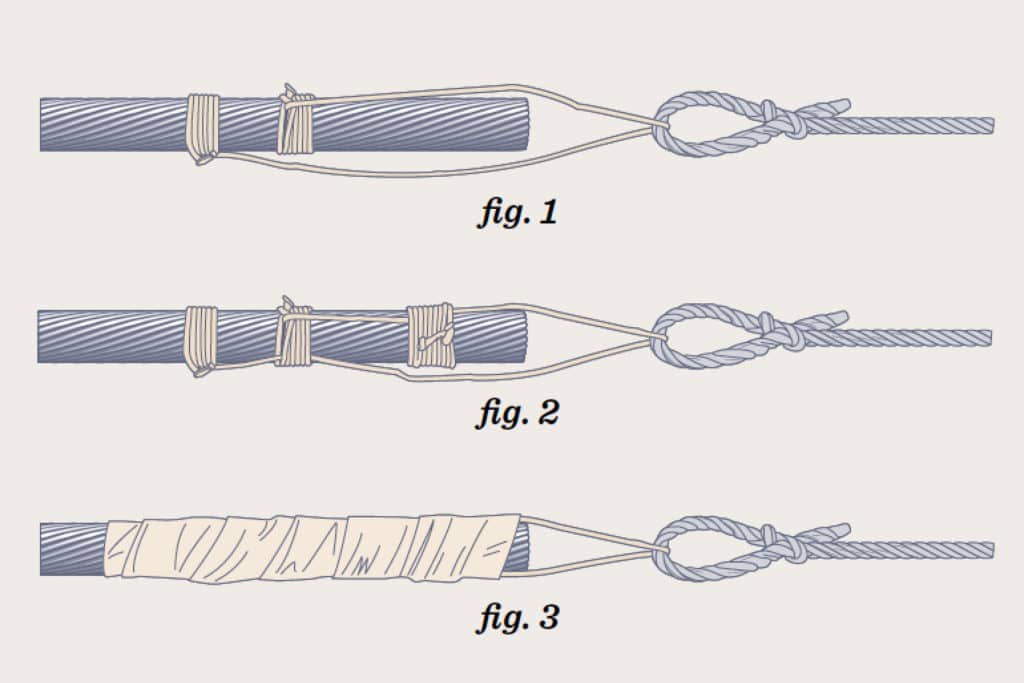
Next I needed to tie a strong cord to the wire to draw it through the 40-odd feet of riveted furler foils, so I could afterward pull the wire back again.
To do this, I secured a 10-inch piece of sail twine to the wire with rolling hitches (fig. 1). Then I added additional whipping near the end for more grip (fig. 2), which formed an end loop that wouldn’t slide off. Finally, I wrapped it all in masking tape (fig. 3). The long draw cord was secured to the loop with a bowline.
The headstay came out, the longer foil went on, and the headstay went back in smoothly.
Read more from longtime CW contributor Tor Pinney at his website (tor.cc).