For as long as people have been exploring the world by boat, we have depended on preserved foods to sustain us on journeys. It’s believed that the ancient South Pacific sailors carried poi, a fermented breadfruit dish, on board during their epic voyages. Salt fish, hard tack and dried fruit were regular fare on the great nautical expeditions of modern times. And Captain Cook, one of the world’s most celebrated mariners, is famous for tricking his crew into eating sauerkraut, successfully warding off scurvy.
Although modern refrigeration is efficient and dependable, and basic provisions available at all but the most remote destinations, I believe there is room on a modest sailboat to preserve some of our nautical traditions by upholding the art of canning.
Getting Started
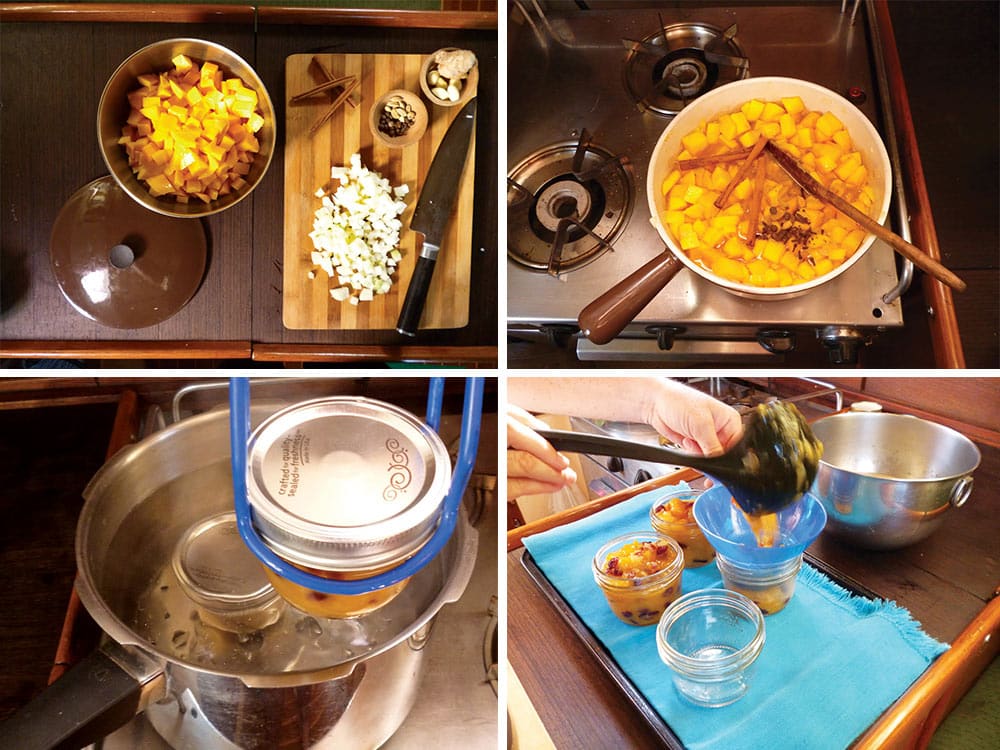
Like most things in life, canning things such as jams, pickles or chutneys is much easier than it looks. There are four basic steps: making the preserves, sterilizing the jars, filling and sealing the jars, and processing them in a boiling-water bath. A mound of fruit, a sharp knife and few other pieces of equipment, likely already at work in the galley of a typical cruising boat, are all you need to get started:
- 2 large nonreactive pots
- A trivet that can be submerged in boiling water
- Large spoon, ladle or measuring cup (optional wide-mouth funnel) and a wooden skewer. All spoons and other utensils used should be wooden, plastic or stainless steel, again to prevent unwanted changes in flavor or color.
- A pair of tongs or jar lifter
- Clean tea towels
- Canning jars and lids

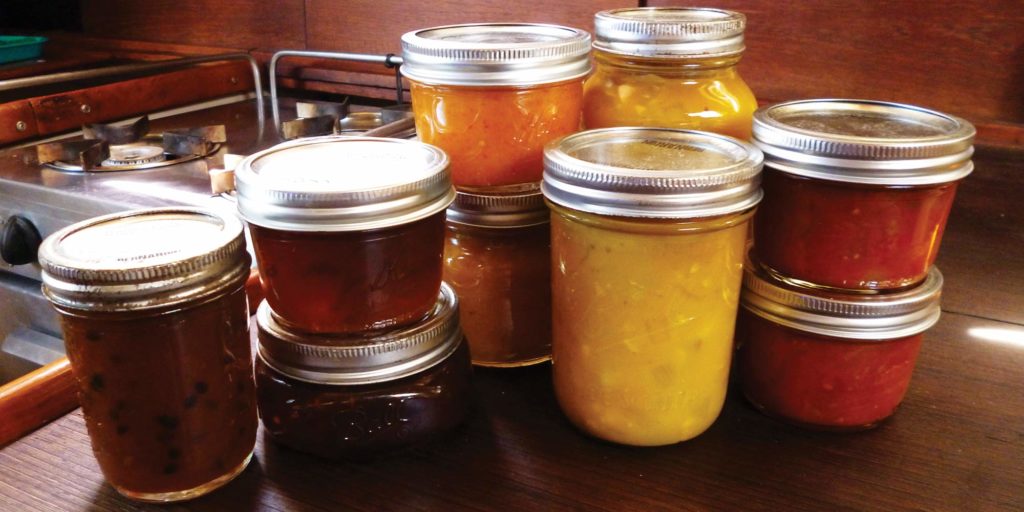
Investing in proper canning jars is a must. Commonly known as Mason jars, they have been the standard in canning for more than 100 years. Canning jars are a three-part system: the glass jar, the flat lid and the threaded ring. The jars themselves come in several sizes and shapes and can be reused for years, as long as they are free of chips or cracks. The threaded rings are also reusable, but it is important that new flat lids be used every time because that is what seals the jar and prevents your preserves from becoming contaminated. These flat lids are inexpensive and small, so it is not difficult to keep lots on board. Reusing commercial jam or pickle jars is not recommended; the lids are not designed to seal more than once, and you risk ruining all your hard work at the stove.
Time to Get Cooking
Good preserves start with a good recipe. If you’re like me and enjoy improvising in the galley, you need to be on your best behavior. Quantities of sugar and vinegar in recipes control pH levels, which is the key to making preserves that won’t spoil or grow deadly bacteria.
The pot used for cooking the preserves must be nonreactive — either stainless steel or enameled cast iron — and have a heavy bottom to prevent the preserves from burning. If unsealed cast iron or aluminum is used, it can impart a metallic taste and discolor your preserves. The pot should be fairly large and wide to give maximum surface area, which allows for even cooking and cuts down on time on the stove and heat in the galley.
So, you’ve obediently followed the recipe and all the peeling, coring, dicing and measuring is complete. There is a big pot happily bubbling away on the stove-top, and the boat is filled with the deliciously sweet smells that are drawing everyone into the galley. While keeping a watchful eye on the preserves, it is time for step two: sterilizing the jars and getting them ready to fill.
We’re in Hot Water Now
Wash the canning jars in soapy water, making sure they are clean and well rinsed. Put the trivet, which protects the jars from direct heat and potential breakage, on the bottom of the pot, then put the jars in and fill with clean, fresh water. This pot must be large enough that the jars are covered by at least 1 inch of water when standing upright and have room to contain the water when boiling. It will also be used to process the filled jars in a boiling-water bath. Do not put the lids or rings in the pot, only the jars.
Like many sailors these days, I have a pressure cooker as part of my galley arsenal. Used without the locking lid, this 8-quart pot is perfect for the job. Put the pot on the stove and turn the heat on high. When the water reaches full boil, set the timer for 10 minutes and let it continue boiling with the jars submerged. Ten minutes at a rolling boil ensures the jars are properly sterilized.
Removing the jars from the scalding hot water can be a bit of a trick, but a good pair of tongs or a jar lifter, and a little care, is all you need. Lift each jar out and tip the hot water back into the pot. With a clean tea towel, dry the jars and place them on the counter or a cookie sheet that you have lined with another tea towel. If the preserves are not ready, simply turn the heat off and leave the jars resting in the hot water until you’re ready to fill them. As long as they remain hot, you do not need to boil them again.

Fill ‘er Up
Now that the jars are dry and the preserves are ready, it is time for canning. While you’re busy filling jars, drop the flat lids into the pot of hot water used to boil the jars. The sealing compound on the underside of the lids needs to soften for a few minutes before you use them, but be sure the water is not boiling.
Using a measuring cup or ladle, fill the jars with the still-hot preserves, leaving ¼ inch of space between the top of the preserves and the rim of the jar. This can be a messy job, depending on your hand-eye coordination. A wide-mouthed funnel, sold for just this purpose, makes the whole ordeal a little less sticky. When all the jars are filled, use the wooden skewer to remove any large air bubbles and wipe the rims of the jars with a clean, dry cloth. This allows for the lids to seal properly. Stubborn sticky bits can be removed with a little hot water or white vinegar.
Remove the flat lids from the hot water and dry with a clean cloth. Place a dry lid on each jar, and screw the rings on until just finger tight, no more. Now you’re ready for the last step: the boiling-water bath.
Processing the jars in a boiling-water bath is important because it creates an environment that is inhospitable for bacteria growth inside the jar. Carefully place the filled and closed jars back into the pot of water, being careful not to splash yourself or overflow the pot (you might need to remove some water). Bring the water to a rolling boil and keep the jars submerged for five minutes. (Most recipes use a five-minute rule, but occasionally, ingredients dictate a longer water bath. Again, it is important to follow the recipe.)
Remove the jars and let them cool, undisturbed (no peeking). As the jars cool, you should hear a ping sound, this lets you know a vacuum has formed and lids are properly sealed. You can also check this by pushing down lightly on the center of the lid; when there is a good seal, you will not be able to flex the lid. When the jars are completely cool, you can unscrew the ring and check the seal by gently lifting the jar by the edges of the lid. Any jars that have not sealed should be consumed right away. Store sealed jars in a cool, dark place and use within 12 months.
Making preserves is a labor of love, but not a very difficult one. The results are not just pretty jars filled with tasty things to eat. Every time we open a jar of homemade preserves, it is like flipping through a photo album, the flavors and smells taking us right back to the anchorage we were in when I spent a little time in the galley and put some sunshine in a jar.
Heather Francis is originally from Nova Scotia, Canada, and has been living and working on boats around the world for the past decade. Her partner, Steve, hails from Australia. In 2008 they bought Kate, a Newport 41, and have been sailing her full-time since. They are currently in the Philippines, looking for wind.
Mango Chutney
Yields 5 to 6 1/2-pint jars
One of my favorite preserves to make is chutney, the perfect marriage of sweet, tart and spicy. It is a thick spoonable sauce, but you don’t have to worry about trying to get it to gel or reaching a certain set point. This makes it almost foolproof and a great starter for first-time canners. Traditionally served with curry dishes, chutney also pairs well with a modest roast chicken or piece of pork, and brightens up a cheese plate for the ubiquitous cruiser happy-hour parties.
- 1 large onion, diced
- 5 garlic cloves, minced
- 1 inch fresh ginger, grated
- 4 large mangoes, peeled and diced (about 6 cups)
- 1 – 11/2 cups water (varies depending on how juicy your fruit is)
- 1/2 cup sugar
- 6 whole cloves
- 2 cinnamon sticks
- 4 cardamom pods
- 2 tablespoons lime juice
- chili powder to taste
- 1 cup raisins or dried cranberries
In a large pan, saute onion in a little oil until translucent. Add garlic and ginger, and saute until fragrant. Add the peeled and diced mangoes, sugar and enough water to cover. Stir to dissolve sugar, then add whole spices. Bring to a boil and turn to low, simmering with the lid on until the fruit is soft (will depend on how ripe the fruit was), about 20 to 30 minutes. Keep an eye on it, and add more water if necessary to prevent burning. This should be a thick, spoonable sauce. If there is too much liquid, remove lid and reduce. When fruit is soft but not mushy, add raisins or cranberries, chili powder and lime juice, then simmer for five minutes more. Ladle into clean, dry jars and process in a water bath for five minutes.
*You can substitute pineapple for one-third of the mango. Instead of dicing, grate the pineapple on a box grater, which will give you a much smoother texture.
*I use whole spices so that the chutney retains a nice yellow color, but ground spices will give the same flavor. I don’t mind picking out the whole spices later, but if that bothers you, simply tie them in cheesecloth and remove before canning.