beadboard 368
I know exactly what people mean when they say that a boat has “character.” My wife, Sharon, and I have owned two of them. Our first project boat was an Out Island 33 that we ended up cruising on happily for 18 years. But-you know the story-we wanted a bigger boat, but not the bigger price.
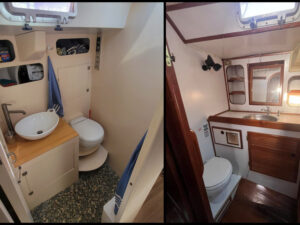
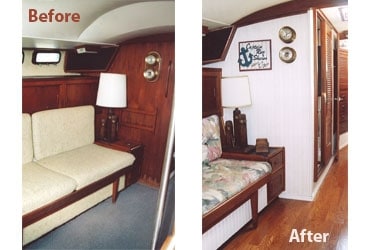
As a result, our “new” boat, Possessor, is a 1976 Morgan Out Island 51. It’s spacious and super sturdy, but it was showing the signs of 30 years of wear and tear. So we ended up giving her a complete makeover. One job that went a long way toward improving the look and feel of the interior was covering the water-stained and delaminating bulkheads in the saloon with crisp, clean, white-painted beadboard.
Beadboard can be found in old ships and farmhouses, but for this job, we chose a modern version by Georgia-Pacific that you can find at any building-supply store. Each bundle contains six tongue-and-groove boards; each solid-pine board measures 8 feet by 3 9/16 inches and is 1/4-inch thick; a bundle covers 14 square feet. I found the boards to be much easier to work with and better looking than the 4- by 8-foot plywood sheets that are also available. The pieces come pre-sanded, which makes painting them-we used off-white gloss paint-easy.
Any bulkhead that you’re planning to reface should be taken down to the structural plywood. As I learned on my previous boat-remodeling project, even if you’re just covering rather than replacing the bulkheads, it’s still imperative to follow the beadboard and adhesive manufacturers’ instructions for installation.
Prepping our existing bulkheads was easy. Then I began to install the boards at the inboard end of the bulkhead and worked outboard. This ensures that the edges will be straight. As I worked my way outboard, each board had to be cut to follow the hull and cabin top. Another reason for starting on the inboard side of the bulkhead is that the boards keep getting shorter and shorter as you move outboard and up the hull. If you cut a board too short, it’ll usually work for the next one outboard, so you have less waste.
Completing the job only required two coats of paint and replacing the baseboard. What a difference! If your boat is too dark below, this is an easy and economical way to brighten it up.
Ron Reynolds enjoys making old boats new again. He lives in Jacksonville Beach, Florida.