The dinghy is an invaluable piece of equipment on board a cruising sailboat. It’s the family car, the tour boat and the workhorse. Some people consider their dinghy a life raft, or at least another floatable vessel in case of emergencies. We’ve used ours to help pull boats off reefs and to assist disabled vessels maneuvering in tight quarters. Several times we rafted our dinghy alongside our own boat and used it as an auxiliary engine. Like any important piece of equipment on board, it pays to take good care of the dinghy. To protect our inflatable and prolong its life, I sewed a custom canvas cover for it, commonly known as a dinghy chap.
The main purpose of chaps is to provide UV and chafe protection to the inflatable pontoons. Both PVC and Hypalon are susceptible to UV damage, and no inflatable is impervious to rusty nails and jagged edges when pulling up to a dinghy dock. Despite how complex the finished product might look, sewing dinghy chaps is not a difficult project. A heavy-duty machine able to handle three to four layers of 10-ounce material is required, but only the basic ability to sew straight seams is needed. If one takes time when patterning and has patience to work in small sections when sewing, the fit will be snug and professional-looking.
Fabric Selection
Choosing fabric for your dinghy chaps is the same as choosing fabrics for all other exterior canvas projects on board. You want something that is both abrasion-resistant and UV-stable. A heavy-duty marine canvas like Sunbrella is purpose-made for just such projects. It is solution-dyed to prevent colors running or fading, and is shrink-proof, stretch-free and easy to work with. It is woven to be water-, mildew- and stain-resistant and, perhaps most important, is rated to block 98 percent of damaging UV rays. All these features mean your finished project will not only fit well and look great, but you can count on it to stand up to years of use and abuse. Sunbrella is available in a wide spectrum of weights, but the best choice for this project is the standard marine awning fabric, which is a 9.25- or 10-ounce cloth.
There is some debate as to whether using darker colors can be detrimental to inflatable pontoons. Opponents argue that dark fabric will raise the interior air temperature quicker than a lighter-colored fabric would. Over the years I’ve seen and sewn dinghy chaps in a variety of colors and never heard any complaints from boat owners. Checking the surface temperature of the pontoons on our dinghy with an infrared digital thermometer gun — one covered with dark green chaps and the other uncovered — I found little difference between the two. If your dinghy serves as a life raft, you might want to consider a high-visibility color like safety orange.
For rough fabric yardage, you need to measure the length of both pontoons (I consider this straight sides only), the distance around the bow and half the circumference of the tubes, adding 1 inch for seam allowances. We have an 11-foot dinghy, but it has oversize tubes, so the chaps need to be 28 inches wide. Most Sunbrella colors are available in two widths: 46 inches and 60 inches. For my dinghy, I estimated that about 8.5 yards of 46-inch fabric would be needed, or to minimize waste and cut down on cost, I could purchase 5 yards of 60-inch material.
On the bow and around handholds, lines and oar locks, I like to use a marine-grade vinyl as an extra chafe guard and for color accents. Depending on the amount of extra protection you would like and the width of the vinyl available, you might need between 1 and 3 yards.
Patterning
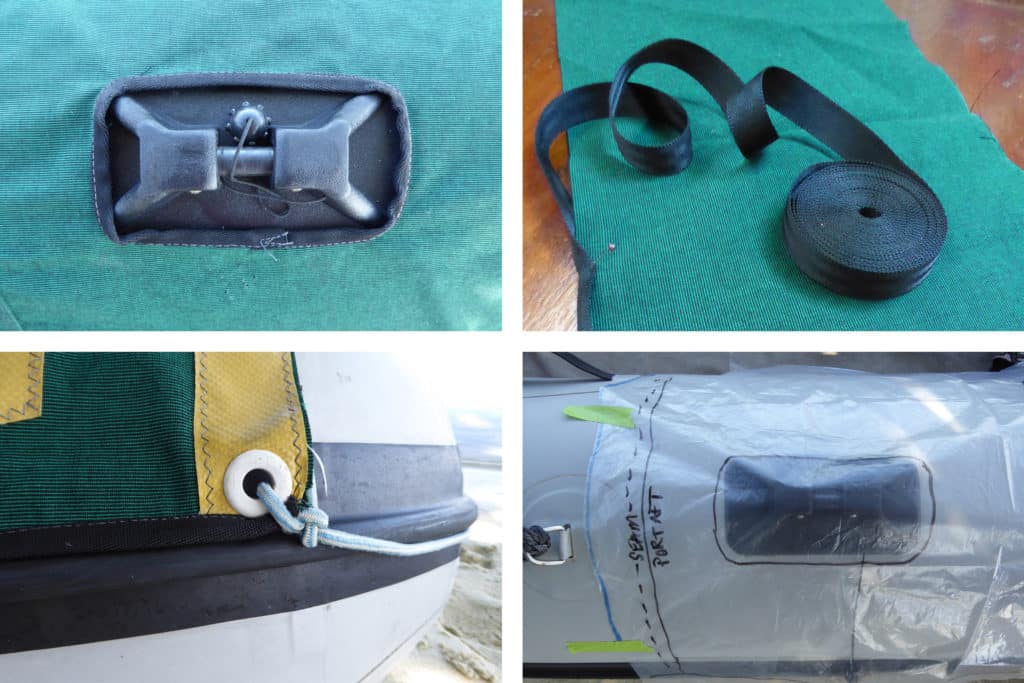
Patterning is perhaps the most important and time-consuming step of the whole project. However, taking time to make a careful and correct outline will make the sewing and fitting go much more smoothly. I use medium-weight plastic sheeting to pattern. This sheeting gives me maximum flexibility and very low stretch, makes tracing and placing cutouts a snap because you can see through it, and has enough body that it drapes well and can hold basic shapes. A light plastic sheet like those sold in painting kits will be frustrating to work with.
I have made chaps from start to finish while the dinghy was in the water, but I do not recommend it. You will have a much easier time if the dinghy is high and dry. Hoisting it up on deck is great if you have ample space to work around it, but taking it ashore is preferred.
If you look at the construction of your dinghy, you will see the lines of your pattern. There are usually seams at either end of the long, straight pontoons to accommodate the tapering of the tubes and the curve of the bow. The bow itself is often broken into three, or perhaps five, sections so a graceful point or rounded edge is achieved.
The pattern for the tubes will be a basic rectangle with various cutouts to accommodate the handholds, oarlocks, grab line, transom and the seat. The rectangle is naturally defined by the rubrail on the outside, where the straight tubes meet the curve of the bow up forward, a straight line parallel to the floor, and where the tube begins to taper at the stern. I do not try to encapsulate the aft sections of the pontoons, as in my experience such chap designs tend to pick up water and cause drag. To transfer the lines onto the pattern material, lay out the plastic smooth and flat over the tubes with a few inches overhang on all sides, and hold the plastic in place with low-tack tape. I like to trace around the oar locks and other hard protrusions and cut them out first so the plastic can lay truly flat before continuing. Next trace the outline using the above-mentioned guides and any other cutouts that need to be made.
In theory you need to pattern only one side of the dinghy because the tubes and placement of things such as oarlocks should be mirrored on the other side. However, I have encountered small variations between port and starboard pontoons, so it is best to check your pattern and make any notations on your pattern using a different-color marker.
Patterning the bow requires a little more patience. The chaps are held taut by creating a pocket that the bow slips into. To do this without also creating a water scoop, first watch your dinghy in action and make note of how far the bow dips when the boat is under load.
Using the seams of the dinghy’s construction, cut and lay out the several pieces of pattern material needed for your particular dinghy. Where seams will lay, overlap the plastic and mark both pieces with corresponding dotted lines. You might need to add darts to achieve the proper shape if your dinghy tubes are particularly rounded. Carefully cut away excess plastic where necessary to allow for a smooth layout. Don’t forget to add a cutout where the painter attaches if your bow pocket reaches down that far.
With the main patterning done, you can then make patterns for the vinyl that will be sewn on top of the Sunbrella. Since vinyl doesn’t fray, you don’t need to account for seam allowances and aren’t as constrained with the design of shapes for accents and chafe guards.
Once all your patterning is complete, you will need a large, flat area to lay out your fabric and cut out your pattern. I use a tailor’s chalk to make any notations and to transfer any cutout areas to the fabric. To prevent the fabric from fraying, it is recommended that you use a hot knife to cut the Sunbrella.
Sewing
As for all canvas products that live outside, it’s recommended to use a UV-stable thread such as a UVR-bonded polyester. You may choose a thread that is the same color as your fabric or use a contrasting color so your seams will appear as accents. Like fabric, thread comes in various thicknesses. If using a 9.25- or 10-ounce Sunbrella fabric, 92-weight thread is needed, as well as a No. 18 needle.
I prefer to work in sections and sew the two straight tubes and bow separately. Plastic sheeting acts and drapes differently than fabric, so I check my progress as I go along by doing several fittings where I take semicompleted sections out to the dinghy to try them on. During this phase I use an invaluable tool called Seamstick, a type of double-sided tape that is designed to hold fabric pieces where they are to be sewn together. Seamstick eliminates the need for straight pins, which could accidentally puncture the dinghy.
When you are satisfied with the fit of the bow and the lay of the tube sections, double-check the final seams where the two meet, making sure they match up nicely before sewing the three large sections together. With the chaps essentially complete, all that is left is to add the vinyl chafe guards and accent pieces, and to finish the hem.
A quick and tidy way to hem dinghy chaps is to use webbing in place of the more traditional double-fold-and-sew technique. Mark and trim the chaps to the exact length that you want them; I use the top of the rubrail as my guide. Then encapsulate the raw edge in the fold of 1-inch webbing and sew in place. This not only reduces the bulk at the hem but it also adds a little weight so the chaps will lie down nicely. Some designs utilize the rubrail to capture a drawstring, but again I find this design picks up water because the rubrail also acts as a chine, dispersing spray while motoring. Others glue the hem in place, which means you cannot remove the chaps. A snug-fitting pair of chaps will not flap about in the breeze if the hem is simply finished and not secured. If desired, a piece of elastic cord can be sewn to the chaps and stretched around the end of the pontoon to hold it in place.
This practical sewing project can easily be completed in a weekend by the experienced and novice alike. A little attention to detail and the proper tools and materials are all that are needed. Handsome dinghy chaps not only make your ride easy to spot at a crowded dock, they will also protect and preserve the pontoons, extending the life of your tender.
Heather Francis is originally from Nova Scotia, Canada, and has been living and working on boats around the world for the past decade. In 2008, she and her Aussie partner, Steve, bought Kate, a Newport 41, and have been sailing full time since. To follow their adventures, log on to yachtkate.com.