Corroded Chainplates
Out of sight and out of mind: For many sailors, that’s an apt description of their chainplates, the stainless-steel fittings protruding through the deck that anchor a mast’s standing rigging wires. In typical installations, the longer portion of a chainplate is hidden below deck in a locker, where it’s difficult to see or inspect. It’s no wonder that many sailors on the cusp of bluewater cruising focus on beefing up or replacing the standing rigging while assuming the chainplates will continue supporting the wires that keep the mast erect.
For safety and peace of mind, however, sailboat chainplates require attention and possibly upgrading. For example, many chainplates are too thin to grip clevis pins correctly. For a ½-inch turnbuckle with a ½-inch toggle, the chainplate should be at least ⅜ inch thick. For a ⅝-inch turnbuckle and toggle, a minimum thickness of
½ inch is necessary.
Another matter worthy of consideration is the stainless-steel alloy the boat’s chainplates are made of. Though 304 stainless is widely used, it’s prone to crevice corrosion when seawater seeps past bedding compounds and becomes stagnant on the metal, thus rendering it a poor choice for chainplates. (This also illustrates the danger of relying on sealants to protect from moisture chainplates that are led through the deck.) When polished to a high gloss, 316L stainless will survive much longer. Grade 2 titanium is ideal, though its high price makes it cost prohibitive for most yacht applications.
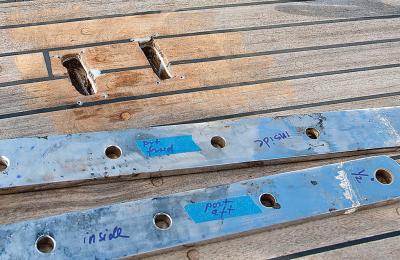
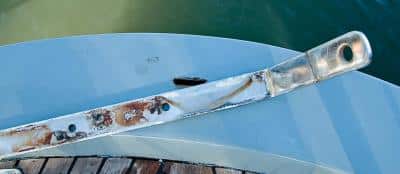
| |In this image, the damaged balsa core, which is typical in older classic-plastic production boats, is visible through the deck slots. Make sure to mark and identify the old chainplates before giving them to the fabricators. They will mark the new ones accordingly.| |
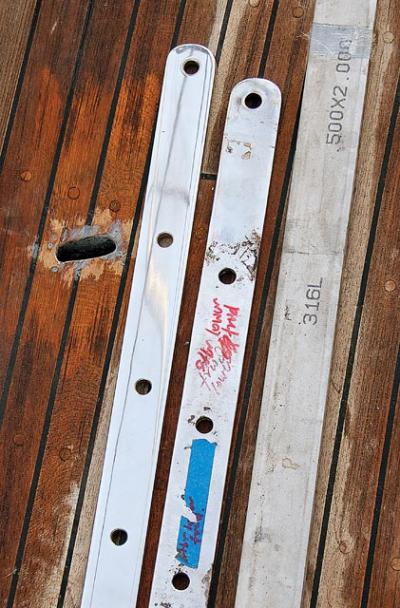
| |Three degrees of chainplate separation: the old chainplate (center), the new 316L bar stock (right) and the finished, polished, brand-new chainplate (left).| |
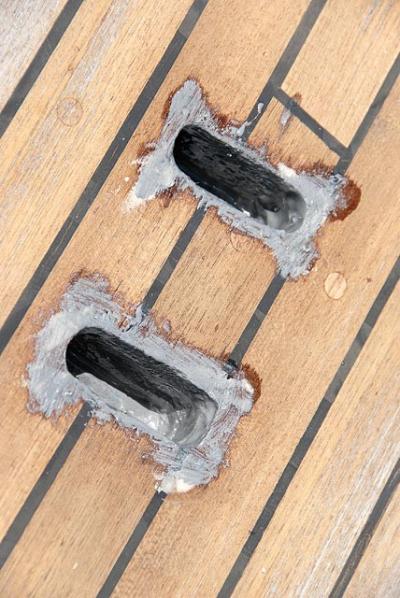
| |The real key to a chainplate replacement job will be how well you effect the repairs to the old balsa core and the deck slots. For my project, I cleared about an inch of balsa core from between the layers of deck laminate and rebuilt the area with thickened epoxy. This not only stiffened the deck, but also created a wall of solid epoxy that would protect the balsa from seawater in the event that the sealant broke down.| |
| |Once the backstay chainplate was pulled, it was clear how the corrosion started (where the metal was seated against the teak transom), and where water was trapped near the through-transom fasteners. I corrected this by enlarging the slot in the teak and inserting a rubber gasket where the new chainplate meets the transom.|
In any case, preventing seawater from leaking down the chainplates is essential. Boatbuilders routinely squeeze bedding compound between the deck and the chainplates before installing stainless cover plates. These screwed-in deck plates are supposed to compress the sealant around the chainplates. However, they are often too small to be effective, and furthermore, they embrace the chainplates so tightly they actually trap water in the worst possible location.
Thoughtful design and building practices would help prevent future problems. To maximize upwind tacking angles, racing boats often have chainplates installed well inboard, and these must be led through the deck. Since many owners of dual-purpose performance cruisers also use their boats for racing, many production sailboats have a similar arrangement for tight headsail sheeting. But even with a narrow rigging base, it’s possible to improve the chainplate installation. Some builders specify chainplates welded to a base that is then bolted through the deck onto a strong under-deck plate that’s sometimes backed by a tension rod. In such a setup the topside component can be sealed with a neoprene gasket, which is more effective than a bedding compound that can be squeezed out when the bolts are tightened. Also, this arrangement permits easy inspection of the fitting and its fasteners for smudges of rust, the first sign of creeping corrosion.
On cruising boats, it makes more sense to situate the chainplates outboard, on the outside of the hull. This provides a very wide, efficient base with longer spreaders and a wider angle between the shrouds and the mast, all of which reduces the loads on the rigging wire. The venerable Out Island series of boats designed by Charley Morgan has such chainplates, which are easy to inspect and reduce the risk of crevice corrosion. While they can still corrode on the underside where seawater can get trapped, their generous thickness provides a welcome safety factor.
All bolts holding chainplates require frequent inspections. Fashioned from 304 stainless alloy (also known as 18/8), the threads on these fasteners can collect saltwater and they can corrode quite easily. When sailmaker Dave Beatson began to remove some chainplate bolts on his Creekmore 34, half of the bolt heads fell off when he turned the wrench. So when we bought a 20-year-old Mason 44, I decided to pull out the chainplates to see what, if anything, was going on.
Ominously, I discovered that corrosion — some of which looked like the beginning of straight saw cuts — had begun to disintegrate the metal right where the chainplates vanished through the deck. And the backstay chainplate was losing metal below the deck where the bolts went through the transom. To address the situation, Peter Messenger, one of the most experienced riggers I know, advised using 316L stainless alloy for repairs. After cutting the material to size, he advised polishing it to high gloss. I ordered lengths of 316L bar in ½-inch and ⅝-inch thicknesses to match the size of the turnbuckle toggles for the lower and upper shrouds, respectively. (The original chainplates were much thinner and, while probably still strong enough, the clevis pins had a loose, sloppy fit. Also, the new bar stock I’d ordered was very slightly undersize, making it a perfect fit with the toggles.)
When effecting repairs or refits, ideally the deck area around the chainplates should be a solid glass laminate. It wasn’t on my Mason, which again is typical for most older production boats. So I cleared out about an inch of balsa core from between the layers of deck laminate and rebuilt the area with thickened epoxy. This stiffened the deck. Also, if the sealant broke down, the wall of solid epoxy would prevent seawater from soaking into the balsa and creating a permanent sponge bath, ensuring accelerated corrosion. To prevent future leaks, I discarded the slim stainless cover plates affixed to the original chainplates. Out of prefab fiberglass plate I then made larger cover plates with slots ½-inch wider than the chainplates.
This allowed a generous buildup of BoatLIFE polysulfide sealant. Before sealing, I wiped all metal parts with degreaser to remove any contaminants. When choosing a sealant, avoid the tenacious 3M 5200 polyurethane so beloved by certain boatyard workers because it hides bad workmanship. Plus, it takes days to set. Use 5200 only where you want the pieces to bond permanently. Although it slowly cracks when exposed to sunlight, you’d still need a heat gun and an iron will to remove it later.

|

|
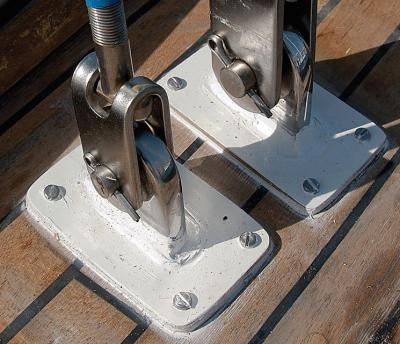
| |The new, polished chainplates for the intermediate and upper shrouds are ready to go in.|To prevent future leaks, I discarded the original stainless cover plates for the original chainplates and replaced them with larger cover plates fabricated from prefab fiberglass sheets.|I bedded the new cover plates with a buildup of BoatLIFE polysulfide sealant.|
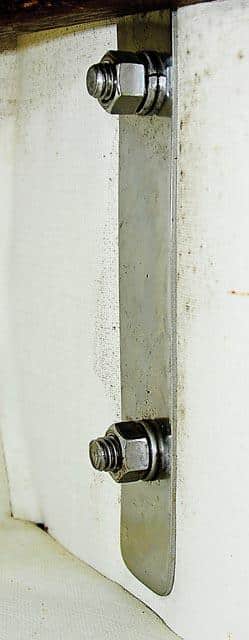
| |Belowdecks, the chainplate fasteners pass through a long 1/8-inch backing plate.| |
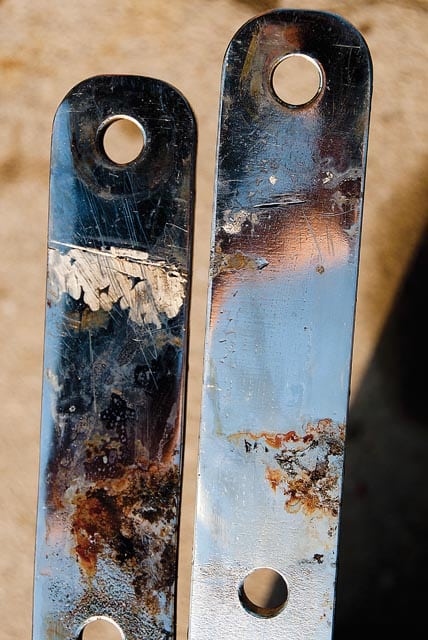
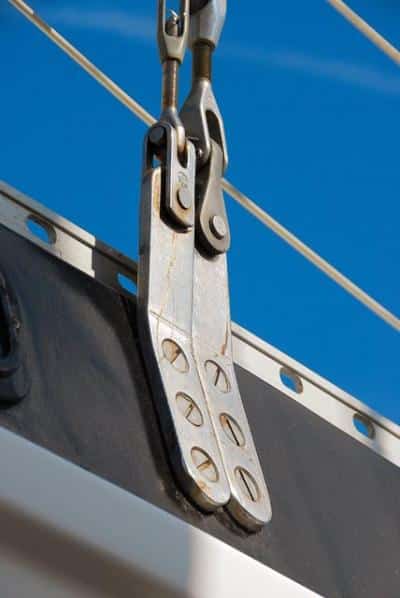
| |Outboard chainplates also work well. Note how the popular U-shaped toggle is beginning to corrode while the old forged bronze toggle is clean.|
Because I tackled the project with the keel-stepped mast still in place, I worked in stages. First I removed the chainplates servicing the lower shrouds; then I made a notation with a marker signifying their locations; finally I brought them to the fabricators to duplicate in the new material. In the calm waters of a protected marina, the upper and intermediate shrouds supported the mast adequately while I worked.
After the lower chainplates were reinstalled, I repeated the steps with the intermediates and then the upper shrouds. The backstay chainplate was the last to go back in: Tension on the mainsheet and the topping lift provided the mast with reasonable fore and aft support.
All this work boosted our confidence in the rig considerably. A month later, knowing our spar was suitably reinforced, we sailed north from Florida to Labrador.
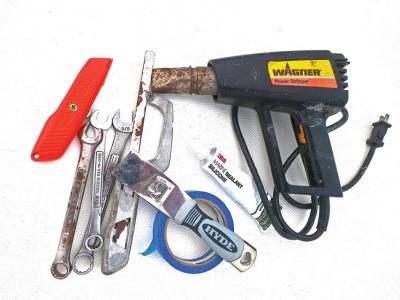
| |Tools for the Job • Wrenches to match and fit the fasteners • Heat gun to soften the old sealant around the chainplates • A narrow metal blade to cut through the sealant adhering to the chainplates • A 90-degree hook (homemade) to scrape balsa core out of the chainplate slots • Epoxy resin and hardener to build up the space left from removing balsa; plus West System 404 High-Density filler additive; a putty knife and gloves • Wide masking tape and duct tape to build up a “dam” that will prevent epoxy from dripping into the boat’s interior • Sandpaper from 40- to 60-grit to smooth out the cured epoxy • Polysulfide sealant and caulking gun • 1-inch-wide masking tape to protect the deck and the upper part of the chainplates from sealant leakage| |Longtime CW contributor Tom Zydler and his wife, Nancy, spent this summer exploring the coast of Labrador and surrounding waters aboard their Mason 44,_ Frances B_.|


