stott prepared 368
The goal of offshore-passage preparation is to become as self-sufficient as possible. You’ll need a life raft and other safety gear, of course, and you must keep potential problems from becoming real ones by fixing them before you leave. You’ll likely need to be able to do repairs on the fly and, perhaps, even deal with a medical situation, too. Here’s how to prepare and a list of what to bring along on any offshore passage.
Rig
Have your rig inspected by a knowledgeable rigger, not just by any boatyard employee. This is an area in which being frugal could become expensive in the long run. If your mast is down while the boat is on the hard, it’s a perfect time for a complete rig and mast inspection. If the rig is up, pay the few bucks to have the rigger go aloft to complete a thorough inspection. Replace all cracked, broken, and worn rigging and fittings.
Rudder
An aging rudder is often overlooked, but rudder failure can often be prevented by proper inspection by a qualified marine surveyor who’s trained to detect water intrusion and the delamination of a rudder. If a rudder is suspect, a simple core sample can be taken to inspect the material inside the rudder, and the resulting hole can be easily filled in if the rudder is sound. Don’t forget to check the integrity of the rudderstock and the bearings for wear.
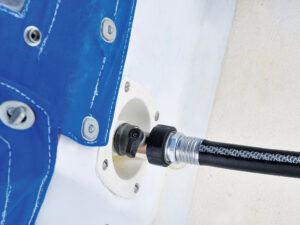
Steering
Check the steering cables and sheaves for wear; lightly lubricate the cables if necessary. Ask your rigger to fabricate a duplicate steering cable for you to have as a spare. If your steering is hydraulic, bring spare hydraulic hoses and fluid.
Locate your emergency tiller and physically put it in place. Determine now, before you need it, if there are any obstacles to deploying the emergency tiller and what exactly is involved in making it functional. Giving the emergency tiller a sea trial is a useful experience; run through its operation with the crew as well.
Engine
Start by inspecting all hoses, including the raw-water intake hose, heat-exchange hoses, and the exhaust hose and muffler system. Be suspect of hoses that show apparent leaks, cracks, or soft spots or have dried out. Replace any questionable hoses, and carry the appropriate spares. Have your mechanic pull the exhaust elbow to check for salt calcification, which can damage it and cause leaks.
Check for engine oil and water leaks, and put a clean oil blanket under the engine so you’ll be alerted to any future leaks by evidence on the blanket. Check the condition and tightness of all belts that drive your water pump, alternator, and refrigeration compressor. Carry a supply of belts; know how to change and tension them yourself.
If you’re not already familiar with replacing the impeller in the raw-water pump, now’s a good time to learn, before the need arises. If the impeller hasn’t been replaced in the last two years, you may want to replace it anyway. Always carry spare impellers.
A lack of clean diesel can cause most healthy diesel engines to stop working when the boat’s pitching and rolling in heavy seas offshore. The common cause of dirty diesel is the presence of water and oxygen in the fuel tank, which allows algae and bacteria to grow. This forms sludge that can clog the fuel filter and starve the engine of fuel. Take the time to make sure your diesel is free of water and that your tanks are free of sludge. Carry at least half a dozen spare fuel filters even if the tank was recently cleaned.
Rebuild the head
If you want to avoid the pleasure of rebuilding the head while traversing the Gulf Stream, be sure to take care of this very important chore before departure. Rebuild the head now, while the boat is on shore or at the dock. Buy two head-rebuilding kits, one to use now and one to keep as an onboard spare.
Waterproof the windlass
If your boat is equipped with an on-deck anchor windlass, consider completely covering the windlass to prevent water intrusion through the hawsepipe when seas wash over the foredeck. An effective way to do this is to completely cover the windlass with a plastic trash bag sealed with duct tape. Only apply the duct tape to the trash bag itself, so you don’t end up with any adhesive residue on the windlass. This guards against water intrusion into the boat and protects the windlass motor from water damage.
Spares
Remember that Murphy’s Law-anything that can go wrong will go wrong, usually at the worst possible time-applies especially in an offshore environment, and nothing can better help to minimize the problems Murphy can cause than a well-stocked spares locker. The list of spares I carry includes six Racor fuel filters; three secondary fuel filters for the engine; five quarts of oil and an oil filter; three impellers for the raw-water pump; a complete raw-water pump, or at least a rebuild kit; a spare pump for the freshwater cooling system and a rebuild kit; 10 fan belts; a starter solenoid; two fuel lift pumps; two thermostats; one fuel injector; and a quart of transmission oil. Pick up a roll of gasket paper and gasket cement in the event you need to fabricate a gasket for a pump.
You should also stop by your local diesel-repair shop and order a complete set of copper washers for both the fuel injectors and the return lines. You may never have a need for them, but extras are good insurance because these little washers can easily get dropped into the abyss of the bilge if you have to remove an injector.
If your boat has a traditional stuffing box in which you adjust the water-lubrication drip for the prop shaft, bring along spare flax in the event that you need to repack the stuffing box. If your stuffing box is of the “dripless” type, bring along a spare bellows and hose barb for the water feed to the prop shaft.
If a companionway hatchboard gets washed away, it’s good to have a second set of hatchboards because these can’t be duplicated easily at sea. The second set of hatchboards doesn’t need to be fancy. Simply have a local glass shop fabricate a duplicate out of Lexan.
Tools
A diverse selection of tools is critical. Make sure to have at least a set of standard and metric wrenches and sockets, adjustable wrenches, a good assortment of screwdrivers, channel locks (as water-pump pliers), Vise-Grip locking pliers, side cutters, a plumbing snake, a wire brush, a drill and drill bits, a hacksaw, a hammer, bolt cutters for cutting rigging away during a dismasting, and a small inspection mirror.
Nuts and bolts
Get a plastic box similar to a fishing tackle box with multiple compartments, build an inventory of your most frequently used fasteners, and label the box identifying the contents of each compartment. The fasteners may consist of No. 6, No. 8, and No. 10 panhead self-tapping screws, flathead self-tapping screws, and machine screws with washers and nuts. Do the same thing with plumbing connections and store them in plastic boxes.
Products already in your supply locker may include such lubrication products as Sailkote or WD-40. Along with your supply of engine and transmission oil, be sure to include a pint of hydraulic fluid for your hydraulic adjustable backstay. Other products I like to carry are such bedding compounds as 3M’s 4200 and 5200, a silicone bedding compound, and a West System G-Flex epoxy/resin emergency-repair kit.
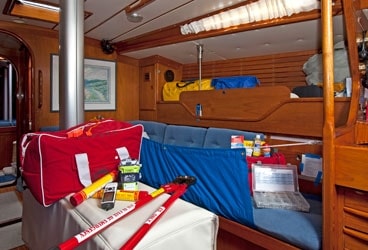
Safety gear
All offshore passages require a particular level of safety equipment, including an appropriately sized life raft, an EPIRB with an up-to-date registration and battery, an SSB radio and/or a sat phone for emergency communications as well as so you can download current weather forecasts. Before slipping the lines from home base, assign responsibility for deploying the life raft, the abandon-ship ditch bag, making the Mayday call, and grabbing the medical kit.
Prepare a ditch bag that’s easily accessible if the boat is sinking. Some of the usual contents of a ditch bag include a battery-operated handheld VHF radio and GPS, which should be stored with extra batteries in individual waterproof bags, SOLAS flares (see “Rescue Me,” page 72), whistles, an air horn, a handheld compass, toilet paper (in a resealable plastic bag), fishing hooks and line, motion-sickness medication, spare eyeglasses, a signal mirror, a strobe light, chemical light sticks, food rations, a bucket, spare water bottles, lip balm, sunscreen, duct tape, and an electrolyte-replacement drink such as Pedialyte or Gatorade. If a crewmember is on a prescription medication that he or she can’t be without, put a supply in the ditch bag. When you put things in the ditch bag, they’re for the exclusive use of the ditch bag only-don’t remove anything during your passage.
Once the decision has been made to leave the big boat to get into the little boat, the rule should be that there’s no going back to the big boat. After all, you left it for a reason, and that reason hasn’t changed.
Marianne Lee| |Must-Have Safety Gear: Harness and tether, Jacklines, Padeyes, Tools, Emergency tiller, Spare hatchboards|
Jacklines
Proper jacklines are essential for the crew’s safety on deck. Don’t use old sheets or an old halyard as a jackline. Also, don’t use PVC-coated wire similar to a lifeline-it can roll underfoot, causing a sailor to fall. Always use flat, polyester-webbing jacklines.
Folding padeyes
You’ll need several folding padeyes in the cockpit to which to attach your safety-harness tether. Don’t use a stanchion or a pedestal guardrail as your attachment point. There should be an attachment point for the helmsman as well as a few other solid attachment points for the crew. Having a folding padeye within arm’s reach for crew exiting the companionway is helpful when they’re first coming on deck in the dark or when the weather is rough.
Harnesses and COB recovery devices All crewmembers should have a strobe attached to their harnesses at all times. They should also wear a separate whistle in addition to the whistle that comes with a safety harness, since there may be emergency situations in which a crewmember might not be wearing a harness but still needs to alert all crew.
Medical info
Develop a medical-information fill-out form requesting baseline information for each crewmember, including the name of a primary-care physician, a dentist, and an onshore contact person, with all relevant phone numbers and email addresses. Ask each to identify an insurance carrier and to list the policy number. Include a specific question on the medical form inquiring about any allergies to anything; take note of sailors at risk for anaphylaxis. Ask sailors to list all current medications and their frequency; ask if they’ve had surgery in the past five years.
Medical kit
There are various medical kits available for addressing wounds, C.P.R., fractures, sprains, and burns; this area requires good planning. You may wish to consult with your physician, explaining the length of your voyage, asking for suggestions, and requesting needed prescriptions. In rough conditions, advise the cook to wear bib-type foul-weather pants while preparing meals to help prevent a scalding burn if the pot of hot water suddenly jumps off the stove.
Lee cloths
All sea berths should be aft of the mast and should have a well-designed lee cloth for safety and comfort. A good lee cloth should have sufficient height and length to keep you in your bunk regardless of the boat’s heel.
Handholds
An offshore boat should have sufficient places to grab on to when the boat is heeled over and you need to move around down below. This simple but important area has been overlooked by many sailboat builders; fortunately, it can be easily remedied with the installation of handrails in strategic places.
Placards
A placard with the proper method to call a pan-pan or a Mayday on the VHF/SSB radios should be posted at the nav station and on the inside of the head door-where everyone eventually has to sit-to give everyone an opportunity to review the procedures. Also post a drawing of the boat’s interior layout so everyone can see the location of all the through-hull fittings. Another placard showing the locations of the stove’s fuel shutoff, the diesel-fuel shutoff valves, the ship’s batteries, the bilge pumps, and the stuffing box should also be posted in a highly visible location.
Ship’s book
Buy a three-ring binder and create a ship’s book, which can be left in the nav station and available as a resource for everyone on board. It should contain everything for the day-to-day operations of the boat, beginning with the daily log. Other important items to include are the watch schedule, the meteorologist’s forecast, a Gulf Stream chart, the coordinates of anticipated waypoints, a copy of the float plan, the contents of the medical kit, the contents of the ditch bag, a suggested menu plan, an inventory of provisions and their locations, a copy of the placard describing how to place a pan-pan and Mayday call, and a copy of the placard of the boat’s belowdecks layout highlighting the locations of the through-hulls, pumps, and valves.
Preparation is the key to successful offshore passagemaking. It’s important to allow yourself ample time to purchase and organize all of the equipment and spares and to perform all of the safety checks. Your preparations will ensure that you, your crew, and the boat are ready to handle the challenges that can arise when you’re many miles from land.
Ed Stott is an offshore delivery skipper/coach and a yacht broker who’s sailed more than 80,000 offshore miles. He’s also available (estott@setsailyachts.com) to answer any passage-prep questions that you may have.