As the total weight of books and articles written about anchoring approaches the total weight of the anchors themselves, one might reasonably ask, “Why another anchoring article?”
Well, because no other aspect of sailing so directly and immediately affects the safety of our vessels. We need to get it right the first time, every time, or things will go bump in the night. That is why the topic deserves constant reiteration.
Anchoring may appear a simple task: throw a hooked hunk of iron overboard with a lot of scope. But in fact there is a lot of forethought, experience and even finesse in properly attaching ourselves to terra firma.
The first consideration is the anchors themselves. What kind, how big, how many? The single most important factor is to carry an anchor of suitable weight. A loose rule of thumb is 1 pound per foot of overall length or, if you are at the extreme ends of the displacement/length spectrum, 3 1⁄2 to 4 pounds per ton of displacement.
If the bow roller, bollards and windlass can handle it, there is much to be gained and little to lose by overdoing it when choosing your anchor weight. Your windlass has a maximum load rating, often referred to as the “stall load.” This is usually three times the rated working load, or the power to haul the combined weight of your entire chain and anchor once freed from the bottom. You should use the boat’s engine, not the windlass, to break free from a deep set. If you deploy the typical maximum of 300 feet of 3⁄8-inch chain, weighing in at 390 pounds, adding 5 pounds to your anchor adds less than 2 percent to your working load, leaving you well within recommended reserve tolerances. Yet that 5 pounds may have a profound effect on holding power, not just due to the additional weight, but also due to the increase in surface area of the flukes or blades
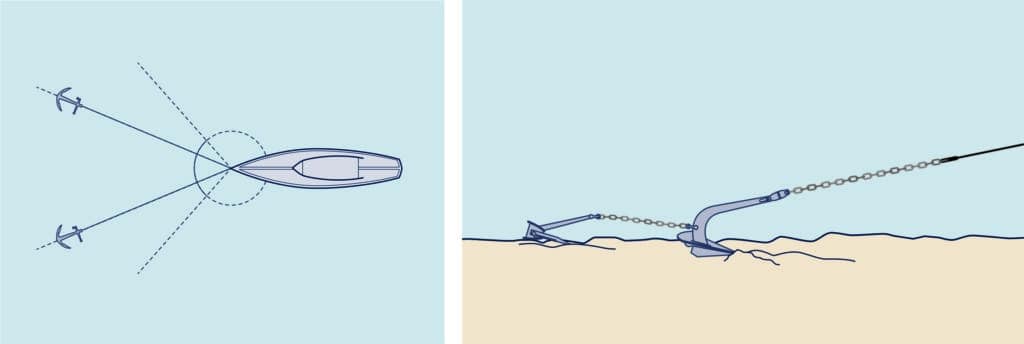
Figure 1a | Figure 1b
The debate rages on as to which style and brand of anchor are best. It’s a discussion clouded with personal preference and often skewed by financial interest. I hesitate to endorse a single product, because there are several excellent choices available. And since different designs excel in different terrains, when choosing an anchor, factor in the nature of your likely cruising grounds.
Traits to look for are robust materials and construction; tested holding power in mud, sand, rubble and rock; average distance from drop to set; tendency to foul in swinging conditions; susceptibility to clogging or jamming articulations; and compatibility with deck hardware.
The predominant styles break down into fluke (this category includes fisherman, Danforth and Fortress anchors), plow (including CQR, Rocna and Delta) and scoop (Bruce). Mushroom and grapnel models are specialty styles not relevant to normal yachting use. Scrutinize several professionally published test results to determine consistent winners across a spectrum of environments and methodologies.
I carry three anchors of three different types on board our 36-foot, 9-ton cutter. My 55-pound Rocna may appear to be overkill, but it served us well in 90-foot-deep Aleutian Island anchorages where short-scoping was an unfortunate necessity. My backup is a 45-pound CQR, as it is convenient to stow and handle on deck and easily attaches to the main anchor to create a hurricane arrangement (see Figure 1b). Its size and shape also make it ideal as an emergency kedge anchor, without threat of puncturing our inflatable dinghy. My old-fashioned collapsible fisherman anchor seldom tastes the salt water, as it is of questionable value in silty bottoms due to minimal fluke surface area, and it is especially susceptible to fouling in tidal swing situations. But in certain slate and boulder bottoms, such as the notorious Pago Pago Harbor, it is the only style guaranteed to hold — so well, in fact, that I joke it would hold on a basketball court. But be warned: Fisherman anchors can be frustratingly difficult to retrieve and should carry a trip line (see Figure 2).
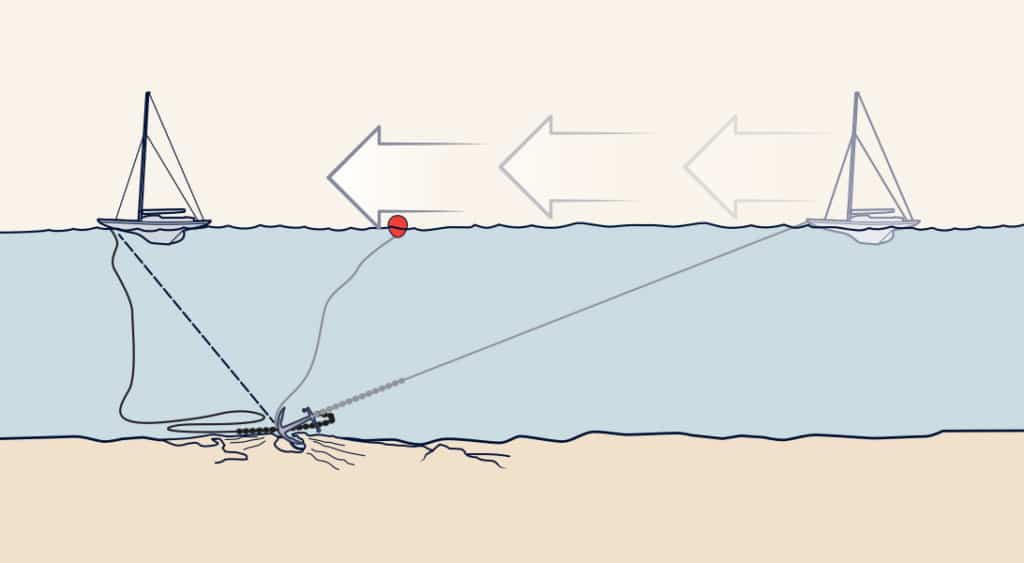
Figure 2
Chain and Gear
A vital but often-overlooked link in our tackle train is the shackle and/or swivel that connects the anchor to the chain. For both, choose a proven brand name, not some cheap knockoff. Use the largest-diameter shackle pin that will fit into your chain link to reduce point loading and wear on the pin. Always mouse the shackle pin securely with seizing wire or, in the event that the pin is recessed into the shackle or swivel body, secure the pin with a high-strength mechanic’s glue, such as Loctite. I further ping the edge of the pin end with a center punch to be sure. Ensure that the shackle pinhead faces toward the least obstructed side of the rollers.
A subtle problem can occur with the modern, sleek style of swivels when they are used on anchors with slots instead of holes on the anchor’s shank end. If the jaw of the swivel slides up the slot before pressure has been applied, it can jam up the channel and the load can bend against, rather than pull on, the swivel pin (see Figure 3a). There have been numerous accounts of otherwise reputable hardware mysteriously parting. I have mitigated this on my Rocna by pressing a bronze eye ring into the slot, which prevents the swivel from crawling up the shank.
The debate over rope and chain rode really comes down to boat size and retrieval equipment. Throughout a 13-year circumnavigation, I successfully used a 3⁄4-inch three-strand nylon rope rode with a 60-foot chain lead, buoyed to lift 20 feet of the chain off the bottom. I had no windlass, but as I moved up in displacement from 6 to 9 tons, and in age from a couple of decades to many, I upgraded my next boat first with a manual windlass and eventually with a 1,200-watt electric windlass. With this added weight-carrying capacity and remote pulling power, there was no reason not to employ full chain, with its attendant catenary effect and resistance to chafe.
Overdoing the chain thickness does not necessarily add to safety. Once you have met your required tensile strength, using a 3⁄8-inch chain over 5⁄16-inch will certainly add to the weight and theoretically increase the catenary effect. But due to weight or space restrictions, your chain may be shorter. In severe situations, it will be the scope, not the chain weight, that will determine the outcome because, perhaps unbelievably, the chain will be pulled bar-tight and the catenary benefits will be minimal.
It is here where a strong 20- to 30-foot-long three-strand nylon snubber will save the day. It can stretch up to 20 percent beyond its own length, adding a bit of cushion to the load and thus minimizing the direct snatch force on the anchor. Many captains employ a bridled snubber, i.e., two lines running from foredeck side cleats to the chain. However, if the nylon is doubled, overly thick and short (as bridles tend to be), it will not stretch sufficiently to create the desired cushioning effect. Either way, snubbers do take the shock load off the windlass axle and place it on the ship’s main bollard or cleat, where it belongs.
As to the type of chain, there is an unfortunate amount of confusion. There is high-test (often called Grade 43, made of 1002 carbon steel), BBB (Grade 30, made from 1008 carbon steel) and proof coil (also made with 1008 carbon steel). High-test boasts nearly twice the strength of BBB or proof coil, and thus a smaller diameter can be used, allowing for more scope at an equal weight. BBB is popular due to its lower cost and compatibility with most windlass gypsies. Because of its short links, it “behaves better,” meaning it piles well and is less likely to foul. The misnomer “proof coil” implies that every link has been certified by the manufacturer, as some chains are, but this is not the case. Proof coil often finds a home as a short lead in a rope/chain system, but it should not be considered for heavy-duty windlass-driven work. Vessels that ply extreme waters might opt for a heat-treated high-test, which adds significantly to the chain’s strength but may lose its temper in the re-galvanizing process. Given the extreme areas I have done much of my sailing in, and the aforementioned loss of catenary effect once the chain is pulled taut, I believe the additional strength and length of high-test is well worth the additional cost.
Any chain, however, requires constant inspection for corrosion and stretch. I end-for-end my chain annually. In the past, it was more economical to re-galvanize a chain than to replace it, but as the cost of galvanizing rises rapidly, that gap closes. In any event, the re-galvanizing must be done before corrosion reduces the diameter of even a single link, and the company doing the process must be certifiably competent.
The fall in the chain locker should be deep enough to prevent “pyramiding” from jamming the hawse hole. Ideally, the locker should be as far aft as possible to minimize hobbyhorsing from extra weight in the bow. The locker should drain so that the chain does not remain immersed in salt water, which can rapidly attack the galvanizing.
The chain should never be directly attached to the boat. Fasten a rope strop leading from a stout D-ring in the locker to the chain’s end. It should be long enough to escape the hawse hole so that in the event of an emergency, from the foredeck, the rope can be buoyed and then cut, and the tackle dropped in an instant.
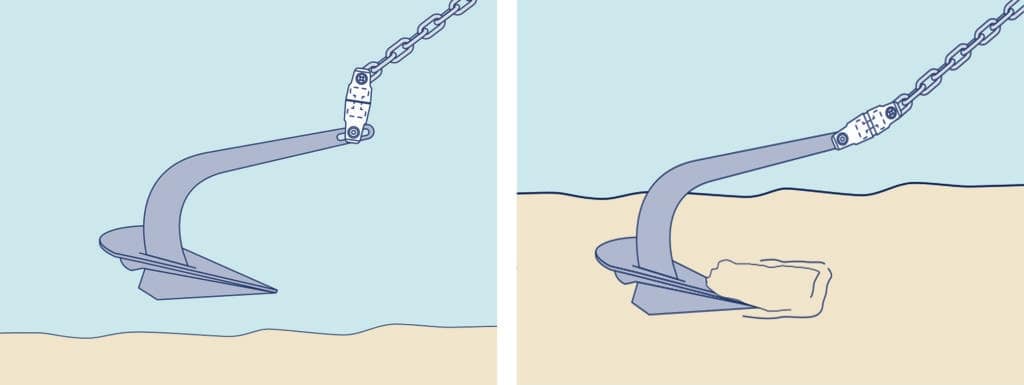
Figure 3a | Figure 3b
Anchoring 101
Now let’s get this tackle on the ground. Unless you are using a moving downwind drop, as is sometimes necessary under sail in crowded anchorages, it is best to turn the boat up into the wind and let your speed bleed to zero. Let out just enough chain for the anchor to reach the bottom. Drift backward slowly, deploying chain at the same rate as the drift. This ensures that the chain does not drop down on the anchor in a heap and foul it. Once you have achieved a 3-to-1 scope, slowly increase the tension on the rode. This will turn the anchor into the setting position without snatching it out of the bottom. Then simply stop. Let the anchor weight settle into the bottom. Next, slowly exert considerable force via the engine’s reverse or, if engineless, back the mainsail to test the set.
Even if the anchor drifts a bit, this process will at least give you a feel for the bottom, and that is valuable knowledge. Of course, you have already scrutinized the depth sounder to get a feel for foul ground. Don’t fall into a casual attitude of “She’ll be right, mate.” If the set isn’t firm and exactly where you want it, do it again. Ten more minutes of work now will translate into hours more sleep tonight. Look around with a suspicious eye at the vessels in your area. Notice if they are anchored or on moorings, as that will dramatically affect the diameter of their swing. How much scope do the anchored vessels have out? Where will the winds be in the night? What will the turn of the tide do? Look for the usual suspects: vessels with thin or chafed rope rodes, mooring lines not led through proper chocks, bottoms obviously fouled. If a vessel has been neglected long enough to be declared a marine reserve, probably so has the ground tackle to which it’s attached.
Scope It Out
Once you have selected your safest location, determine the maximum scope to deploy. When you’re alone and with swing room, there is no such thing as too much scope. But 300 feet of light line on a vessel with a penchant to “hunt” in gusts is the scourge of a crowded anchorage.
In its simplest terms, scope is defined as the ratio between the depth of water and the length of rope or chain deployed. To fine-tune that, however, you must add the rise from the waterline to the bow rollers, additional wave height in storms, and tidal rise and fall. This may not seem significant until you anchor in Tierra del Fuego in 10 feet of water, deploy 40 feet of rode assuming a 4-to-1 scope ratio, and confidently retire. The 45 feet of tidal rise in the night will snatch your anchor smartly from the bottom and set you swirling adrift.
Conventional wisdom calls for a minimum scope of 3-to-1, ranging when possible up to 5-to-1. The greater the scope, the less the angle of upward pull on your anchor and the better its holding power. This presumes a flat bottom, however (see Figure 4a). If you are forced to anchor on a contrary slope, as is often the case, such as in Vava‘u, Tonga, the downward inclination of the bottom will increase that angle, thus decreasing the holding power of the anchor (see Figure 4b). The anchor is pulled out of the side of the mountain, so to speak, and the farther it drifts down, the smaller the scope becomes. In this situation, the best strategy is plenty of catenary effect from excess chain and perhaps even an additional anchor weight. Even if the anchor does pull out of the downward-sloping wall, the extra scope will help it reset once it contacts a deeper but flatter surface.

Figure 4a | Figure 4b
Watch It!
In an ideal nautical world, we would always anchor in 20 feet of water over hard sand with an offshore breeze. But too often the water is deep, the swing room limited, or the bottom so fouled that your anchor will hook on old discarded rigging wire or an abandoned crab pot. Inevitably, that’s when the blustery onshore wind comes, at 0200 on a dark night. In these conditions, the right decision is the hardest to make: post an anchor watch. Have someone up, dressed and alert with the engine already warmed.
When I traveled near Cape Horn, the williwaws were so severe that often anchors alone simply wouldn’t work. That required dropping a series of anchors as we pushed ourselves right up to the steep shore and tied off to stumps or boulders, the spreaders actually in the trees. We dropped fenders and old car tires between the boat and the cliffs.
All we need to know is written on the land and sea, if only we can learn to read it. I call this natural literacy. For example, we learned to anchor by color during our travels. If we saw bushes with fresh green leaves intact, we snuggled right up close to that shore, knowing the leaves could be there only if the 100-knot katabatic winds could not bend sharply enough over the cliffs to terrorize our little sanctuary. A mere 100 yards away, the wind would whip the water’s surface into a foaming frenzy while on deck a candle could have burned. Sea lions lazing on a rock indicated a deepwater approach and another haven from the wind.
As sensible as carrying hull insurance may be, it can only reimburse you for the loss of your vessel well after the fact. It cannot make you safe on a dark and dangerous night. Your best and most affordable insurance is made of rope and iron, not paper and ink. But remember, a chain is only as strong as its weakest link, and you are a link in that chain. Invest the time to learn and practice the so-called black art of anchoring, and you will be able to safely secure yourself to any bit of bottom in our wide and watery world.
Two-time circumnavigator Alvah Simon is a CW contributing editor.