Mark’s anchor 368
When Lewmar offered to let someone at Cruising World assess the difficulty of installing an anchor windlass on an older sailboat, I bravely stepped forward. Like a lot of guys, I’ve spent most of my adult sailing life cursing tangled rodes, avoiding anchoring altogether, or, better yet, standing in the cockpit and steering while encouraging my wife, Sue, to pick up the pace a little as she hauled in the chain. She loves to garden, I reasoned, so why wouldn’t she enjoy flexing those same muscles afloat that she uses at home to pull weeds? Not that we discussed it much, but apparently she didn’t see things that way; she was always wondering why she didn’t steer while I did the pulling. Pushing a button seemed to be the solution for both of us.
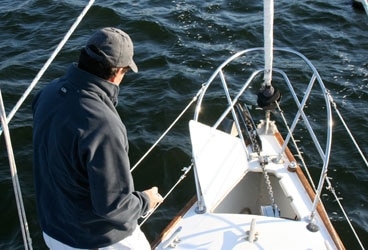
Our boat, Jackalope, is an older Sabre 34, with a good-size anchor locker and hatch in a foredeck that’s uncluttered and, therefore, a comfortable place to lounge. Decision One would be where and how to mount the windlass, given that the boat wasn’t designed to have one.
Like most windlass manufacturers, Lewmar makes both vertical and horizontal models, which allow for several different mounting scenarios. In windlass speak, horizontal and vertical refer to the orientation of the motor and driveshaft, not the gypsy that grips the chain and rode. Who knew? It took me a while to get this straight, and so I had a couple of fairly confusing conversations with Bill Jennings of New England Bow Thruster, a local Lewmar installation representative, as we discussed my options.
One was to replace the existing locker cover with a beefed-up panel that could support a windlass and the considerable forces at work on it. I’d have to build the new cover in such a way that I could still lift it to access the chain locker below, but it would need to be fastened to the deck in a pretty solid fashion when the windlass was in use. The drawback to this plan was the amount of space a horizontal windlass would occupy on deck. I also wasn’t wild about changing the anchor-locker hatch and, therefore, the overall look of the front of the boat. Due to life’s circumstances, I’ve looked at a lot of older boats over the years, and I’ve come to the conclusion that one man’s improvement may well be another’s eyesore. So sticking to the look that Sabre founder Roger Hewson chose for this boat held appeal.
A second option was to go with a vertical windlass, which would have a much smaller footprint on deck that would be essentially the size of the gypsy. The drawback here, aside from cutting a hole in a perfectly good deck, would be the amount of space the motor would either eat up in the anchor locker or, if mounted farther back, in the V-berth.
A third option, and one that quickly grew on me, was to construct a bracket in the anchor locker and mount a windlass entirely belowdecks so that on the exterior, nothing would appear to have been changed. Bill and I concluded that we could fashion a shelf that could be through-bolted to the bulkhead and affixed to the hull using Plexus or a similar adhesive. The trick would be to have the bracket at just the right height so that the chain would lead cleanly from the anchor roller into the locker, where it would then run itself around the vertically oriented gypsy of a horizontal windlass.
When deciding on a windlass, you want to look for one rated to lift roughly four times what your ground tackle weighs. Jackalope carries 100 feet of 5/16-inch galvanized chain and a couple of hundred feet of rode. We guessed that together with a 35-pound CQR anchor, the total would come to about 200 pounds. So we settled on Lewmar’s Pro Series 1000, rated for 1,000 pounds of pulling power.
Then we got out the cardboard, magic marker, and duct tape. With a razor knife, we cut cardboard panels and taped them together until we had a mock-up of a bracket that would fit snugly in the starboard corner formed by the forward bulkhead and the hull. We marked a cutout panel for wiring, then used the windlass’s gasket to trace holes for bolts and the chain fall. With the cardboard mock-up held in place, we then set the windlass on it, adjusting the height to ensure a proper lead for chain and rode. Once we were sure it was going to fit, I took the template to J&J Marine, a full-service marina and metal fabricator in Somerset, Massachusetts. Go with aluminum, the experts at J&J advised, because it’s half the price of stainless steel, lighter, and plenty strong. And have it powder coated to prevent corrosion. I left my cardboard cutout behind and returned a couple of days later to pick up an aluminum bracket that fit perfectly into its space in the anchor locker.
Next on the list of chores was to run wiring from the bow, along the cabin-top liner, and back into the engine compartment, where we’d mount a breaker by the companionway steps. Windlasses draw a lot of current, and the manufacturer supplies a 70-amp breaker for circuit protection. Lewmar also specified that there be less than a 10-percent voltage drop along a wiring run that would be nearly twice the length of our 34-foot boat (from the breaker to the windlass and back), so I chose to go with 2-gauge wire. Given the price, it was tempting to use 2-gauge automotive SAE battery cable, but in the end, I played it safe and went with 100 feet of marine-grade AWG wire. The rubber insulation used on automotive wire can deteriorate in the many fluids found in the marine environment, and it’s also susceptible to degradation from ultraviolet light.
To mount the breaker, we used a hole saw sized roughly the same as the back of the switch to cut a hole in the plywood panel by the companionway; then we squared the corners with a rough file so the breaker would fit snugly into place. We mounted the windlass’ solenoid switch in a nearby locker adjacent to the battery compartment. I was able to use the cut-off ends from the main wire run to connect battery, solenoid, and circuit breaker. Our electrical installations inside the boat were completed once we’d mounted and hard-wired the receiver switch for the windlass control switch. The trick here, according to Bill, was to find a location, approximately amidships, where the mast and other metal objects wouldn’t interfere with the signal. The first location we tried worked well, although there was a dead spot in one area on the foredeck, so we moved the receiver to a locker a bit farther forward. We also made provisions to be able to add a hardwired up/down switch as a backup.
On deck, we ground away the paint inside the anchor locker and the took the bulkhead that would hold the bracket down to bare wood. We needed to glue in a piece of fir strapping for filler along the hull; then the wood, hull, and bulkhead were covered with a layer of 24-ounce woven roving and epoxy to create a good bonding surface for the Extreme Adhesives 310M that we’d use to mount the bracket permanently in place. As a final step, the anchor locker and hatch were painted with a white, two-part epoxy paint that cured overnight. Bolting in the windlass was almost anticlimactic. The Pro Series 1000 comes with a multitool wrench from Lewmar that does it all, from screwing in the mounting studs to securing wiring posts to adjusting the windlass’s clutch.
We ran the windlass’s two wires through a hole in the bracket and connected them to the much larger 2-gauge cable using wire terminals and wiring lugs, which are essentially nuts and bolts with an insulated base that we then covered with electrical tape and tucked into an opening behind the bracket. That done, we fired up the boat’s engine (given the voltage draw, many windlasses are intended to be used with the engine running) and used the wireless control to wind the rode and then the chain into the locker. The gypsy on the windlass is designed to make a seamless transition from rope to chain, so the only time I had to bend over was to close the lid of the anchor locker, once we’d collected the tools and called it a day.
For photos of the installation process click here.
Mark Pillsbury is CW’s senior editor.


