About a year ago, a good friend mentioned that his smartphone and tablet had become his sole means of onboard digital charting. His comment concerned me. While trying to figure out how to install a basic digital navigation network on my own boat, I had been doing a head-to-head comparison: an iPad loaded with iNavX versus a B&G Vulcan multifunction display.
At the chart table, they both excelled, but in real-world sailing conditions, the multifunction display had several important advantages.
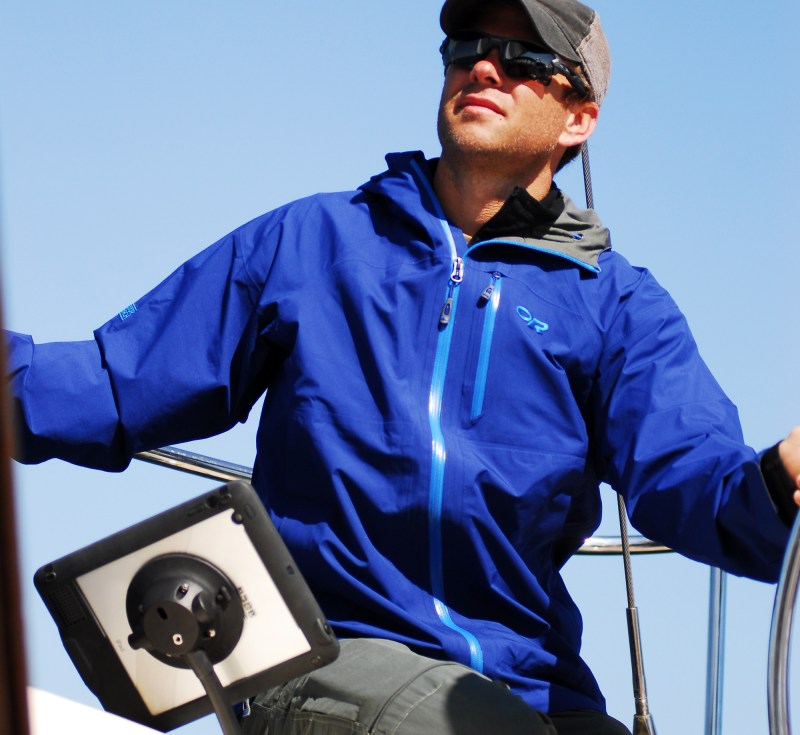
In calm seas and under the dodger, the iPad looked pretty good, but in direct sunlight, there was a distinct deterioration in contrast. What fully tipped the scale in the MFD’s favor was a seamanship issue that became quite clear as conditions deteriorated: The general rule of “one hand for yourself and one for the ship” left me one hand short while holding the iPad in a rough seaway. I tried a series of clamping devices, but none was as effective as a permanently mounted MFD.
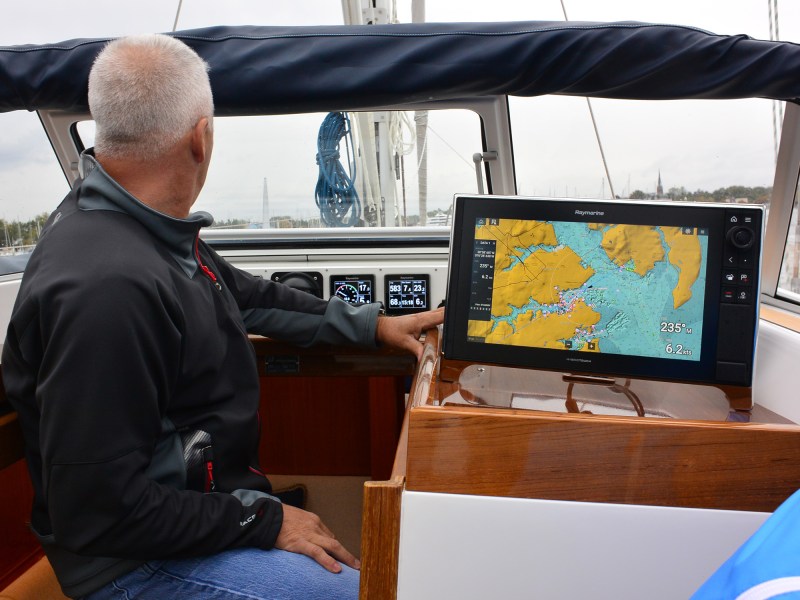
I initially coupled the B&G Vulcan to a long NMEA 2000 drop cable. This allowed me to temporarily mount the unit in several locations: at the helm just above the binnacle, midcockpit just forward of the mainsheet, and on the coachroof just under the dodger. Determining the permanent roost was a matter of preference. For me, the right solution was a flush mount on a raised bridge deck just forward of the helm and mainsheet, where I could reach the wheel and the touchscreen controls. (Sailors who prefer to mount the unit on the SS tube guard over the binnacle can check sources such as Edson and NavPod for quality mounting brackets, hardware and housings.)
The most important thing I learned is that the key aspect of installing a basic digital navigation network is the word “basic.” Think of the project as phase one of interfacing cables and components to get the most important features of a digital charting system.
To complete phase one, you need to learn how to set up an NMEA 2000 backbone, and then use it to connect components to an MFD. It also makes sense to add a stand-alone depth display, because that number, more than any other, can determine a sailor’s fate.
MFDs have a lot of similarities, but their software does differ. The best way to make an informed choice about which MFD to purchase is to visit vendors at a boat show. Ask for demonstrations. Try your hand at calling up menus, plotting a waypoint, zooming and panning. You’ll likely learn that bigger screens are better, and that if you’re thinking about a 7- or 9-inch MFD, placement on board will be extra important.
Also take a look at how the NMEA 2000 cables connect to the unit. A sailboat’s cockpit is often more of an aquarium than a patio. High marks go to manufacturers that take extra steps to keep water out of cable connections, and to owners who opt for quality NMEA cables and fittings, such as those made by Ancor.
It can also make sense to purchase a remote antenna, even if the unit has a built-in GPS antenna. The remote antenna improves reception.
There’s also a need for a depth-sounder transducer. Add the necessary NMEA 2000 cables, along with the fittings to connect to the network. Carefully reread the manufacturer’s installation guidelines before doing this work.
NMEA 2000 cabling expedites installations. One of the big plusses is expandability. T-connectors are used to attach “drop cables” that run from electronic equipment to the network backbone cable. Think of this wiring backbone as the mainstream source of 12-volt DC current, along with much of the digital information traveling to and from connected components and transducers. Take note of the cable that connects the backbone to ship’s power. That cable needs to be fused or provided with a circuit breaker.
The best way to begin a DIY installation is by sketching the path of the NMEA backbone and the junction points where components will connect along the way. Some boatbuilders provide handy wiring pass-throughs for a clear run.
Lacking those, get an angle drill and a set of hole saws. A good rule is to keep the backbone cable as far away from the bilge as possible.
Refine your sketch before you shop for cables and connectors. One option is to use a tape measure or some light line to mimic the backbone’s route. You can determine the length of each drop cable and note where each T-connector will be placed. Extra cable length can be coiled and tucked away, but a cable that’s too short won’t work.
And remember that the longer the run, the greater the electrical line loss. Select cabling that best fits the dimensions of your NMEA backbone, and heed the manufacturer’s advice on maximum-length cable runs.

Once you have installed the basic components and the system is fully functional, you can read up on a phase-two expansion. For example, a radar installation adds the complexity of mounting a dome and installing an Ethernet cable to support the higher data rate. An autopilot installation adds the need for high-amperage current, necessitating a separate 12-volt DC power cable. Adding a digital compass is easy, but the mechanical demands of installing the drive motor and linkage might not be.
For phase one, keep things simple. It will lower the slope of the NMEA learning curve and make phase two much more manageable.
Pro Tip
When it comes to interfacing a diverse gaggle of new gadgets while upgrading your electronics, consider your electronic gear as a navigation system rather than individual components. Before focusing on specific brands, create a realistic two-column list of gear under the headings “Must Have” and “Might Want.” Once that’s completed, steer clear of brand-hopping, thus minimizing the need to lash one manufacturer’s equipment to another’s network. Carefully consider the value, cost savings and reliability that come from brand allegiance. Focus on the essentials, and go with the gear line that hits the most points in the Must Have column.
Selecting an MFD
Settling on the right multifunction display should be more than a price-point decision. If your plan is to expand the network over time and add AIS, radar, wind instruments, weather data and more, then look at the manufacturer’s entire lineup of products. In most cases, it’s best to stick with one brand for compatibility; when components from differing brands are merged, certain functions become unavailable.
The “big four” brands among sailors are B&G, Furuno, Garmin and Raymarine. They all offer 7- and 9-inch MFDs, as well as larger screens. Each MFD is highly expandable using NMEA 2000 backbones.
B&G’s Vulcan 9 and the 9-inch Zeus 3S are excellent candidates for cockpit installation aboard smaller sailboats. Furuno’s GP-1971F has C-Map built in, as well as Navionics cartography. Garmin’s GPSMap 943xsv also comes with built-in Navionics charts. Raymarine’s Axiom+ 9 with built-in Lighthouse also supports C-Map and Navionics charts.


