Occasional grounding is an inevitable problem of navigating a yacht that draws 6 feet, 6 inches in the shallow Intracoastal Waterway. If you have a deep-draft boat like my 50-foot schooner, Britannia, and you happen to wander off the main channel, you can easily run aground. This does not normally cause damage for a long keel boat because the bottom is mostly soft black mud, but depending on how hard the boat goes on, it can be a quite a trial to refloat.
With any attempt to refloat, the propeller is whirling madly only a few feet from the muddy bottom. It is certain to disturb lots of silt and sludge, which then can be drawn into an engine-water-cooling intake.
Most freshwater-cooled marine diesel engines operate on the same principles: An impeller pump draws in cold seawater to cool the engine’s hot, fresh water through a heat exchanger; the residual warmed seawater is then pumped out the back of the boat, usually through the exhaust.
The large mesh filters fitted to most boats’ engine intakes will capture larger lumps of debris, such as seagrass and even small fish, but minute particles of sand and sludge can still pass through, clogging the seawater neoprene impeller and then working their way into the engine’s heat exchanger and cooling passageways. The first sign of this trouble is often a rise in the engine’s temperature, along with a reduction in revolutions and performance.
Stopped in Her Tracks
This exact scenario occurred when we were traversing a 20-mile section of the Intracoastal between Titusville and New Smyrna Beach, on Florida’s eastern coast, in spring 2022.
Suffocating fumes suddenly filled the saloon, and I immediately cut the engine, then made an emergency stop by running aground in the soft, shallower side of the channel. There was no time to consider anchoring: I thought we were on fire.
All the hatches and portlights were flung open, and the breeze soon cleared the smoke to reveal a cracked fuel pipe on the Perkins 4.236 engine lift pump. This crack had been spraying diesel all over the hot engine, creating the thick, acrid smoke throughout the boat. For the first time in my long sailing career, I had to call for a tow. We went back to the Titusville mooring field, where we examined the fuel-line breakage.
I unscrewed the large primary engine filter and found the 2-inch-diameter wire gauze blocked on the outside—which is where any debris should be—but also completely solid on the inside, something I had never seen before. It was obvious that a considerable amount of muck had been sucked into the engine.
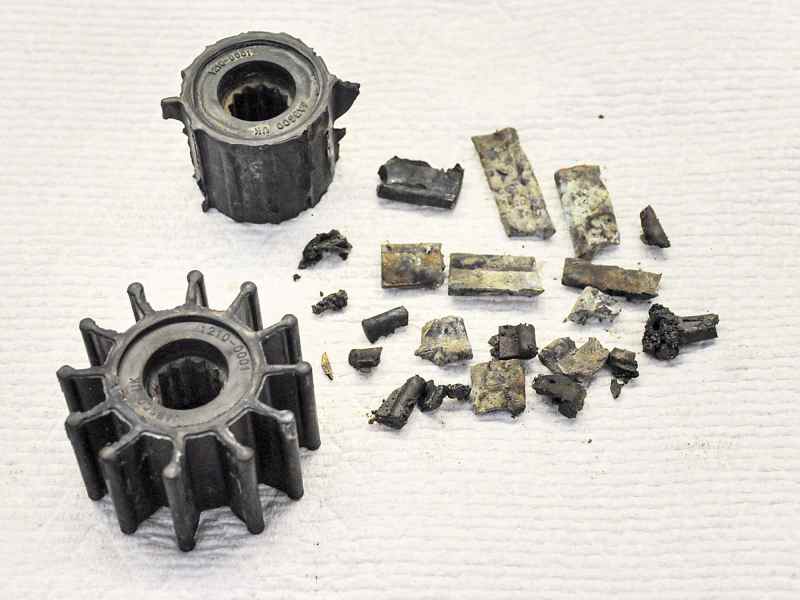
With the plate removed from the front of the Jabsco seawater pump, I could see, to my complete amazement, that the impeller vanes had disintegrated and vanished, leaving only the hub on the shaft. This must have happened when the primary filter become totally clogged and the impeller ran dry, shredding the vanes.
There is only one place the broken bits can then go: into the bowels of the engine. No wonder it overheated; there was little or no raw-water circulation.
The next day, I cleaned the filter and pipes, and fitted a new impeller, but it didn’t help with the overheating. We had to restrict the engine to only 1,300 rpm as we trudged back to Britannia’s marina berth, 15 miles south, at 3 knots.
To further investigate, it seemed logical to follow the flow of seawater from the impeller to the next piece of equipment and then onward. The first place any broken impeller pieces could go from the raw-water pump is into the oil heat exchanger, right at the back of the engine—of course it would be there, wouldn’t it?
I removed the water hose to the heat exchanger and poked a finger inside—and found soft rubber and dirt. This discovery meant removing the double-barreled oil cooler, which was no easy task with a bulkhead in the way. I finally managed to get it off the engine and, using long-nose pliers, I pulled out as many bits of impeller as I could. Then I back-flushed the twin pipes with water.
The next path for the raw cooling water was to the engine heat exchanger, which was also partially blocked with tiny bits of impeller, and lots of sludge. This was when I concluded that I had to completely dismantle and clean all the seawater passageways in this big engine.
Dismantling
All the parts of the cooling system had to come off, to be examined and cleaned. But this was easier said than done, because two floor beams had been positioned over the engine, and it was impossible to get a wrench on some of the engine fasteners.
The beams had to come out, so I used my circular saw to make 45-degree cuts on each end, then removed the beams. Weeks later, after reassembling the engine, I glued a sliver of wood on one end of each beam to make up for the thickness of the saw cuts, then bolted the beams to the splice to secure them.
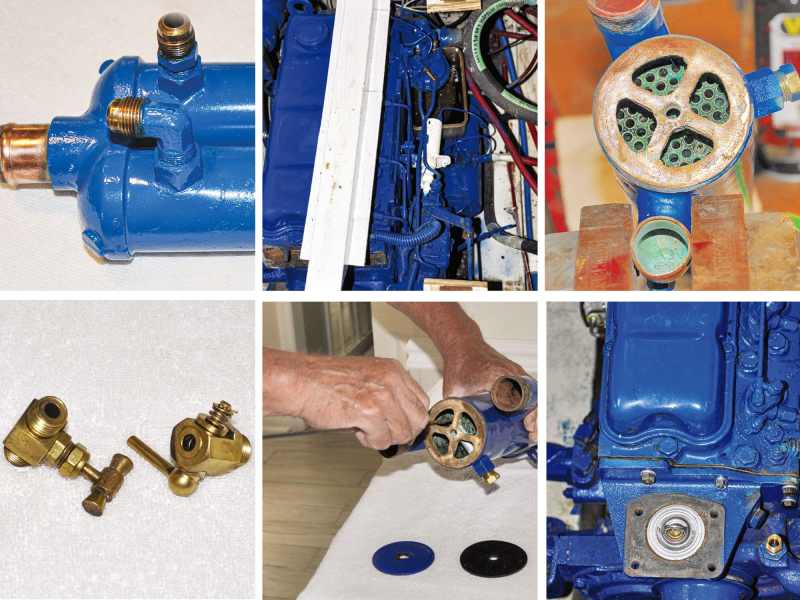
The most important item to clean was the engine’s large main heat exchanger, with its honeycomb of tiny tubes carrying the hot fresh water to where it is cooled by the flow of seawater—that is, when there is any.
To get at the exchanger, I first had to remove the intake manifold—to get at the nuts to remove the heavy cast-iron exhaust manifold—to then get at the nuts securing the heat-exchanger. It is at times like this when I would like to get my bruised knuckles around the necks of the people who built this boat.
Three hours later, I had the engine heat exchanger in my hands. I counted about 100 ⅛-inch-diameter pipes inside the honeycombed body, but only about 30 would actually pass water. The rest were blocked with sludge, which had passed right through the transmission heat exchanger. No wonder poor old “Perky” didn’t have any strength. It needed a multiple bypass operation.
I bought a 24-inch-long ⅛-inch drill bit, and carefully rotated it by hand down every tube I could get to, extracting reams of dirt from each. But some of the tubes were so solidly ingrained that I had to drill them clean using an electric drill. This is called “rodding the tubes,” and it needs to be done carefully. If the tubes become fractured, fresh water and seawater will mix, and the expensive heat exchanger becomes useless.
I then immersed the whole thing in a bath of Rydlyme Marine dissolving fluid, a descaling liquid that diesel engineers use to clean inaccessible parts of engines. After that, I pressure-washed the pipes until clean water flowed through both the seawater and freshwater tubes.
The engine heat exchanger distributes water to the front and back of the engine block, so I removed all the remaining water pipes, and it was clear that debris had permeated through the whole seawater system, including as far back as the exhaust elbow. I think this must have been building up for a long time, well before our recent grounding.
Another item to inspect was the thermostat, but it wasn’t where the engine manual said it was. I then found out that my so-called British engine was a “North American model,” and the thermostat was located under the large header tank at the front of the engine. When this tank was removed, the thermostat was there—or, rather, the great black blob of muck that was covering it.
By now, things were completely out of hand, and I had bits of the motor all over my garage. In for a penny, in for a pound, I thought asI removed the freshwater pump to gain access to examine the inside of the block. To do this, I also had to remove the thermostat housing on top of it.
All these heavy cast-iron pieces were bolted with rusty nuts and studs into the block, and had probably never been unscrewed in 45 years. Some were so welded up with rust that I needed a long socket handle, which I smacked with a hammer to break them loose. (These I threw away, then bought new fasteners.)
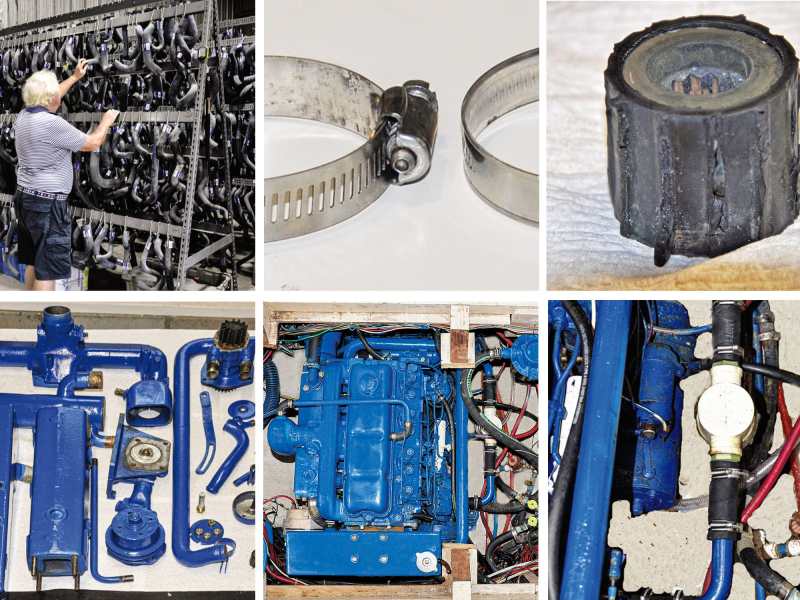
I also had to cut many of the hoses and lever them off the pipes. I had no Perkins part numbers for them, so I took the old hoses to my local auto-parts store, where I rummaged through the many shapes in their stockroom for similar pipes. New gaskets cost $150.
Some of the water-hose clamps had actually snapped, leaving the pipes holding on by corrosion and simple friction. The most serious of these was a 4-inch clamp securing the exhaust elbow to the large muffler. This was broken, and the joint was literally held on by corrosion. If the pipe had parted, hot exhaust would have entered the engine bay and easily caused a fire.
The correct type of water clamps for pressurized engine pipes are the sort that have indentations where the worm drive engages in the continuous stainless band. The clamps with open slots are thinner and weaker, and liable to fail over time. I replaced 21 of these weaker clamps.
By now, the engine was looking completely naked, with hardly anything on either side or ends of the block. After cleaning everything with degreasing fluid, I spray-painted the block and all the parts with blue engine paint, and prepared for reassembly. I wanted my hard work to at least look good.
The engine-block freshwater drain taps were seized up and impossible to open. They had to be unscrewed from the block, dismantled and cleaned. Still, no water came out of the hole until I reamed it with a drill bit, releasing a torrent of filthy brown water.
Clearly, the block also needed cleaning out, so I tipped all the remaining Rydlyme Marine fluid into the block and left it overnight, in hopes of dissolving much of the ingrained grime and silt.
Reassembly
After draining the dissolving fluid from the engine—fluid that, from the looks of it, had done an excellent job—I began the tedious task of reassembly. It had been a month, and I couldn’t quite remember which pipes went where. I felt like one of the king’s men, trying to put Humpty Dumpty together again. It was a good thing I had taken photographs before I started.
And, by the way, all of this happened in the height of the summer, with daily temperatures in the 90s, and sometimes over 100 degrees inside the boat. All I had for protection against the blistering heat was the boat’s air conditioning, which managed to keep the temperature around 80 degrees. Otherwise I would still be at it.
On the starboard side, first the engine heat exchanger was relocated, along with its four connecting hoses. One long metal pipe coiled around the back of the engine to the other side.
Then came the bulky, heavy exhaust manifold, which had to be bolted with new hose clamps to its equally massive exhaust elbow. After that, I secured the inlet manifold to restore the starboard side of the motor.
On the port side, the all-important raw-water pump was rebolted in place with yet another new impeller.
I decided to fit a second flow filter directly after the impeller pump. This would catch all the bits of any future impeller failure.
I then primed all the pipes with water, from the seacock through both heat exchangers and the exhaust. This would ensure that circulation occurred the moment the engine fired up, instead of the impeller running dry for even a few seconds. The freshwater pump was reconnected to the front of the engine.
Before refitting the thermostat housing, I filled the engine with fresh water, ensuring that water filled the cylinder head. I checked for leaks in the pipes and gaskets. Thankfully, there were only a few hose clamps to tighten.
Then the header tank was refitted and filled, the alternator reconnected, and the belt tensioned. The job was now complete—well, nearly.
I had drained all the oil out of the engine sump by reaching right down into the bottom of the engine and unscrewing the drain plug. It drained into the engine pan, which I sucked clean with my vacuum pump. I then replaced the plug with a 90-degree elbow and a pipe connected to a hand suction pump next to the engine, so changing the oil will now be much easier. I also changed the transmission oil, along with new fuel filters, and then bled the fuel system.
It was now nearing the moment of truth—to see whether the engine would start, and, much more important, remain at its nominal operating temperature of 196 degrees Fahrenheit.
I opened the seacock and gingerly pressed the start button. After a few splutters, the engine fired up as though nothing had happened. Within seconds, there was 50 psi showing on the oil gauge.
By now, things were completely out of hand, and I had bits of the motor all over my garage.
Water soon began pouring out of the exhaust pipe with a lot more volume than before—a good sign. It still took a few anxious minutes for the water temperature gauge to begin to move. I refilled the header tank with another pint or two of fresh water as it gurgled its way into every part of the engine.
The gauge slowly rose to 196 degrees and then stopped as the new thermostat opened, allowing for full circulation of water throughout the engine. I engaged forward gear and slowly increased the engine speed to 2,000 rpm. With the mooring lines bar-tight, the temperature remained steady.
Taking Britannia out for a longer trial run was next, and with her plowing along at 2,500 rpm, the engine temperature remained constant.
This was a successful, but long and difficult, revitalization of a 45-year-old engine that had probably been slowly silting up for many years. It is actually a fine testament to these heavy old motors that it ran at all.
I’m relieved that it’s over, and I have to say, I wish the engine builders and boatbuilders had given more thought to their customers who work on the boats. Many items could have been positioned for much easier access.
Britannia had been immobile since early May 2022. It was now mid-August. Being retired, I was able to work on her most days, but delays in parts delivery, repairs, weather and more all took their toll. My actual work log showed 130 hours.
I intend to be careful in the future to avoid groundings and, if I have one, to immediately check the water-inlet filters. I certainly don’t want a repeat of this hard labor, or the costs.


