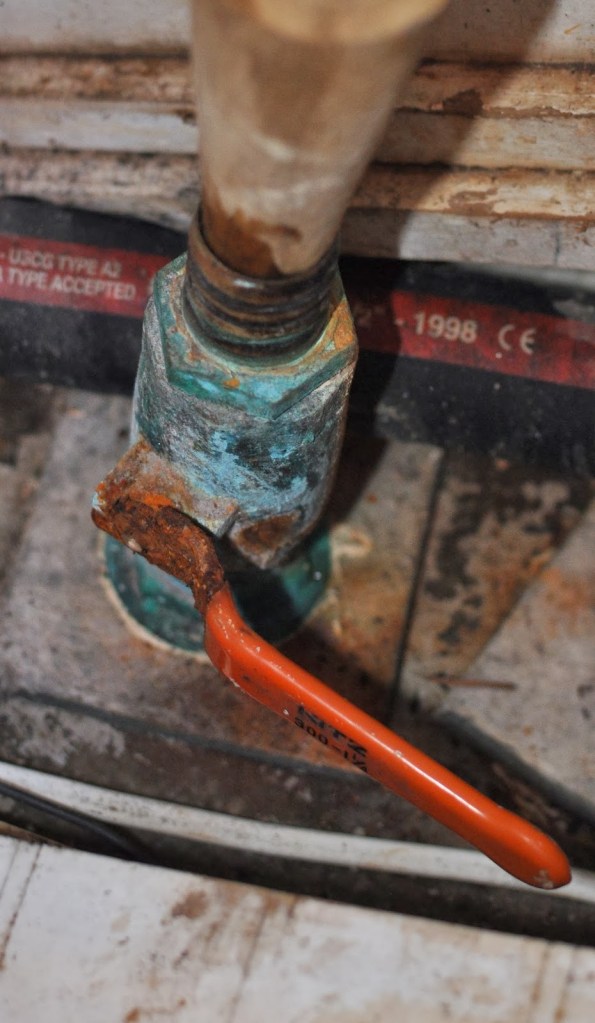
Throuh Hull Valve
Long-time friends live full-time here in La Paz, on the Mogote. They’re in the States for twelve days and left us the keys to their home, the remote for their big-screen TV, and instructions for operating their golf cart. We loaded up our clothes and sundries and moved in.
And I’ve not been around to enjoy any of it.
Today is the end of my sixth day working myself to the bone aboard Del Viento, tackling two nagging, toxic, and disruptive jobs that can be done only when we aren’t living aboard:
- To explore the consequences of a poorly-bedded galley sink
- To paint the interior
I dove into both jobs with characteristic optimism. In fact, I thought the scope of these off-boat projects was narrow and kept a mental list of about ten additional things I’d get done in this time. Windy cautioned me not to think beyond these two projects.
The destruction phase of the first job went swimmingly, but revealed significant problems. Once all the rusted, impossible-to-reach wing nuts that held the sink in place gave up their grasp, a two-foot section of sodden, thirty-six-year-old plywood countertop fell away. Fortunately, the support structure underneath was soaked but remarkably sound, made of solid teak. Once it dried, I replaced the missing countertop with some scrap plywood that I epoxied in like nobody’s business. I used the regular West System stuff for adhesion and then all around the edges, thickened G-flex epoxy to create a flexible, impenetrable water barrier. Nobody will ever have to do this job again.
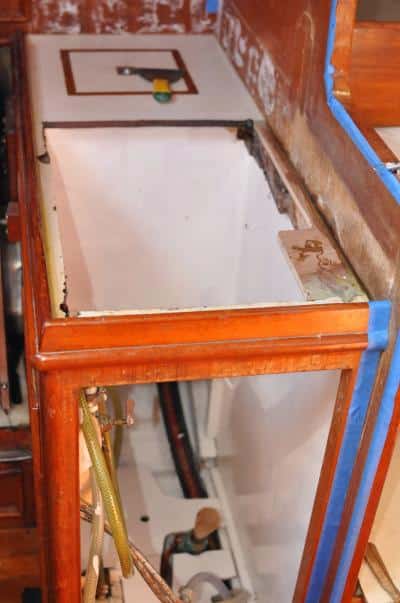
| |Day 4: Sink and tiles removed, rotten wood removed, new plywood partially epoxied in place, and cabinet interior and bilge area underneath covered in a first coat of paint.|
I also cleaned the sink until it shines like new, bought a replacement faucet, relocated our water tank vent, installed a new salt water tap, replaced hoses, sanded and re-varnished the soap dispenser, removed the remaining backsplash tiles, skim-coated the bulkhead behind the sink with epoxy, and painted the inside of this cabinet space the bilge below it.
All that is left for this job is three coats of polyurethane paint on the bulkhead and reassembly of everything—and we’ll nearly have a new galley.
The second job is a monster. Using an electric sander on the interior of your boat that’s filled with all your stuff requires the kind of logistical preparation that nations undertake before going to war. The dust is fine and will go anyplace that isn’t sealed and on everything that isn’t stowed and protected. So having relocated and sealed everything, I’ve spent all my days down below, breathing Darth Vader-like through my respirator and immersed in clouds of either sanding dust or fumes from single-part polyurethane paint or two-part epoxy.
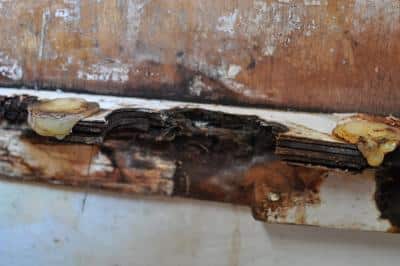
| |Here is the sodden portion of plywood counter top. It had the rigidity of a wet sponge.|
The areas I’ve finished so far took three coats, and most were painted before. The bright white that’s replaced the dingy gray is startlingly pretty. But a few of the areas I’m painting have always been a dark teak finish and it was a bit nerve-wracking to commit paint to those surfaces—it can never be undone, what if it looks terrible? Fortunately, I can see already that this was a good choice. Our boat is heavy on the wood below—and we both like this—but the visual relief offered by these small, now-white areas, is welcome.
I’ll have more pictures when this work is done. I can see now that I’m going to need all six of my remaining days.


