bedding hardware 368
Most boats are built using some type of cored composite construction, particularly in deck and cabin structures, although many hulls are also cored. The inner material can be plywood, balsa, or synthetic foam, but they all share a common enemy: water.
If your boat was built in an ideal world, the naval architect detailed precisely where each piece of deck hardware was to be installed. Knowing this, the builder laminated into these areas either solid fiberglass or high-density core that’s designed for this purpose. Then the folks drilling the holes in the shop mounted the hardware using the accepted method of measure, drill, apply goop, and install.
Unfortunately, that’s not always the case. Builders sometimes fail to install hardware pads, or hardware is added after the design is complete or years after the boat is delivered. In either case, something must be done to protect the core from water intrusion or other damage.
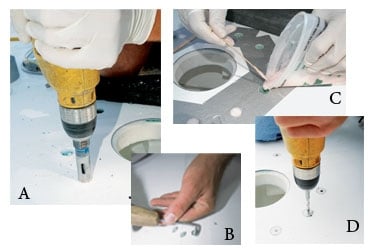
Here’s a thumbnail sketch of procedures called reefing and backfilling: When mounting hardware, mark and drill the holes for the fastener. Then redrill from the outside a hole about half again as large as the initial size, taking care not to drill into the fiberglass skin below. For example, a 1/4-inch hole would be redrilled as a 3/8-inch hole. Next, reef out the core to a distance of about half an inch around the inside of the hole using a pick, a bent nail, or an Allen wrench chucked into a drill. Be sure to wear eye protection.
Now it’s time for the backfilling. Cover the hole inside the cabin with masking tape, then fill the void using epoxy thickened to the consistency of mayonnaise. West System used with 406 or 404 filler works well for this. Apply the epoxy slowly using a brush or syringe to prevent air entrapment. Once the epoxy has cured, redrill your hole, making it slightly oversized, and chamfer the exterior edge of the hole to create a space for sealant. A 1/4-inch fastener would call for a 5/16-inch hole.
Now wipe down the area with a damp rag to remove amine blush, which is a water-soluble wax that forms on the surface of cured epoxy. Then, to remove wax, oil, and other contaminants, wipe down the piece of gear and the fasteners with a clean rag moistened with 3M General Purpose Adhesive Cleaner. The power of these contaminants to cause sealant failure shouldn’t be underestimated; just watch the rag turn black as you clean the hardware. Finally, apply polyurethane bedding compound to the bottom of the hardware as well as to the fasteners. Here’s a trick: Don’t apply bedding compound to the parts of the fasteners inside the vessel, such as the washers, nuts, or backing plate; if the exterior bedding fails, you’ll know because you’ll see water leaking in. If that happens, it’s time to rebed. Sealant inside will also tend to trap any water that does leak in, possibly damaging the core.
Remove as much excess sealant as possible using a clean, dry rag. Lastly, use a rag moistened, once again, with adhesive cleaner.
Now you’ve achieved two ends: You’ve virtually eliminated the possibility of water entry into the core, and, just as important, the epoxy ring prevents the fastener from crushing the core. A 1/4-inch fastener can exert more than 500 pounds of pressure on the core, which means four closely spaced fasteners could apply a ton of force.
Steve D’Antonio is a regular CW contributor who offers services for vessel owners, boatbuilders, and others in the marine industry through Steve D’Antonio Marine Consulting (www.stevedmarine
consulting.com).