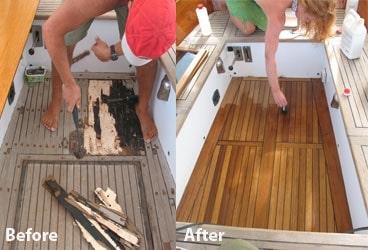
teak cockpit sole 368
Some might say that my wife, Kylie Deacon, and I are gluttons for punishment because we cruise the tropics aboard our wooden pride and joy, Meggie, a 48-year-old Cheoy Lee Bermuda 30 ketch built entirely of teak. The maintenance schedule must have been getting light because I decided to tackle a project that had been taunting me for some time: the refurbishing of our somewhat tired-looking-well, to my eyes at least-cockpit sole. Like most cruisers, the cockpit is where we spend 90 percent of our time, and we wanted it to reflect the same level of care as our nicely varnished mizzenmast, cockpit table, bulkheads, tiller, and coamings. Once into it, I realized that this would be an easy way to spruce up any boat-wood or fiberglass. Here’s how we did it.
The process was rather straightforward and offered a chance to be creative. In fact, I did all the work at anchor in a fairly calm bay. Although I’m a carpenter by trade and have an arsenal of planes, chisels, slicks, power tools, and the like stowed on board, the tools necessary for the job aren’t beyond what you might find aboard most cruising boats or could easily borrow.
First, I decided on a rough layout, then calculated the linear footage of teak decking needed. Teak decking can be purchased through most chandleries, hardwood mills, or even shipyards, but shop around first for price and quality. Decking is typically milled to half-inch thickness by 1.75-inch width. A rabbet on one edge creates a caulking seam. It’s best to get some wider stock to use for margins around the perimeter. This breaks up the decking and allows for layout flexibility; the margins can be cut and shaped with a plane to make the decking layout fit perfectly.
Although any layout will work, it’s wise to take some photos of your old sole before you start tearing it up. Once the old sole was removed, and because Meggie is wood, I chose to lay a new plywood subdeck first. I used first-grade, 10-millimeter-thick, Lloyd’s-stamped Okoume plywood. After I’d cut it to fit, Kylie sealed it using Interlux Wood Sealer before I bedded it down permanently. On a fiberglass boat, surface preparation is easy. Fill in any voids with thickened epoxy, then sand it level and wipe with acetone before fitting the deck pieces.
The next step was to lay out, cut, and fit each piece of decking. Once happy with the dry fit, I drilled a series of pilot holes, approximately 10 to 12 inches apart, in the caulking seams between each board; I’d use these later for clamping purposes during the final fit. After numbering each piece and wiping the backs with acetone to remove any surface oils, I stacked them and set them aside.
Now came the final fit. First I laid the perimeter margins, bedding them with 3M 5200 and using silicon bronze screws set in counterbored holes, later to be plugged. These were the only fasteners used. Leave the margins loose-about 1/16 to 1/8 of an inch-around the perimeter to allow a good caulking gasket. The biggest trick to the whole job is to apply just the right amount of caulking under and up the sides; too much gets it all over the place. A good solution is to first tape off the vertical sides of the cockpit just above the margins; this ensures keeping the caulk where you want it.
When it comes time to lay the decking, you want a good bed of caulking underneath with no voids, but not so much that it oozes up between the seams when you tighten the clamps. I used a soft plastic trowel to spread the caulking evenly, in a way that’s similar to laying tile. Once all the pieces were lightly placed on the surface of the caulking, I used 1.5-inch drywall screws with large flat washers in the pre-drilled pilot holes to clamp the decking down. This does a great job of achieving even clamping pressure and minimizes sanding.
The next day, I removed all the screws and washers and cleaned up any caulking that may have squeezed up. After leaving a tube of caulking in the sun to soften so it’d be easier to work with, I transferred some into a syringe and injected caulk into the empty screw holes to ensure a watertight seal. On a fiberglass boat, I’d try to tape the screw holes from the under side of the sole, then inject them with epoxy.
After I carefully taped each caulking seam, the seams were ready for caulking. Over the years, I’ve used many different caulking products, but for this application, I found the best product to be SIS 440 from Teak Decking Systems (www.teakdecking.com). It’s both long lasting and easy to use. I caulked half of the cockpit at a time, and then, using a small scrap of decking as a trowel, I leveled off the caulking. I then looked for any air pockets that may have appeared. I popped any I found with a utility-knife blade, then refilled the voids and smoothed them over with soapy water on my fingertip. The soapy water allows you to manipulate the curing caulking without it sticking to you.
I pulled the tape immediately after finishing each section, using a blade to start an edge and an empty Coke bottle in my right hand to wrap the strips of tape around as I proceeded. Of course, this required my best acrobatics, as I could no longer stand on the sole. The next day, I gave the floor a light sand with 120-grit paper on a random orbital sander; I sanded the remainder by hand.
To finish up, Kylie applied two coats of Tip Top Teak Wood-Oil Sealer to help protect the new teak and to give it that amazing honey color. We now sit in the cockpit and enjoy the result of four days of leisurely work.
We never sand our bare teak; we let it gray and wear naturally. To keep it clean, we use a light scrub brush and lots of seawater, occasionally using mild soap. We also try to apply teak oil three or four times a year. All of these routines have worked well on Meggie’s 48-year-old decks.
There’s nothing like the warm beauty of a natural teak deck, and nothing is better underfoot.
Mike Shaw and Kylie Deacon continue to “punish” themselves by maintaining and cruising aboard the all-teak Meggie in the tropics.
PROJECT TIPS
The tools and adhesives you’ll need to replace a teak sole on your sailboat include items that are fairly easy to find.
• Hammer
• Pry bar
• Power drill and saw
• Drywall and bronze screws
• Syringe
• 3M 5200
• SIS 440 teak caulk