Stripping Paint
For many, slapping on a new coat of bottom paint is a time-honored springtime ritual. That step, however, is merely the last task at the end of a long road. If you’re the owner of an older sailboat, you may be dealing with years of various bottom coatings, aging barrier coats, and possibly blisters, which all must be dealt with before you apply a new coat of antifouling.
If your boat’s bottom has reached the point where years, or perhaps even decades of paint buildup has started to make it look like a topographical map, you should consider taking all of the coatings off and starting over.
If doing some hard time on the hard is in your future, here are some steps to take that will renew your boat’s bottom and make your sailing that much sweeter.
For a bottom that’s in decent condition, “sand lightly with 60- or 80-grit sandpaper and wipe off the sanding residue,” says Jim Seidel, the marketing manager for Interlux Paint. “When sanding, feather out the edges of any areas that may have been scratched or damaged. Once the bottom has been sanded and cleaned, go ahead and apply the new antifouling paint, first making sure that the new paint is compatible with the old. Most modern paints are compatible with one another, but there are still some that can cause problems.”
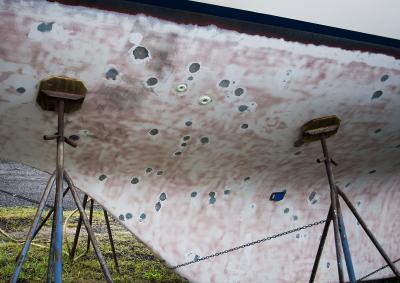
If you notice any old bottom paint that’s flaking, you’ll need to take a scraper and chip the loose bits off, then feather out from the area with a sander until you reach paint that’s adhering well. This is best if you encounter only a few relatively small areas of flaking paint. If much of the bottom is this way, you’ll probably want to remove all the existing paint down to the barrier coat, or possibly to the gelcoat. “We recommend stripping bottoms when there’s clearly excessive buildup and the bottom starts flaking in areas that’ll expand every year,” says Scott Murray, the yard manager at New England Boatworks in Portsmouth, Rhode Island. “Once that happens, you can sand and try to feather out the edges of the flaking areas, but when paint is applied, the solvents in the paint will attack those edges and can make the problem worse.”
“No matter how well the surface was prepared, there’s only a certain amount of paint that’ll adhere to it,” Seidel says. “As the boat is launched and hauled, the paint will absorb water and then release it, causing the paint to swell and contract. This buildup, as well as the absorbing and drying out of the paint, causes the oldest coats to get weaker, and they may start to crack or detach from the surface. When this happens, it’s time to start over.”
If you need to take off many paint layers, there are several ways to do this, and what you ultimately decide on will depend on your boat’s current condition, your budget, and the boatyard’s rules.
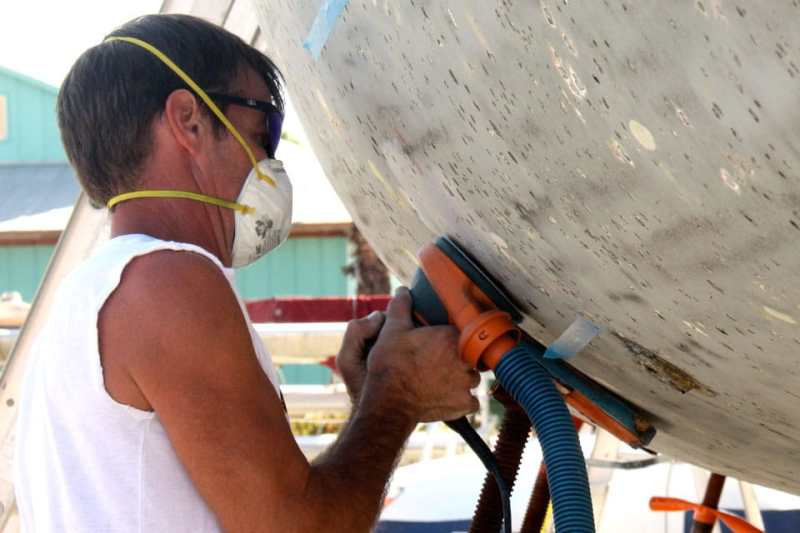
Sanding the boat’s bottom is the dreaded chore that most boat owners will face at some point. This is definitely a case in which having the right tools will really make your job easier. Using a vacuum sander helps keep most of the dust out of the air, producing a much cleaner work environment. Many boatyards also require them. Prices for a random orbital sander with a vacuum port range from about $60 for a Ridgid brand to about $450 for a top-of-the-line Festool. You’ll also need to buy a Shop-Vac-style vacuum.
You’ll want to sand down the bottom with 60- or 80-grit paper until the excess paint is removed and the bottom isn’t overly textured. Be careful not to damage the gelcoat. Most boatyards in the United States have strict rules about how bottom jobs are done and may require a ground cover or a tent around the boat from the waterline down to capture the dust and debris.
A quicker way to remove many layers of paint is through high-pressure blasting with either soda, sand, or a special glass material shot at the hull. It’s effective and faster than sanding, but it’s also not typically a do-it-yourself project. If having your hull blasted is something that you’re considering, do your homework and find a reputable blaster. Also check to see if your boatyard allows it. Expect to pay about $35 to $45 per foot for professional blasting.
Soda blasting is what many boat owners choose for bottom-coating removal on fiberglass boats because it’s less abrasive than other materials, though if you have a steel or aluminum hull, you can probably go with sand blasting. If the project is done by a skilled blaster, the soda will take off coatings down to the gelcoat or barrier coat—if it’s in good condition—without damage.
After soda blasting, the surface is typically too smooth for bottom paint and must then be sanded with 60- or 80-grit sandpaper. Before covering with new antifouling paint, wash the bottom with water and let it thoroughly dry. According to Mike Morgan from Chesapeake Blasting Service, “Most boats can be blasted unless they have serious issues with the gelcoat or fiberglass. If this is the case, they should be peeled and a whole new bottom applied.” (See “Banishing Bottom Blisters,” April 2012.)
A chemical paint stripper is another way to remove paint buildup and is the method of choice for some boatyards since there’s no dust or noise and the residue can easily be contained. Paint stripper is relatively easy to use—you brush it on with a paintbrush, wait the recommended time, then remove the resulting goo with a scraper—but it can be a time-consuming process, not to mention a messy one. A ground cover is essential, and you’ll need to discuss the debris disposal with your boatyard.
When choosing a chemical paint stripper, be sure to check that it can be used on your particular hull material, and expect to use 5 to 6 gallons for a 45-foot sailboat. Paint strippers work best when not used under direct sunlight, as the chemicals need to stay moist to work. After the old antifouling paint is removed, you’ll still need to sand the bottom with 60- or 80-grit sandpaper to rough up the bottom for paint.
Jen Brett is Cruising World‘s associate editor.
Barrier Coat Q&A with Don Zabransky, Pettit Paints
What’s a barrier coat?
A barrier-coat system is a heavy-duty, two-component epoxy coating for use where maximum resistance to fresh or salt water is required. It reduces water absorption in fiberglass hulls, making it an excellent choice for the prevention and repair of osmotic blisters.
Who needs one?
People who want to protect their investments and those performing blister repairs on a hull. It’s also recommended that hulls stripped by methods such as soda blasting receive a barrier coat to provide a new protective skin to the bottom of the boat.
How long do they last?
A 12-mils thickness of a properly applied, high-quality barrier-coat system should result in 10 or more years of blister protection.
How do you apply one?
• Thoroughly prep the hull as per the manufacturer’s instructions. Don’t mix more material than can be used within the specified pot life shown on the label.
• Apply the recommended number of coats of the epoxy barrier-coat system. A wet film thickness of our Pettit-Protect should be 7 mils per coat, which yields a 4-mils dry-film thickness. A wet-film thickness gauge should be used to monitor paint application. Total dry-film thickness for a three-coat application should be 12 mils minimum for maximum coating performance.
• Always follow recoating windows set out by the manufacturer. These windows will be relative to the temperature of the hull and its surroundings. Typical windows between coats will be from two to six hours on the short side to 14 days on the long side. Missing these windows requires sanding between coats.
• Apply the first coat of antifouling paint over the last coat of epoxy within the specified over-coating schedule set by the manufacturer. These times are also temperature related. This is known as “hot coating” because the paint is applied and a bond formed before the epoxy is fully cured.


