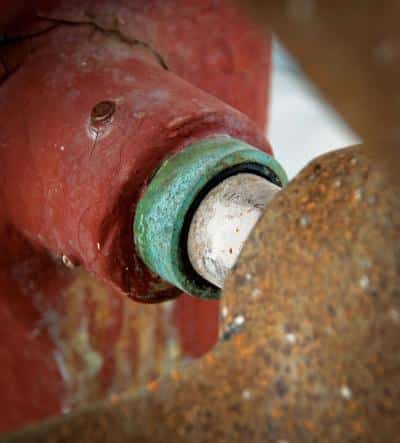
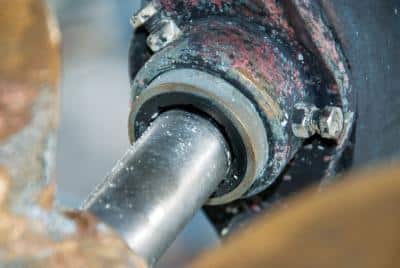
By definition, a shaft bearing (sometimes called a Cutless bearing) is a rubber-lined composite or brass bearing through which the propeller shaft turns, and as such, is the final component in the drivetrain forward of the prop. The cylindrical bearing generally has a grooved inner surface so water can flow through for lubrication. The bearing assembly also supports the shaft; when the bearing and the engine and shaft are correctly aligned, the result is vibration-free running under power. But what happens if you can wiggle the shaft, even a little? Or if you see uneven wear around the lip of the bearing, a telltale sign that the engine is out of alignment? The answer is simple: Replace the bearing. The task itself is a bit more complicated. But if your boat is hauled for the winter or for fresh bottom paint, now’s the time to tackle the job.
Removing the prop is the easy first step, and one for which I recommend paying the modest fee to the pro at the boatyard wielding the proper puller. Let’s just hope that your boat’s rudder doesn’t stand in the way of removing the propeller shaft.
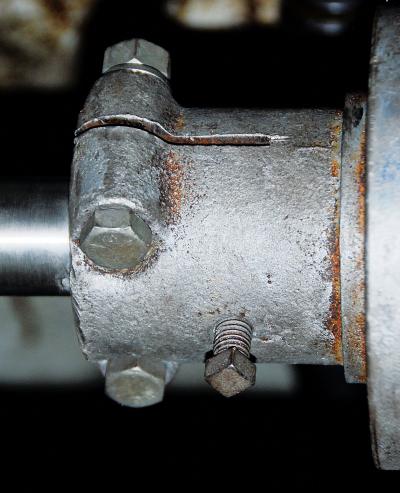
Either way, that’s where the real battle usually begins: pulling that propeller shaft. This involves slipping it out from the flange coupling that connects the shaft to the transmission. Often the propeller flange maintains a death grip, and typically, you won’t have much room to apply helpful tools like shaft pullers and sledge hammers. The shaft and the flange are locked together by a key, a set bolt and several other bolts that prevent the shaft from slipping off the flange when the engine shifts into reverse. Once those bolts are removed, in theory the shaft is free. But further “persuasion” may be necessary.
Luckily, some shaft flanges have slots. Open them up by inserting a steel wedge and tapping it with a hammer. Then spray penetrating lubricant generously in the slots. Or try this well-established trick: Bring the shaft flange back to the transmission flange; connect the two loosely with new, longer bolts; insert a short piece of smaller propeller shaft (or a socket from your socket wrench kit) between the two; and start cranking on the nuts on those flange bolts. If it’s still locked in, use a heat gun to try loosening the flange. Though it may take some time, with any luck the shaft will slip out. All that said, depending on the price you put on your labor, it may be cheaper to cut the shaft with a grinder fixed with a steel-cutting wheel. An online search will locate new shafting material at reasonable prices.
With the shaft removed, it’s the shaft bearing’s turn. Loosen the setscrews that prevent the bearing from turning when the prop shaft spins. If you notice what looks to be blue or red Loctite, take the heat gun to the setscrews before attempting to remove them. The goal is to avoid stripping the Allen heads. An impact driver may also accomplish this feat.
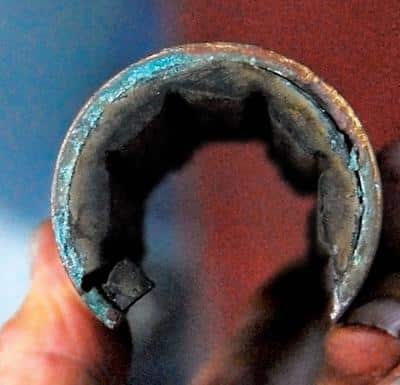
The next task is cutting into the bearing, which can be accomplished in one of two ways: either by hand with a hacksaw, or mechanically with a Sawzall with a metal-cutting blade. Be very careful if you use the Sawzall; it works fast, so make sure you don’t saw right through the fiberglass or other material surrounding the bearing.
Personally, I prefer the hacksaw. Start by cutting a lengthwise slot first through the very tough rubber, and then into the brass sleeve. Some experts advise cutting along the line of setscrews, something I’ve found to be nearly impossible though it may work on large-diameter bearings. Once you’ve almost cut through the brass sleeve, insert the setscrews and crank on them till the sleeve begins to cave in. (Warning: If the shaft bearing is in a fiberglass shaft log or stern post this technique may quickly collapse the threads in the glass.)
Once you’ve managed to cut a slot right through the bearing, take a strong screwdriver and a mallet to its edges to collapse the walls of the sleeve inward. You want to create a lip to which you can affix vice-grip pliers to twist and pull the bearing out. Be persistent; built-up corrosion can make this step a battle.
Once the bearing is removed, you’ll want to clean out the inside surface of the strut that contained it. Thoroughly degrease it, then fill the odd cuts and “bruises” with reinforced epoxy like Marine Tex. Lightly sand it to obtain a smooth surface, then insert the new bearing and the setscrews.
When removing a shaft bearing, there are steps you can take to make the operation easier in the future. For instance, the propeller shaft stock may be oversized by a couple of thousandths of an inch in relation to the inside diameter of the flange. The key material may also be very slightly larger. Take the key stock, the flange, the propeller and the shaft to the machine shop that will cut the key ways and the taper for the propeller. Ask them to make sure the shaft and its key go into the flange smoothly. The setscrew for the key and clamping bolts on the propeller flange will exert enough force on the whole assembly later. The flange on the shaft side must have lengthwise slots that will be closed tight by the bolts; avoid flanges with solid bodies.
On boats where the shaft bearing sits in the fiberglass sternpost, removing the bearing may pose a challenge due to the possibility of inflicting damage while sawing through the sleeve. Wooden boats utilize bronze bearing carriers that fasten to the stern deadwood with lag bolts. On heavily built fiberglass boats, one can easily fabricate a similar carrier assembly, as long as there is enough space in the propeller aperture. Such a bearing carrier can be unscrewed and slipped off — with the shaft bearing inside it — while the shaft remains in. Simply take the bearing carrier to a bench and press the old shaft bearing out. Remember to loosen the shaft from the transmission flange and support it somewhere along its length before removing the old bearing.
While many boatyards favor shaft bearings with brass sleeves, for boats used in salt water it’s a poor idea. Brass corrodes and the brass casing can develop pits that make it even harder to remove. Use shaft bearings with the phenolic bodies commonly used in steel and aluminum boats; they’re easy to cut through and corrosionproof. Like a good boatyard mechanic, leave some of the shaft bearing tube protruding, which provides a lip to lock onto when trying to slide the thing out.
Cutting a stubborn propeller shaft may seem drastic. However, consider that boatyards charge between $75 and $95 per hour for a mechanic. When I replaced the bearing on my Mason 44, it cost only $250 for an 8-foot-long piece of 1.25-inch Aquamet 22 shafting. Remember, while all brand-new shaft materials shine brightly, their properties vary widely. Aquamet 22 is the same alloy as Nitronic 50, which is used in the best rod rigging (short of titanium, it’s the most corrosion-resistant metal in marine applications). Since the shaft spends its life in the water and out of sight, using quality materials makes sense.
Shaft bearing removal is easier on boats with propeller shaft struts. Bearing removal tools like a Strut-Pro, though expensive, are found in many boatyards. With one, the bearing can be removed while the shaft stays in.
Tools and Resources
The following gear and suppliers can help facilitate shaft bearing replacement projects:
• Strut-Pro shaft bearing replacement tools
• Aquamet stainless-steel boat shafting
• Buck Algonquin flange pullers, stern-bearing housings and related hardware
This article first appeared in the February 2014 issue of Cruising World with the title “Bearing Down on Cutless Bearings.”

Propeller Shaft Struts
Cutless Bearing 1
Cutless Bearing 2

Cutless Bearing 3
Cutless Bearing 4

Cutless Bearing 5
Cutless Bearing 6

Cutless Bearing 7

Cutless Bearing 8
Cutless Bearing 9