A sailboat’s gelcoat does a lot more than catch the eye of the new-boat buyer. It’s also a barrier coat that lessens moisture intrusion, which can damage underlying laminates, and it acts as a thicker-than-paint surface resisting fender rubs and continual assault from years of grease and grime. Thanks to its thickness, minor docking scuffs can be erased with compound, wax and some polishing patience. Gelcoat is a major ally in the quest to maintain a sailboat’s like-new look. And with some annual spring commissioning—cleaning, polishing, and tending to minor scrapes and gouges—your boat’s gelcoat life span can be significantly extended. Many owners have been able to postpone a costly paint makeover and extend their boat’s original gelcoat life well into a second decade of sea service.
Sailors seldom consider how their sailboat’s hull and deck are under a constant beating from seawater—the universal solvent — and sunlight, with its plastic-killing UV radiation. Gelcoat must also endure physical impacts from docking mishaps and other close-quarters encounters. The net effect ranges from stains and scuffs to scrapes, gouges and structural damage. Fortunately, most DIY-oriented sailors are ready to roll up their sleeves and annually clean the slate. These projects begin with more than a casual cleanup. Contaminants accumulate regardless of whether the boat has been stored in the water or on the hard, and smearing rubbing compound and wax over a dirt- and grime-caked hull can do more harm than good. This is especially true with older, more-oxidized gelcoats. The porosity of older gelcoat causes the surface to behave like a sponge, accumulating the grime that has not been washed from the it. So, whether you’re just going through an annual cleanup plus a coat of wax (fine for newer boats), or you have some compounding and waxing to do and gelcoat repairs to make, all such work begins with an enthusiastic washdown.
Washing and Waxing Gelcoat
The first step to restoring gelcoat is to flush away loose bits of winter’s airborne detritus with a simple hose-down. This is followed with some serious soap-and-water scrubbing. Scrub-brush-bristle stiffness is linked to the age of the gelcoat—soft bristle for new boats, medium bristle stiffness for the three- to five-year-olds, and even stiffer brushes for older, oxidized classics. This job is aimed at removing most of the stains, streaks and unwanted marks on the topsides and decks. Try to accomplish this with the least-caustic, biodegradable, environmentally friendly products. For example, see if some white vinegar on a cotton cloth will dislodge stubborn stains. If not, try Windex or Simple Green before reaching for a fine mesh scrub pad, acetone or other aggressive solvent. The goal is to avoid prematurely cutting into, or chemically destroying, the hard, outer surface that an intact gelcoat delivers. Hopefully, at least for the first few years, washing and waxing will suffice, and the need for more-abrasive scrubbing can be postponed.
Older boats, or those with less well-maintained topsides and decks, might require chemical and/or abrasive cleaning and polishing prior to waxing. In such cases, less is more, which means trying to remove as little gelcoat as possible during a more aggressive cleaning process. The good news is that gelcoat is much thicker than a paint finish, but over the years, wet sanding and/or too much use of abrasive compounds will prematurely remove the coating. When a deeper gelcoat cleaning is necessary, and stronger acids, bases or solvents are handled, wear heavy-duty dishwashing gloves and try to keep the chemical use as localized as possible. Older, oxidized surfaces are harder to keep clean and are porous enough to soak up stains from tannic acid (the ICW merit badge). Stain-remover products from Star brite, 3M, Marykate, FSR, Boat Brite and oxalic acid (available at West Marine) chemically clean the surface, but over time it will continue to become more porous. Compounding and waxing helps to lessen porosity.
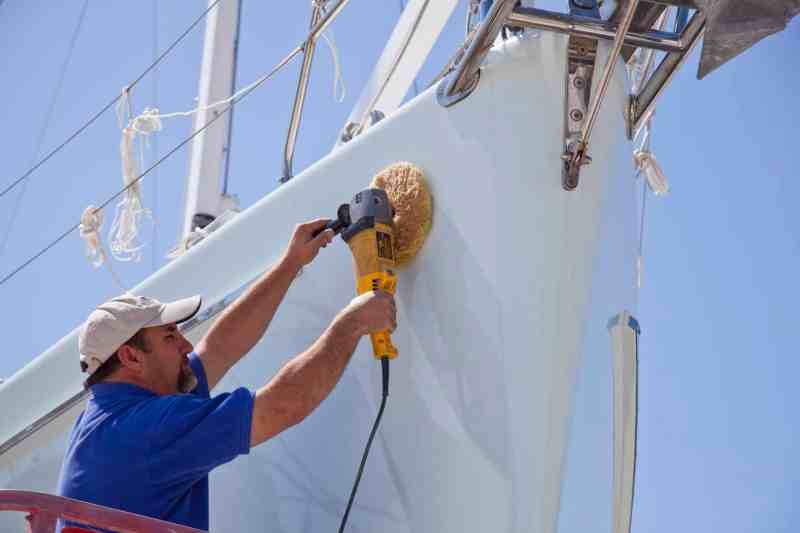
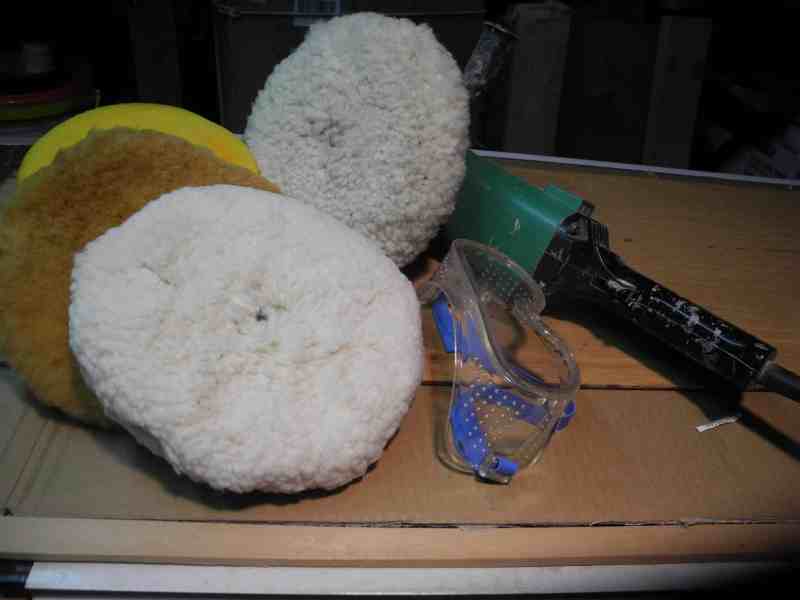
The approach to compounding a highly oxidized gelcoat is called cutting and buffing by the pros, and makes use of several different grit pastes and polishes. These rubbing compounds are simple to apply but tedious to use. The process can be expedited with a variable-speed power buffer and some waffle-foam-pad polishers that work in conjunction with the rubbing compound to cut away the porous oxidized gelcoat. The polisher also spins a wool-pad buffing wheel that brings back the shine. The key to success lies in doing a small area at a time and applying only gentle pressure to the buffer as you keep the rotating pad moving back and forth over the surface. Too little movement, too much pressure or too gritty an abrasive can result in a “burn through.” To prevent such gelcoat damage, use a soft touch with the buffer and recognize that less compounding is better than too much.
Once all the rubbing compound has been cleared from the surface, a paste wax or liquid polish is used to create a protective layer over the compounded surface. Products by 3M, Meguiars and a long list of others fit the bill. These liquid-polish products contain wax plus other chemicals that bond to the surface, making the skin less porous and less susceptible to staining. Some sailors still prefer multiple coats of a high-carnauba-content paste wax. The process requires more buffing but does deliver an admirable shine. Both approaches yield great initial results, and an extra coat of wax does extend the gleam. When washing the boat, be sure to avoid or reduce the use of wax-cutting detergents. Instead, do a few freshwater hose-downs (sans soap) in between all-soaped-up scrub-downs. Clean the waterline regularly with a sponge rather than waiting too long and having to use an abrasive scrub pad.
When the ravages of time really start to take a toll, especially on dark-colored gelcoats, there’s one last alternative to a costly paint job. It involves the use of products called gelcoat restorers. They belong to a generic group of acrylic or urethane-modified sealants that penetrate the porous surface of older gelcoat, and quickly cure and generate a more reflective—and therefore, more glossy—wet look. Application involves sponge brushing or rag wiping the gloss restorer on the gelcoat. It delivers a season’s worth of renewed gleam. And though not quite a fiberglass fountain of youth, the gloss can be rekindled the next year with an additional couple of coats. Each one is easy to apply and very quick-drying, and all can be applied in one day. Brands such as Poli Glow and NewGlass2 are solid performers and work best on well-cleaned, dewaxed surfaces. The gloss resurrection they deliver is bold, but surface damage, scrapes and scratches also become more noticeable, so cleaning and repairing gelcoat prior to application is a must. As with all coating systems, good prep work pays off.
Repairing Sailboat Gelcoat
Topsides attract scrapes and gouges like a magnet lays claim to iron, and each one reminds the skipper of a lesson learned the hard way. Fixing these promptly prevents moisture from entering exposed laminates and fades the memory of the mishap. Most handy do-it-yourselfers can master minor gelcoat repair. First, the perimeter of the ding is sanded with 220-grit sandpaper, dusted off, and then wiped with acetone. There are gelcoat-repair kits available—such as Evercoat’s Match n’ Patch and West Marine’s Gelcoat Repair Kit—that include coloring agents so you can mix the shade to match your boat.
Gelcoat needs an oxygen-free environment in order to properly cure, so most kits also include a sheet of Mylar or plastic to cover the patch during the curing process. The plastic will also help to level and smooth the surface. Once the gelcoat cures, some wet sanding and feathering is usually necessary, especially around the perimeter of the repair. Wet sand with 320-grit, followed by 600, then 1,200; then use a fine-grit polishing compound and a good wax. If care has been taken during the prep process, and the color match was good, only the person who did the touch-up work will be able to locate the original gouge or ding.
Ralph Naranjo, the author of The Art of Seamanship, has managed a full-service boatyard and tested a wide range of coating restorers and paint systems.
Ralph Naranjo, the author of The Art of Seamanship, has managed a full-service boatyard and tested a wide range of coating restorers and paint systems.


