I recently installed solar panels on Toad, a 32-foot steel sloop that the owner was fitting out for extended cruising. The goal was to maximize output with a simple self-managing system that would be robust enough to keep the basic devices on the boat running indefinitely. Gear that would rely on the panels included refrigeration, lights, fans, laptops and navigation equipment, including a chart plotter. The goal was to provide enough power to minimize the need to use the engine to charge the battery bank while living aboard and on passage.
To get started, we used the battery monitor to map the power usage of each electrical device and determined how much electricity each would consume in a day. For instance, the refrigeration compressor draws up to 4.5 amps, and in the Bahamas and southern waters, where the boat was headed, we figured it would run 12 hours daily. We went through each piece of gear the owner had aboard, and we were able to estimate that 60 to 80 amp-hours would be used in a 24-hour period when the boat was in use, and 15 to 20 amp-hours would be required when the boat was left unattended. If your boat doesn’t have a battery monitor, you can still get an idea of the current drawn by the respective units by referring to the manufacturer’s specifications. Some multimeters can also measure current draw; you’ll need to disconnect and bridge each unit’s positive power-supply lead.
The only space available for permanently mounted panels on Toad was above the bimini, where there was room for two 100-watt panels to be secured on a custom rack. With the two panels totaling 200 watts in ideal conditions, we could estimate their output in real-world terms. The average voltage output of the panels when charging is 13 volts. To determine the amperage, watts are divided by volts; in this case, the equation would be 200 watts/13 volts = 15.4 amps.
Solar panels function best when they are directly pointed at the sun with no cells shaded. With the permanent mounting system on Toad, the panels would function at full output for only a few hours each day while the sun was almost directly overhead. During other daylight hours, there still would be some output; my seat-of-the-pants estimate was that the array would be exposed to the equivalent of five hours of full sunlight in a given day, giving us roughly 77 amp-hours in a 24-hour period. I arrived at this figure by multiplying the 15.4-amp output (calculated above) by five hours.
Given the location of this installation, I was certain that at least some of the cells on one or both panels would be shaded from time to time. If a solar panel’s individual cells are wired in series, its output is directly related to the sum of its cells. If a couple of cells are rendered useless due to shade, the entire panel effectively ceases to charge the batteries when the output voltage drops below the voltage of the batteries. The way around this loss is to wire the panels in series with each other, bumping the solar output voltage to 24 volts at peak charging levels. This effectively makes the array one large panel. It also allows the unshaded cells to keep producing useful power — less than the peak output of 24 volts, but more than the voltage of the batteries, roughly 12 volts. In this case the panels are connected to a charge controller that converts the voltage to the 12 volts needed by the batteries. There is some loss of power during the conversion, so wiring the panels in this way only makes sense if cells are likely to be shaded.
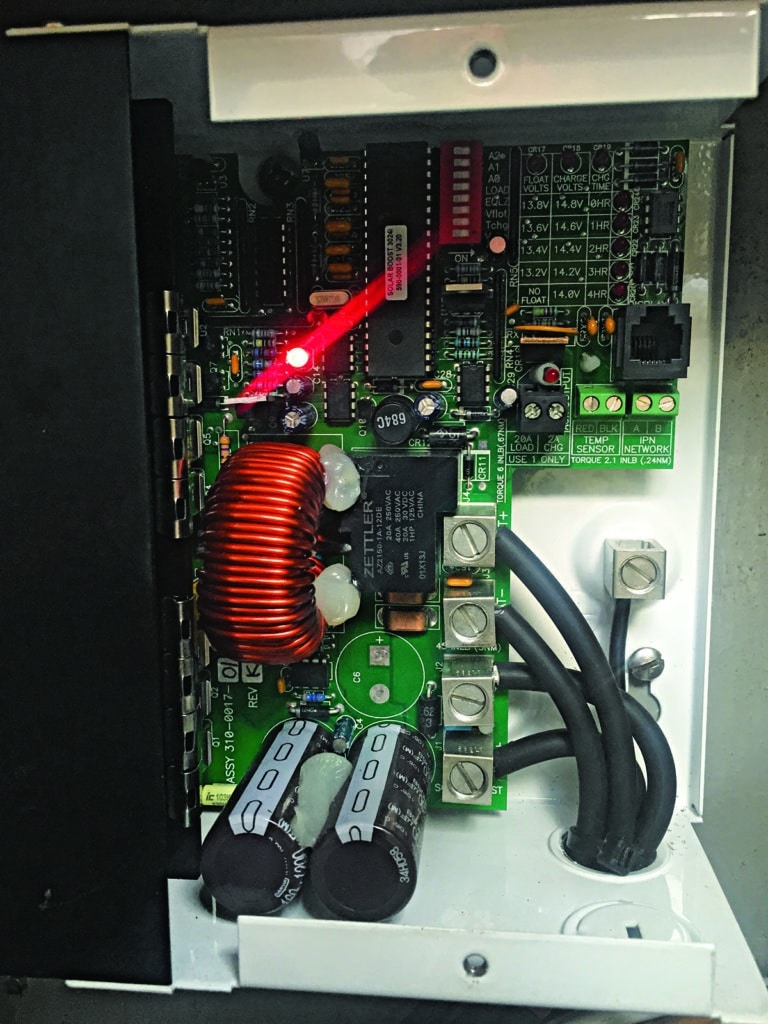
Solar panels should never be wired directly to the battery bank. Doing so can overcharge the batteries, causing catastrophic failure. So in addition to converting the output from the panels aboard Toad to the correct voltage, the charge controller monitors the charging voltage and bleeds off excess power in the form of heat. I chose the Blue Sky Solar Boost 3024i because it is a quality charge controller. It can accept up to 30 amps input (allowing for expansion of the alternative-energy system at a later date) and will accept either 12-volt or 24-volt input while automatically adjusting the output to the correct charging voltage needed by the batteries.
The panels for Toad came from Windy Nation, one of the most reasonably priced solar-equipment suppliers around. I’ve had good luck with their panels in the past (I use two on our sailboat, Lyra). The panels, plugs and most of the wire were purchased from their website (see “Useful Links and Products”). While the wire is not ABYC-color-code approved, it is properly tinned and has a good UV cover.
Jeff Serrie of Island Marine Canvas in Newport, Rhode Island, was fabricating a bimini and enclosure for the boat while I was designing the solar charging system. He created a lovely rack for the boat that can be easily adapted to most biminis. The rack consists of two rails attached with T-fittings to the spreader rods that tension the bimini assembly. The rods have threaded ends and function much as turnbuckles would. The panels were bolted directly to the rack with through-bolts.
Using the MC4 wiring plugs I ordered, I exchanged the male and female plugs on one panel so the positive and negative outputs were swapped from the factory’s configuration. Thus the panels would be in series when plugged into the MC4 T-branch connectors.
I brought the wires from the branch connectors down the radar pole to the Blue Sky Solar Boost 3024i charge controller, which was mounted in a dry and well-ventilated area of the cockpit locker. From the controller, the positive output wire was led to a 30-amp circuit breaker near the battery bank, and then to the positive terminal on the battery charger post. With this configuration, the panels will charge the house bank even if the main battery switches are off, allowing the batteries to charge while the rest of the boat is shut off. Turning off the circuit breaker will stop the solar charging.
The Blue Sky Solar Boost 3024i has a simple DIP switch and LED system that allows you to customize the unit’s output. Variables include charging times and voltages for bulk, absorption and float charging. I set these variables to the specifications of the boat’s battery type, in this case AGM Group 31 batteries from West Marine. The battery bank consists of four 90-amp-hour batteries, making it a 360-amp-hour bank. For more information on setting these variables, consult the manuals for your battery type and charge controller.
The last thing to do was to turn on the circuit breaker and verify that the sun was charging the batteries. A simple test of watching amps coming in on the battery monitor while unplugging one lead on one panel and then the other verified that both were producing a charging current.
Installing a solar-panel battery-charging system is simple to do and well within the capabilities of most boat owners. As I sat down to write this story, I contacted Toad’s owners, who were then three months into a cruise to the Bahamas. They were in George Town, Exuma, and had made numerous offshore passages, living aboard full time, since the boat left Rhode Island. When I asked how the solar system was doing, they said, “The solar panels? I don’t know. We don’t really pay attention to them.” This was perhaps the best reply the system’s designer and installer could hope for — the solar array is flawlessly keeping up with their requirements and needs no maintenance.
Green Brett is a waterfront handyman in Newport, Rhode Island, where he is a charter captain aboard his family’s Reliance 44 ketch, Lyra. Find out more about the boat at onwatchsailing.com.