It’s easy to be satisfied enough with cruising sails. Seasonal sailing and a nearby sail loft minimize the consequences of any problems. Offseason, local sailmakers inspect and repair. They might report that those sails won’t last forever, while pushing a glossy brochure featuring impressive new technology into your hands. But cruising sailors are…frugal. For seasonal sailors who are careful with their canvas, cruising sails can work well enough for a decade or more. However, shift to a sabbatical cruise in the Caribbean or extended voyaging through the South Pacific, and the consequences of worn and torn sails grow quicker than wind in the leading edge of a squall.
In 2015 we were enjoying the wild, far side of the world on our Stevens 47, Totem. The Indian Ocean offered Nelson’s lauded Trincomalee Harbour in Sri Lanka and countless Maldivian reefs as prized playgrounds for a relatively small group of offshore sailors. Along the way, MacGyver-ing autopilots, outboards and other gear into working order was common. “If it breaks, we can fix it or do without” is a self-fulfilling axiom when remote. But sails that withstood one squall too many began to fail. A common repair using adhesive Dacron proved inadequate. MacGyver-ing cruisers struggled without a nearby sail loft.
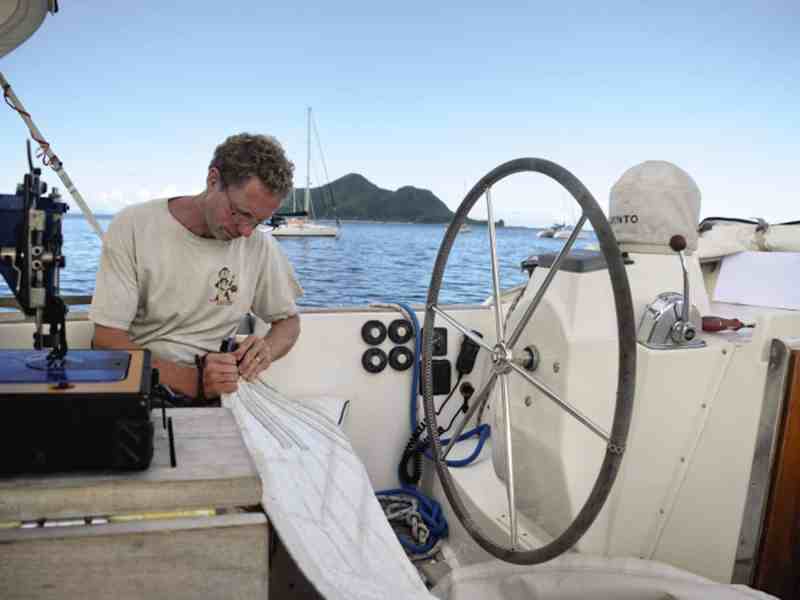
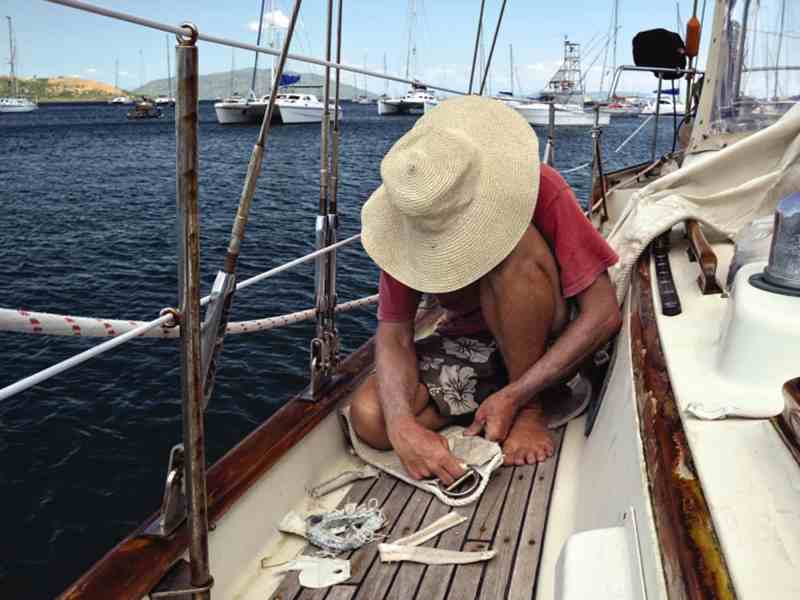
Fortunately, there was an experienced sailmaker in the group: me. I’d repaired sails in unloftlike places before, such as the inside of a stiflingly hot shipping container in Antibes, France, tweaking a 900-pound Kevlar genoa for a 120-foot sloop. While cruising on Totem, I repaired sails in roomy cockpits, skinny foredecks, splintery docks and on an idyllic beach. No clean, spacious sail lofts inhabit remote-cruising reality.
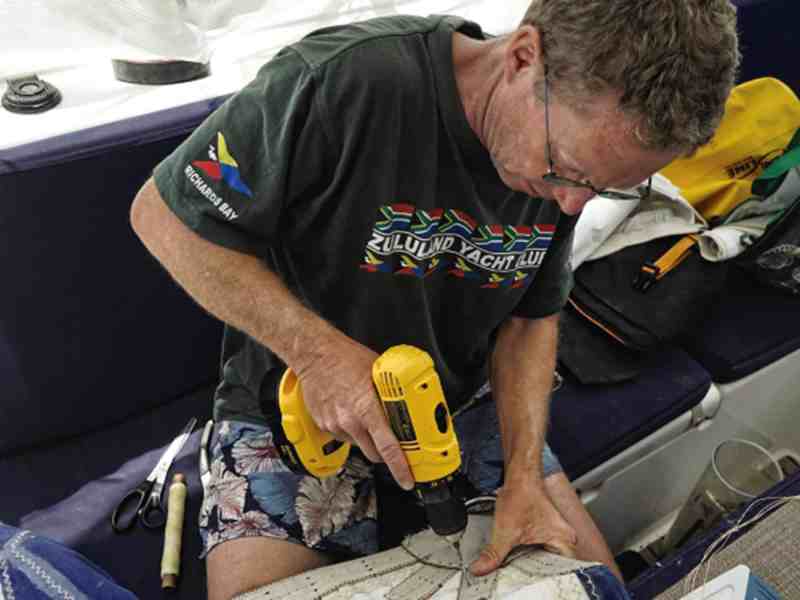
I am a sailmaker without a sewing machine. Not a problem: There is usually a cruiser nearby eager to lend their machine. Good Samaritans abound when it comes to sewing machines, with the caveat that “it might need a tuneup.” This sets up a trade triangle. I correct the machine’s timing and smooth the burred hook so that it sews. Then I sew the failing UV cover—shredded cloth fluttering from the genoa leech like Tibetan prayer flags—back onto the sail. In exchange for the repairs, I receive sincere gratitude, thus keeping alive the tradition of impoverished, appreciated sailmakers.
At uninhabited Salomon Atoll in the Chagos Archipelago, Ripper’s (not its real name) crew carefully piloted into the coral-head-studded lagoon. Once secured on a mooring, Ripper’s crew asked for help repairing two sails damaged on passage from the Maldives. Before seeking out a Good Samaritan with a machine, I dinghied over to assess Ripper’s sails. At a glance, I winced, knowing that any repair would be unreliable.
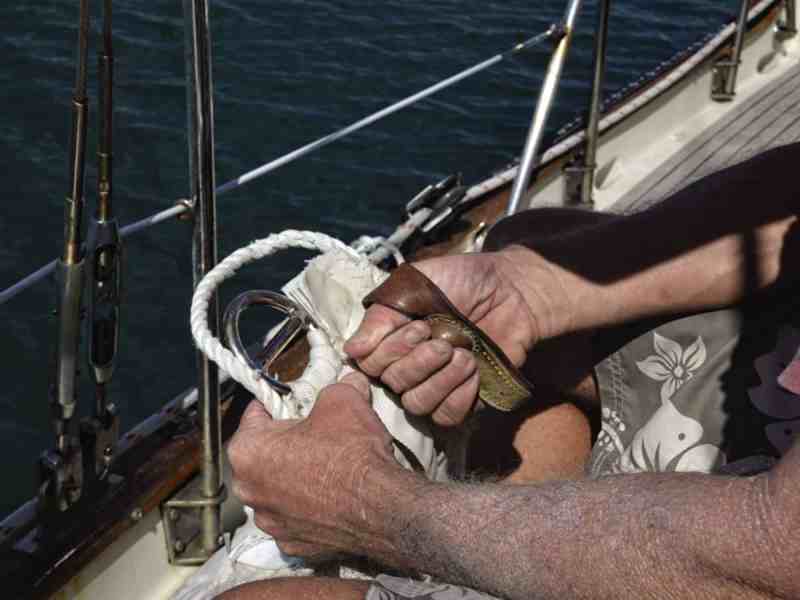
Before explaining the issue, I demonstrated it. Pinching each side of a tear, daintily for effect, just a light tug easily tore it further. Ripper’s crew winced. “What are you doing?” they demanded. The sailcloth was like tissue paper, badly damaged by the sun. Unrepairable. That four-year-old sails built for offshore duty could be rotten confounded the crew. How did we stare at these sails over thousands of miles, without a hint that they were doomed? they wondered.
It’s ironic that long-distance sailors often learn more about suturing pork bellies and analyzing diesel-injector spray patterns than inspecting the sails that muscle them so far. Those skills are worthy of practice, especially suturing with its similarity to hand-sewing sails. But skill in sail inspection is attainable without years spent crawling around sail-loft floors like a deranged J.R.R. Tolkien character. Fundamental knowledge about sail materials is the crystal ball required to seeing problems before they happen.
Sailcloth 101
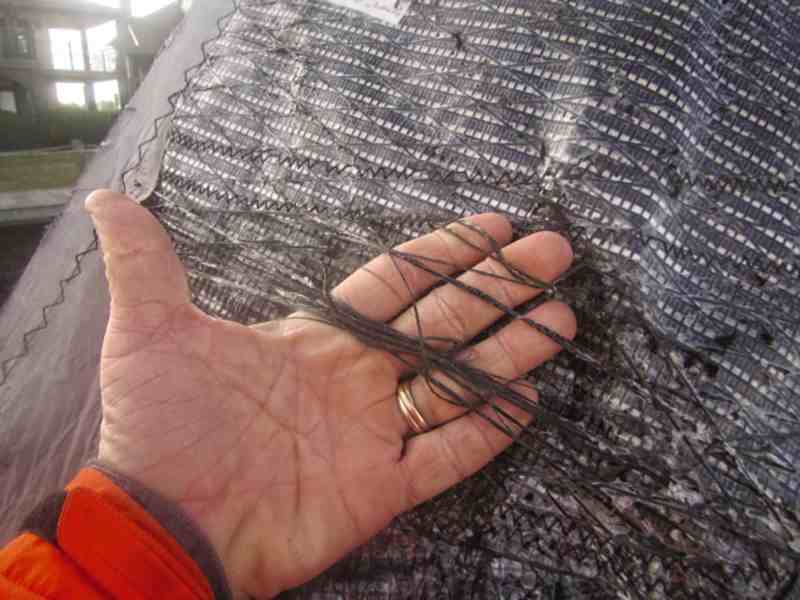
Fibers bundled together make yarns. The more fibers there are in a yarn, the thicker, stronger and heavier it is. Weaving yarns mechanically locks them together with strength in two directions. Fill yarns run across a cloth roll. Perpendicular to those are warp yarns that run the length of a cloth roll. Diagonal to fill and warp yarns is called cloth bias. Without diagonal yarns in woven cloth, the bias has more stretch and less strength. This Achilles’ heel of woven cloth is mitigated somewhat by very tight weaving and synthetic coatings to rigidly bind the yarns into place.
Another method of making yarns into cloth is by chemically bonding them with other material layers. Though there are different lamination techniques, they all rely on the integrity of chemical bonds. The same fill, warp and bias direction apply but without being limited to fill and warp yarns only. Laminated sailcloth can and often does have diagonal yarns that give bias strength and stretch resistance that woven sailcloth cannot match. Laminated sailcloth and the construction options that it enables are far superior to woven sails in all measures but one: Chemically bonded layers are less tenacious than woven yarn.
Frugal cruisers like tenacious sailcloth. Dacron offers durability and economy, so it’s no surprise that woven Dacron crosscut for upwind sails and woven nylon triradial downwind sails remain the most common choice for boats up to about 55 feet. Sometimes, trauma—as in an uncontrolled jibe—can bring an unexpected end, even to tough sails. The role of DIY sail inspection won’t prevent botched sailhandling. It does help sailors to stay tuned to subtler issues like UV damage, chafe, bias distortion and delamination (of laminated sails) that degrade structural integrity.
Sail Inspection
I divide sail inspection into two categories: passive inspection and active inspection.
Passive inspection
While sailing, do more than admire your beautiful sails. Inspect them. It’s a hands-off, zoomed-out approach and still helpful. Try to position yourself so the sun is shining through the sail toward you. Look for variations in the light passing through the cloth for possible signs of 1) subtle tears; 2) a line of weakened yarns from hard or repeated creasing; 3) an area of thinned cloth caused by chafe; 4) pinholes from bias distortion that loosen the weave; and 5) discoloration from UV damage (can also be dirt, which requires more testing).
When sailing downwind, look where the mainsail lies against rigging. This points to obvious chafe spots to check during an active inspection. Keep in mind that those spots change when reefed. Is better chafe protection on rigging or sails necessary?
While sailing upwind, look for damaged sailcloth where the genoa leech impacts rigging. In an active inspection, the cloth there might feel much softer than other parts of the sail. On the mainsail, look for horizontal wrinkles projecting outward from luff attachments. If halyard tension is good, these wrinkles might indicate a luff hardware misalignment. Luff slides shouldn’t carry much load. Misalignment can lead to distorted or torn sails and broken hardware. Also note that the battens should present a smooth curve. Irregularities could be a fracture or break that can hole a sail very quickly.
Active inspection
Up close and hands on gets to the heart of sail inspection, but finding a space to do so can be challenging. If you’re able to lay the sail flat, inspect the top surface and then flip the sail over to inspect the other side. When space is insufficient, inspect in smaller sail sections that fit the available space. In the absence of a suitable workspace, go vertical. On a windless day, hoist up a sail several feet at a time, inspecting both sides as you go.
Downwind sails made with thinner, lighter cloth are easier to inspect. Tie a line to the head of the sail and secure it to a fixed object, such as a tree or bored crewmember. Near the head, lift the sail overhead, with arms held high and apart. Then slowly walk toward the foot, with arms fixed in place, forming a 3-foot-wide viewing area of sailcloth. Think of this as a sailmaker’s X-ray machine, looking for light and color variations as the cloth slides by over your hands. Downwind sails are easily damaged by snagging on fixed objects and need this active inspection to surface a problem.
Upwind sails get too heavy to inspect in the same way. Instead of the X-ray-machine approach, traverse the top surface in 3-foot-wide swaths. Scan the surface of the sailcloth for abrasion, frayed yarns, small pinholes and, of course, more-obvious tears. Remember those downwind chafe spots you noted on the mainsail? Look there. Take note of color variations. Is it soiled, as we see on Totem’s sails in the dusty and rainless Sea of Cortez? Or more of a yellowed patina from baking in the sun? If an area shows possible damage, slip under the sail to look up through as a kind of spot X-ray. Subtle topside damage might shine through clearly from below.
Feel the cloth surface for textural differences and areas of greater roughness. This can indicate degrading sailcloth. Crinkle the cloth to gauge the hand. Dacron and nylon tend to be crinkly from coatings added for bias stability. Softer areas indicate that the coating is chafed or failing from excessive bias stretch. This was the case with Totem’s genoa by the time we rounded South Africa after a sporty Western Indian Ocean crossing. Crinkling laminate cloth can reveal delamination—failed chemically bonded layers. Delamination is revealed by a higher-pitched, extra-crinkly sound.
Test stitching integrity by scratching a thumbnail firmly across stitching. Broken stitches indicate that the thread is rotten from UV. Fraying stitches indicate rotting thread. Both conditions are repairable if the sailcloth isn’t also rotten. Stitching that tends to get more exposure is on UV covers; the mainsail leech, which might not get covered as soon as the sail is lowered; furled downwind sails (screecher, cruising code-zero) that have little or no UV protection; and webbing reinforcement exposed on furled sails.
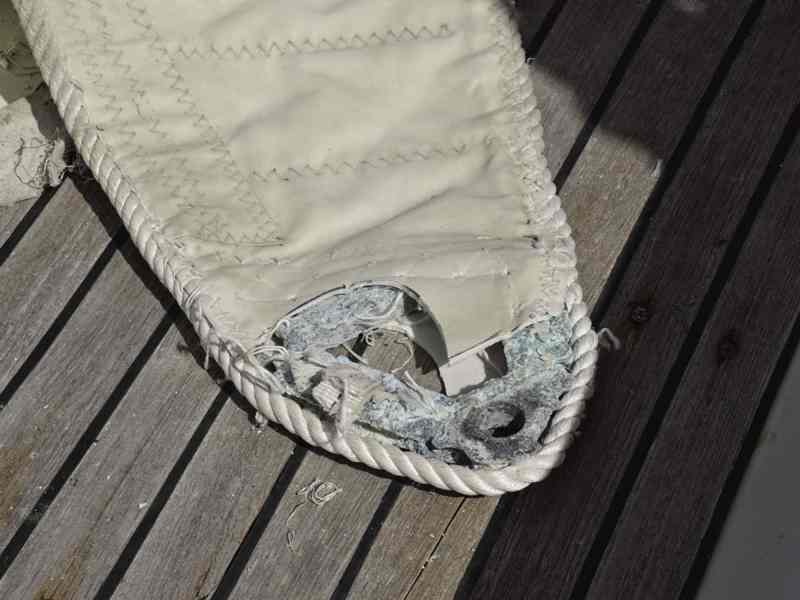
Inspect sail hardware. Metal sail hardware isn’t affected by the sun, but it can wear, corrode and deform. Inspect battens—along with the pocket—especially at the ends for wear from point loading. Inspect luff cars with low-friction bearings. Worn or lost bearings and ongoing use can irreparably damage the car and track. Plastic hardware degrades from UV; check it closely for discoloration and rough surfaces, which might indicate damage.
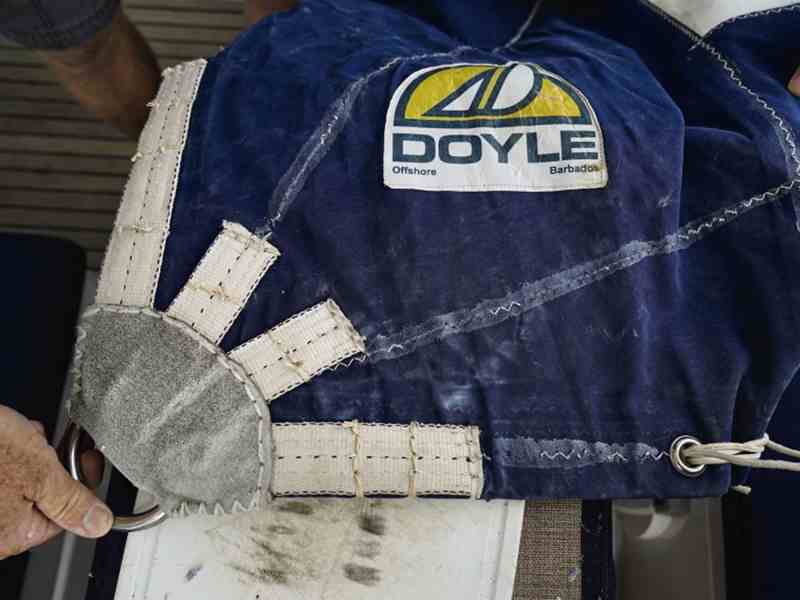
On passage to Madagascar, the crew on another boat in our group shredded their mainsail. No problem—they had a spare! Unbagged, the spare main’s mildewed funk put it to question; upon inspection, the aluminum headboard was a corroded, crumbling mess. I repaired it by installing a large stainless-steel ring, secured by hand-sewn polyester webbing straps.
The Tear Test
For crosscut Dacron sails that have done time in the sun, the only way to truly test sailcloth integrity might make you cringe. Gauge sailcloth strength by deliberately tearing it a little, just as I did with Ripper’s main. Make a 1-inch cut parallel to the fill yarns (across the crosscut panel width) in the suspect area. Then tear it a little by hand. If it tears like tissue paper, it’s rotten. If it tears with relatively little force, then it’s rotting.
Yes, this method hurts! Review UV damage indicators before cutting into a potentially good sail. Those indicators include areas with discoloration (not dirt), rough texture, pinholes and very softened hand. If the cloth is suspect and your local sailmaker isn’t nearby to say otherwise, this is a sure way to verify cloth integrity before going on passage.
I recently taught a class on sail inspection to a group of cruisers in Mexico. Within a few days, three students reported testing and confirming rotten sailcloth. All expressed sincere gratitude for help exposing this before departing on the 3,000-nautical-mile passage to the South Pacific (made impossible later due to COVID-19 restrictions).
Ripper sailed 1,200 nautical miles to Reunion Island with old sails and a conservative sail plan. There they collected new sails and carried on to circumnavigate the globe. Journeys and destinations get woven into the sailing adventure of a lifetime, one yarn at a time.
A former sail designer for America’s Cup and Vendée Globe competitors, Jamie Gifford now focuses on cruising boats.
More Cloth Smarts
Polyester fibers that make up Dacron sailcloth degrade at the same rate from UV exposure. However, differences in the yarn sizes make or break sailcloth strength. Exposed outer yarn fibers degrade from UV exposure. And they act like sunscreen to protect the inner fibers. But small yarns have few inner, undamaged fibers. This is why we orient the tear test with the cut parallel to the fill yarns. It’s the smaller warp yarns being tested. And this point is a consideration for new sail choices. High-aspect Dacron uses small warp yarn to dedicate great fiber density in the fill direction, thus making the warp yarns more susceptible to UV degradation. This is the case of failure for most UV-damaged sails. Low-aspect Dacron is a better choice for tropical sailors, even with a high-aspect-ratio rig.
DIY Tips When There Is No Loft
- Sewing thick layers: Pull out your power tools, and pre-drill holes for stitches with a small bit.
- Patching the torn test area with adhesive Dacron: This is suitable for sails with rotten cloth, where the sailor needs to eke out just a little more use. Wipe the repair area with acetone, and then apply two layers of adhesive Dacron.
- Patching the torn test area with 3M 4200: This is suitable for a sail that retains cloth integrity. Cut a Dacron patch (similar weight to the sail) that is about 1.5 inches longer on each side than the tear. Wipe the repair area with acetone. Spread a thin layer of 3M 4200 FastCure over one side of the patch. Press the patch over the tear. Be sure the patch stays pressed into place until cured.


