It all started with a YouTube video on a rainy summer day in Jamestown, Rhode Island; I was 12 years old and had stumbled upon a channel called Wicked Salty. The videos, by a guy named Wes, depicted his adventures and the refit of a small sailboat in nearby Massachusetts. The endless horizons—and the self-sufficiency—depicted in the vlogs tickled my sense of adventure, launching my own dreams of a day when I might start a similar project.
Flash forward a few years to summer 2016, when I saw a cover story in Cruising World about nautical photographer and sailor Onne van der Wal’s extensive refit of a Pearson 36. Van der Wal not only wrote several stories about his various projects and challenges, but at the same time he documented the whole project through his lens. That part really set his project apart from all others, allowing me as the reader to become a part of the process. I now had a new goal: Fix a boat and record the whole project.
The Beginnings
Fast forward to 2019. I was now 17, it was the fall of my senior year. For my senior project at Tabor Academy, in Marion, Massachusetts, where I was also on the sailing team, I’d decided to tackle that long-anticipated boat refit. It would combine my love for photography (I’d actually met and even worked with Van der Wal by now, who was particularly encouraging), building things and sailing. I was decidedly excited about the idea. I was missing only one thing: the boat.
I reached out to everybody I knew who might know of a tired boat. Then, in class on a sunny day in early September, I got an email with the heading: “FREE BOAT! PEARSON 26, NEWPORT RI.” Oh yeah. I checked out the photos; she looked to be floating well enough. And I immediately thought to myself, Why not?
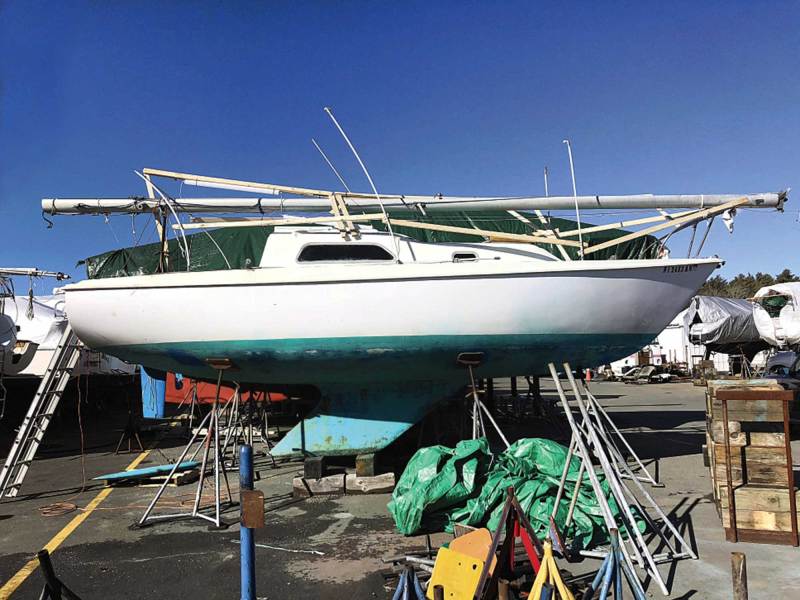
Not one to wait around, I introduced myself and my idea to the owner, a lively Newport native named Herb McCormick, who happens to be the executive editor of this magazine. A week or so later, my (skeptical) dad joined me to meet McCormick in person and check out the Pearson. She looked tired, but behind her faded, teal-green deck paint and slightly odd aroma, I could see the potential for adventure.
Sitting there on the starboard berth, all I could think about were the great projects and adventures to come. I had heard that Pearson 26s were sturdily built. The 1973 classic plastic had a solid-fiberglass hull, but other than that, it needed a lot of cosmetic work. As McCormick put it straightforwardly, the two best bits were the galley table and the head (a previous owner had owned a marine-plumbing business). Other than that, it needed quite the refresher. After I was done looking around, McCormick asked the big question: “So, do you want her?”
“Yes!” I respond.
I shook his hand. Just like that, I was a boat owner.
My introduction to boat ownership, however, was not sugarcoated. A couple of days after acquiring the Pearson, a 50-knot nor’easter barreled through southern New England, and an email from McCormick later that morning informed me that the headstay toggle had failed and the deck-stepped mast had gone over the side. Yikes. I thought all was lost, but McCormick and the harbormaster got the spar out of the drink and back on board, for which I am extremely grateful because it saved the project.
I was quickly learning that sometimes you just have to look at the bright side. In this instance, I realized I’d saved a few hundred bucks to unstep the mast. With my first incident under my belt, and many more storms coming, I knew that it was time to get the boat out of the water, and had her hauled and trucked to Brownell Systems in Mattapoisett, Massachusetts, which is close to Tabor.
With the boat on stands, it was time to start work, but I needed to find paint and other supplies. Luckily, early on I was introduced by Van der Wal to the incredible team at Jamestown Distributor’s TotalBoat (totalboat.com), specifically Kristin Browne and Mike Mills (it’s largely because of their partnership with the project that I was able to complete it on time and within budget). Their easy-to-use products, expert advice and endless support were paramount to my success. From the nonskid deck paint on the cabin top to the barrier coat at the bottom of the keel, I used TotalBoat products exclusively for the painting and refinishing, and I could not be happier with the results. With great supplies and a power sander in hand, it was time to truly get started.
The Games Begin
It was the moment I’d been waiting for. Like a deer prancing in a forest, I bounded into my bright-white Tyvek suit, strapped on a respirator, and flicked the switch that got the random orbital sander whirring. My first project, refinishing the port cockpit locker, was underway. Man, it was hot, dirty work…but a weird part of me loved it. For hours in that tight locker I sanded and sanded off the old, flaking paint, revealing a clean surface begging for fresh paint. I then cleaned the area with a shop vacuum and did the surface prep before whipping out my first can of gray bilge paint. I happily rolled on the epoxy paint, stepped back and admired my work. Painting a sail locker is a small feat, but the sense of accomplishment was awesome.
Next up were the coachroof windows. When I got the boat, both of them leaked quite a bit. I talked with a neighbor, who had the same issue on his Pearson 36, and he told me my best bet was to remove them, scrape out the old sealant, and replace them using new sealant. The windows on the Pearson 26 are a fairly simple design, with a piece of glass sandwiched in a pair of frames, one inside and one outside. After unscrewing and removing everything, I scraped off the old sealant and used a whole tube of TotalBoat Seal around the inside of the window before inserting it back into the cabin. The windows leak a lot less now, although in a really heavy rain, I do get a small drip. But I will call it a success.
The boat’s main bulkhead in the little saloon was decorated with a dark brown, fake-wood vinyl veneer that really made the cabin feel small and out of date. To fix this, I applied three coats of white paint that made the cabin much brighter and feel like home. I was starting to get places.
But my favorite project was installing a new sound system, which I had purchased at West Marine. Before installing the new speakers, I needed a new electrical panel to wire them to. I decided to install the panel right next to where I was going to install the stereo. After wiring up everything, flipping the switch and seeing the panel light up (yes!), it was time to install the bumpin’ new speakers. Conveniently, there was already an old, broken system in place, so when I bought the new one, I made sure it could easily fit into the existing locations. To install the stereo, I used a duplex cable run to the electrical panel and the negative bus. I then plopped the new speakers in place of the old ones and—voilà!—I had music to work to!
Moving on, one of the most useful skills I learned during this project was how to repair a sail. My mainsail had many small holes and tears in the tack that needed to be fixed. I reached out to Ben at Sperry Sails in Marion, Massachusetts, to see if they could assist me in the process. With the guidance of a loft worker named Grey, I began work on the repair. To make the necessary patch, I traced the Dacron and then cut it with a hot knife. Then, for the first time ever, after a quick lesson, I attacked a sewing machine.
To my helpers, my lack of experience was quite obvious from the beginning.
For my first row of stitches, I had the machine in reverse and just decided to feed the sail from the back, thinking to myself, Hmmm, this is odd, but never figuring out why. After a few minutes, Grey caught on to my mistake and helped me literally turn things around. From then on it was pretty smooth sailing, with no injuries or breakages to myself or the machine. Now when my sail needs repair, I will have an idea of how to fix it.
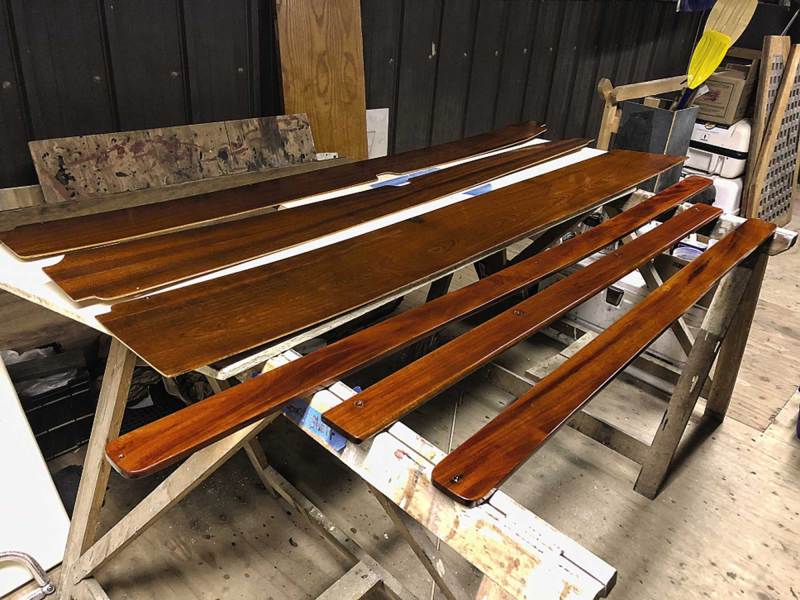
Another satisfying job was sprucing up all the varnished wood on the boat. Most of the varnish down below looked OK, but it needed a few refresher coats. I was loaned the space in a loft at Tabor used for work on the school’s training ship, SSV Tabor Boy, so I removed all the wood from the interior and refinished it there. I sanded everything with 320-grit to scuff the surface before the first coat, and then brushed on three coats of TotalBoat Gleam 2.0 gloss varnish. Next was two coats of Gleam 2.0 satin varnish to give the interior a soft feel. The only wood in really bad shape were the companionway slats, hatch and grab rails. For these, I used a heat gun and scraper to remove all of the original varnish, exposing beautiful wood underneath. I proceeded to sand with 180-, 220- and finally 320-grit sandpaper before applying the Gleam 2.0 gloss varnish. The final result was glowing wood inside and out. Sweet.
By now it was March, time for spring break, and my plan was to spend a couple of weeks in Bermuda at my classmate Felix’s home there. Of course, soon after arriving, COVID-19 began to really descend on Boston, and flying back to New England felt unsafe. A week later, the first cases were diagnosed in Bermuda, and the country suspended all commercial travel indefinitely. We took advantage of this incredible opportunity to do online schooling for the next 60 days in Bermuda (thank you, Cutler family!).
I did accomplish one project for the boat. With the help of Felix’s dad, Alec, I learned how to carve wood and fashioned a new nameplate out of a piece of Bermuda cedar from a 250-year-old building that once stood on Front Street in Hamilton, the country’s capital. The cedar has an incredible smell, and with a coat of varnish, the new nameplate (and the boat’s new name) absolutely glowed in the sunshine: Why Knot? Why not, indeed.
Final Stretch
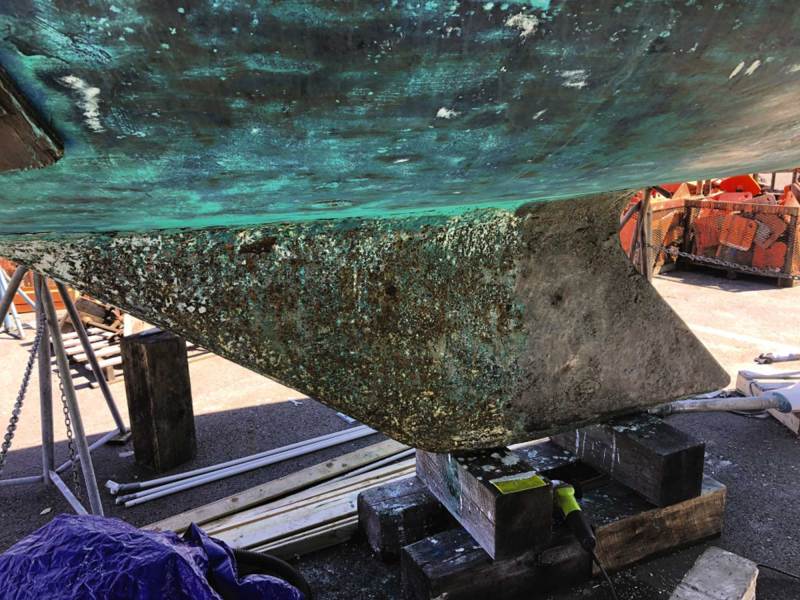
When I first hauled Why Knot?, it was clear that the entire boat needed to be repainted from the bottom of the keel to the top of the cabin. It was also apparent that the keel needed some attention because you could see rust from the 2,200-pound cast-iron foil showing through the bottom paint. Before addressing what would become one of the most physically demanding projects, I talked to a sailor who had had the same issue with his keel. He recommended a heavy wire brush from Harbor Freight and a good angle grinder for the job. Done.
I ground all the way from the bottom of the keel to the keel/hull joint, and applied caulk where necessary. Once I got to the joint, I replaced the grinder with a sander and razor blade to scrape out and replace the old sealant. I then used two rounds of TotalFair epoxy fairing compound to fair the keel, leaving me with a smooth surface. I whirled up the sander and gave the keel a final sanding with 80-grit paper to roughen up the surface before an application of TotalProtect, a two-part epoxy barrier coat. I applied three coats of the paint, allowing it to become thumbprint tacky in between coats. Once the barrier coat had dried, I gave it a quick sand, and then proceeded to sand the entire bottom with 80-grit and repainted it with red Spartan bottom paint.
I was now in full painting mode.
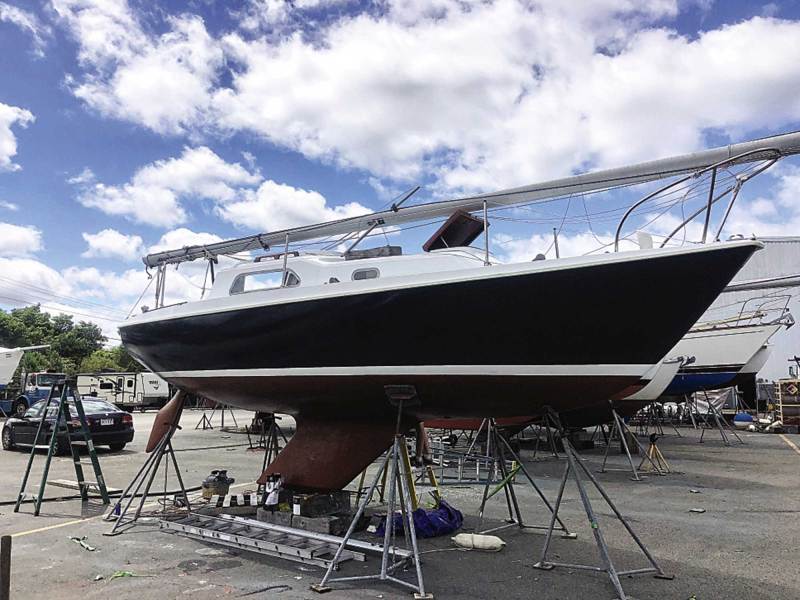
Next was the waterline and hull, on which I used WetEdge topside paint. While I was sanding off the bottom paint, two faint lines in the hull appeared, revealing where a boot stripe should have been. I followed the lines and taped off the area, then painted a white boot stripe using the rolling and tipping method. This was my first time doing so, so working on a small area was good for practicing the technique. The one-part topside paint is wicked convenient because there is no mixing involved and it rolls on very evenly. The result was a glossy white boot stripe that is extremely durable.
With some rolling and tipping practice under my belt, it was time to paint the hull. To prep the area, I sanded off the old paint and taped off the area to avoid any possible drips. I used two ladders with a plank in between to reach the top while painting. With the help of my dad, we painted the hull with three coats of flag-blue WetEdge paint. I am so thrilled with how it came out. The combination of red bottom, white stripe and blue hull is a lovely, classic color scheme for a lovely, classic plastic.
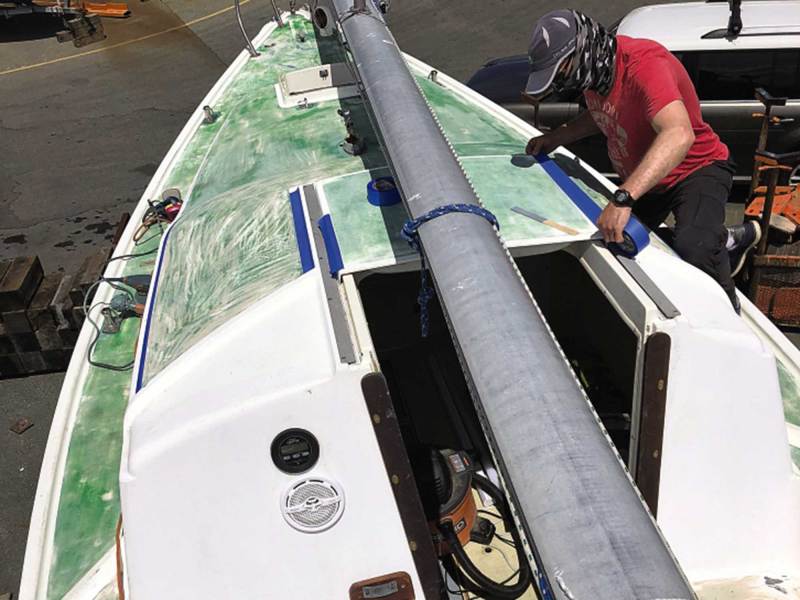
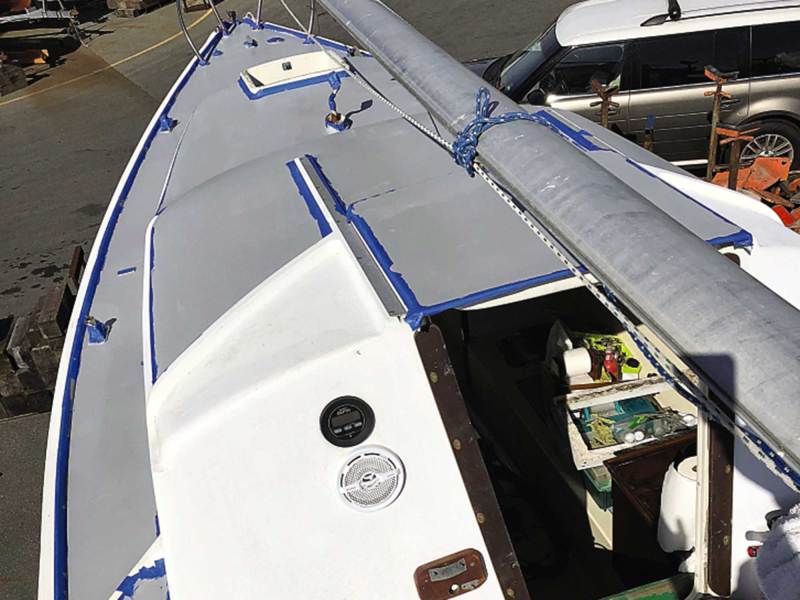
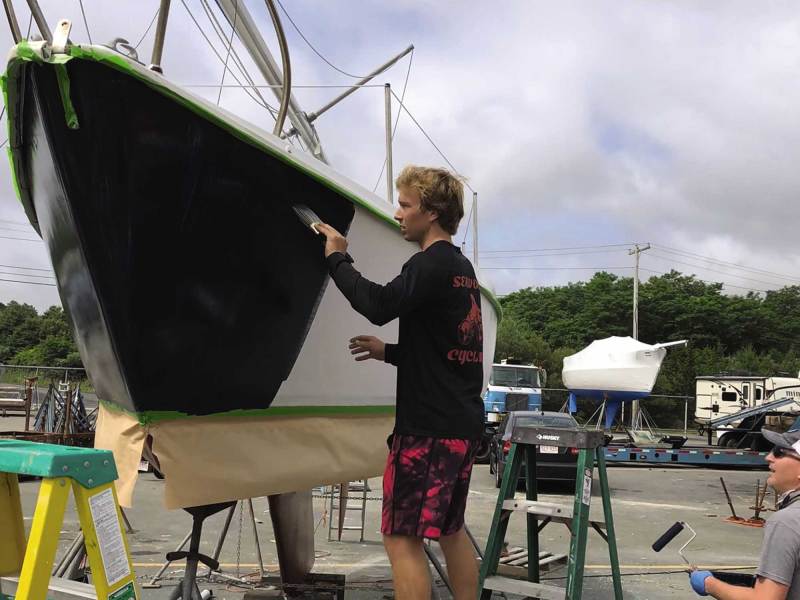
Back on deck, there was still major work to be accomplished. From the moment I’d first stepped aboard, removing the faded-green deck paint was on the top of my to-do list. Everything that came into contact with it was bombarded by green pigment. To solve this problem, I sanded off all of it and repainted it with two coats of light gray TotalTread nonskid deck paint. Watching the deck turn from green to gray really made the boat feel close to completion.
The final exterior painting job was painting the coachroof and cockpit. The old paint was quite dull and needed refreshing. I rolled on and tipped fresh, glossy, white WetEdge paint. After many weeks of sanding, painting and more sanding, I was thrilled to see the finished product ready for launch. I will never forget the first time I stood back and took a look at Why Knot? after finishing it all, seeing her glisten in the sun, begging to be splashed in the ocean.
With the painting complete, the nameplate installed, and new standing and running rigging and lifelines from R&W Rope in New Bedford, Massachusetts, in place, it was time to launch and christen her, which took place after trailering her to nearby Fall River.
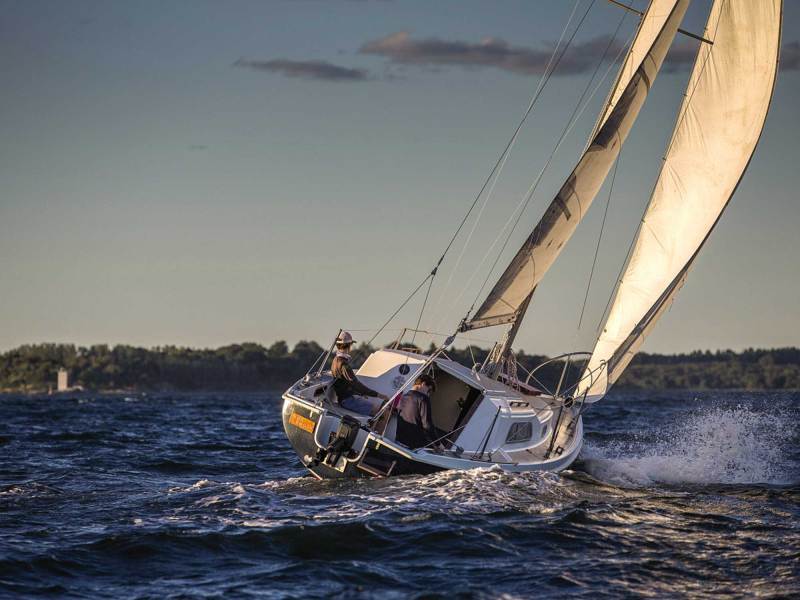
There was absolutely no wind, but we had a strong outgoing tide in our favor, so my family towed me to Jamestown with our Boston Whaler. As we rounded the north end of the island, the wind began to fill in, so I set the sails and sailed her onto our mooring, where she spent the rest of the summer. From there, we took a few Narragansett Bay day trips to Mackerel Cove and an overnighter to Potters Cove on Prudence Island, along with many sails with friends and family. Why Knot? sails as good as she looks. I couldn’t be more excited for the adventures to come.
Stuart Wemple has matriculated to the University of Denver, where he is currently a freshman. Here at Cruising World, we think it’s safe to say he has a bright, bright future.


