Keep the rig up. These four words mean everything to a sailor. Over Lyra’s winter layup, I spent many hours working on her rig to ensure that we do just that. A big part of that came in the form of replacing the forestay, as well as a comprehensive overhaul and inspection of the ProFurl furling system.
Lyra is our 1980 Reliance 44, and has a nine-year circumnavigation and several trans-Atlantic crossings under her belt. Additionally, we’ve been racking up an average of 2,000 nautical miles annually for the past 10 years on a rig that was last seriously serviced in the early 1990s while the boat was in New Zealand. It is a testament to her overbuilt design and uncompromising owners that it has held up well. With the rig out for the first time since we put the boat together after purchasing her 10 years ago, I wanted to address any issues before they occurred.
The furler’s aluminum-foil extrusion had to be removed from the headstay in order to inspect the actual wire; and in order to remove it, the Sta-Lok fitting on the bottom of the stay needed to be disassembled. Even though the existing stay passed a visual inspection perfectly, it proved to be a relatively simple and inexpensive process to simply replace the wire for future peace of mind.
Headstay and Foil Removal
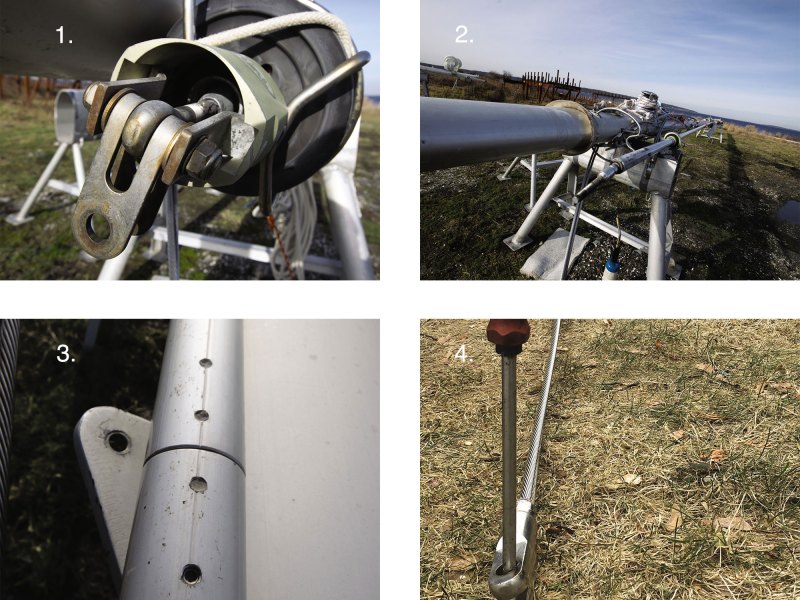
Removing the furling assembly and turnbuckle allowed me to see the Sta-Lok terminator on the bottom of the stay. The two tangs on the outside of the fittings slid down after removing the two Allen bolts in the bottom of the titanium furler base (photo 1). Now the turnbuckle could be spun off.
I next removed the two large Allen set screws that keep the drum assembly attached to the foil and slid it off as well (photo 2).
Using two wrenches to take apart the Sta-Lok fitting, the lower terminator could now be removed. I had to use some heat in the form of a propane torch to break the Loctite in the threads, which was fine because all of the parts that will be reused needed to be cleaned before reassembly.
The foils were now ready to be disassembled. Four Allen set screws kept each connector insert in place inside the foil (photo 3). Mine were sealed with silicone sealant, which popped right out when a sharp screw was turned into it. Once removed, the sections slid apart and off the end of the stay where I had removed the Sta-Lok. Be careful using heat to free the set screws, so as not to melt the plastic bearings that allow the foil to rotate around the wire. I had to drill out a few.
Replacing the Headstay
With some attention to detail and the following items, I found that replacing the wire using the existing Sta-Lok fittings was well within the skill set of the average DIY sailor. The tools needed are a tape measure, hacksaw, masking tape, drill, Scotch Brite pad, wire coat hanger, a couple of wrenches, Loctite, silicone sealant, and new cones for the Sta-Lok fitting.
I sourced 54 feet of 10 mm high-end Loos wire rope from RigPro in Portsmouth, Rhode Island. With the replacement set screws for the foil, the bill came to $545.46. I was fortunate enough to have a spare Sta-Lok terminal, which I installed on the new wire. By anchoring the terminals in the ground with a screwdriver, I could pull the old and new wire side by side to get an accurate measurement of length (photo 4).
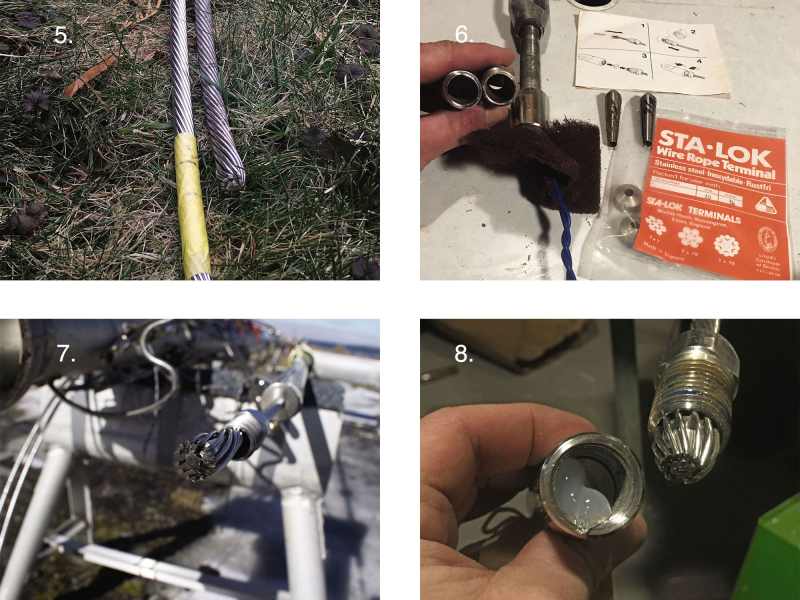
I wrapped the new wire in masking tape for ease of marking and to keep the strands together as I cut them (photo 5). The old stay was a half-inch too long, so I cut the new one a half-inch shorter. Using a sharp hacksaw blade to cut the new wire saves time; any burrs need to be filed smooth.
A wire coat hanger doubled around a piece of brown Scotch Brite pad and twisted back to the drill’s chuck is an easy way to clean out the inside of the old Sta-Lok fittings without damaging the threads (photo 6).
There is an insert buried in the fitting that should be removed for inspection and replaced if it is scored. I replaced the cones that slide over the wire and are captured in the Sta-Lok fitting. I had to keep in mind that the lower terminal installation would need to wait until the wire was back on the mast and the foil was reinstalled.
I had to pre-fit the lower terminal (photo 7). On the wire rope, I slid the top nut onto the wire. Then, I gently unlaid the outside layer of wire strands until the new cone would go in, leaving about an eighth-inch of the core strands sticking out the bottom.
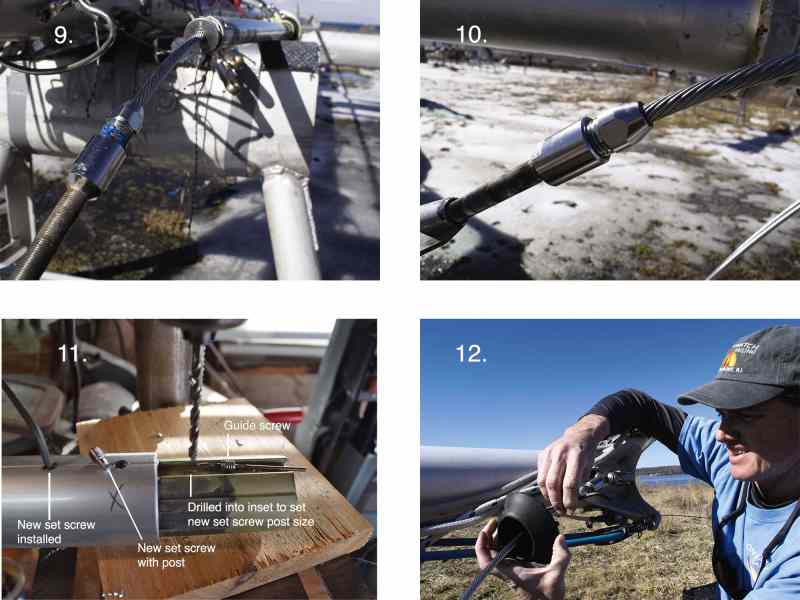
Photo 8 shows the top terminal all gooped up and ready to thread together. The fitting was gently dry-fitted first, so the cone has moved down to its home and the outer strands are bent into place. Last, I added blue Loctite to the threads and put it together (photo 9). Sta-Lok says not to use too much force when tightening, so I went with a very firm feel. Sealant should (and did) ooze out the top. Wipe it clean (photo 10), and it’s all done!
Servicing the ProFurl
The ProFurl furler was in decent shape. There are bearings in the furler unit and top swivel that moved freely and had no play, so I opted to leave them as they were. There was some wear on some of the connector’s plastic bearing inserts, so I bought four sets of them and replaced as needed. The biggest job was to replace all of the original set screws with longer set screws with a post below the threads, an upgrade recommended by RigPro. The idea is that the stud would keep the connectors in place more effectively than the original friction-reliant, cupped set screws did (photo 11).
In order to accurately drill a hole in the connector to receive the stud on the new set screws, I had to make a guide. This was done by drilling out the center of an original set screw with a bit sized to the post on the new set screws. This allowed me to screw in the guide using an Allen wrench, perfectly centering the bit without damaging the foil’s existing set screw threads. The center measurements between holes drilled by the factory are not all the same, so it was important to keep each insert in place and oriented—easily done by dry-fitting the new set screws as I drilled. Once the project was completed, the foil was ready for a cleaning and reinstallation.
Before installing the lower Sta-Lok terminal, I slid each section onto the new stay and assembled the foil after screwing in the foil connector’s set screws with some blue Loctite on the threads. A dab of silicon sealant on top of each screw completed the process. Last but not least was installing the new halyard wrap stop on the new wire (photo 12).
Conclusion
The forestay is one of the most important structural items on your rig, and is subjected to big loads, constant cycling and a corrosive marine environment. Often encased inside a roller furling foil, it is difficult to inspect. While Lyra’s headstay passed inspection, we wanted to have the peace of mind associated with new wire. Given her Sta-Lok system, the headstay replacement was not a difficult process.
The other piece of the puzzle is the furling system. In our case, we expect our roller furler to work flawlessly, and the ProFurl is robust. By replacing some of the connector bearings and adding set screws with a post inserted into the connector, it should last for many more years.
Lifelong sailor Green Brett is a regular contributor to CW. During summers, he’s at the helm of Lyra and offering daysailing charters in Newport, Rhode Island, through his company, On Watch Sailing.


