This week was a zeitgeist of recipe requests after some of the traditional food preservation techniques (and a fun recipe!) showed up in our social media. These are great for cruisers storing food for passages or remote sailing… and they’re great for the land-bound trying to make the most of each grocery trip under Coronavirus confinement. Fermenting, salt preservation, and harvesting wild yeast (doesn’t that sound exciting) ahead, along with a few updates from our crew.
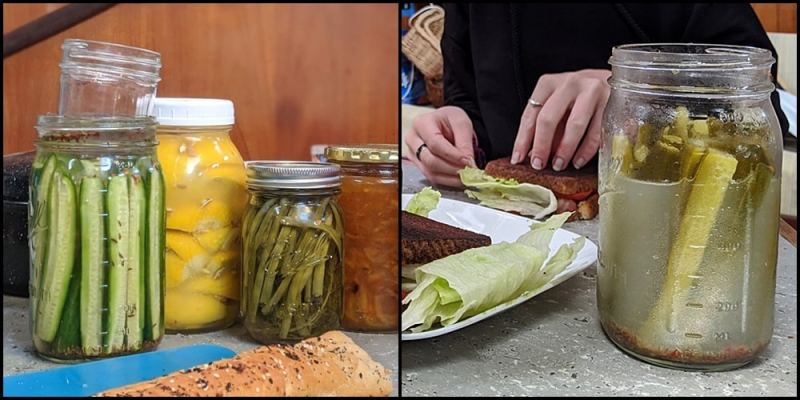
Fermented pickles
There are two basic kinds of pickling: quick pickles, using vinegar, and fermented pickles, using… well, not using vinegar. The latter- technically referred to as lacto-fermenting- is what we do. This method is gives pickles a delicious sour flavor (vs a vinegary one), and is easier to imbue with other flavors too, and it’s shelf-stable without processing for canning. Also, it’s really simple.
I used Persian/mini cukes. You can use whatever you want; pickling cucumbers have firmer skin for better crunch later, just a little more time to be ready.
- Prepare glass jars. I used a pint sized mason jar. A repurposed spaghetti sauce jar would be fine.
- Cut cucumbers into quarters, lengthwise.
- Prepare brine: 3 Tbsp salt per quart of water. I needed less than half that for my lone jar.
- Add pickling spices of choice into jar (all I had was caraway seed and chili flakes), then add cucumber slices and cover with brine. Optional, but helps retain crunch: add something tannic. Traditional is an oak or grape leaf; a little loose black tea works, too.
- Ensure the cukes stay submerged. You can do this with a purpose-designed weight, but it’s easy to improvise. I have a smaller glass jar with water in it weighting mine down below. If that’s not handy, use a Ziploc bag with water. Whatever keeps the pickles submerged!
- Fermentation begins! Check jar daily and ‘burp’ it so any pressure is released. Pickles may be done as soon as three days; the brine will get cloudy, taste test for readiness. Move to cooler location for storage (to prevent further fermentation) or the fridge if you want to park fermentation entirely. An inboard locker will do nicely on Totem.
There is endless learning to do about fermentation. I’m a new devotee of Sandor Katz and his book, Wild Fermentation. Online resources: Wild Abundance has a good comparison of vinegar vs. lacto-fermented pickles; Prepare & Nourish describes the method I use with better detail.
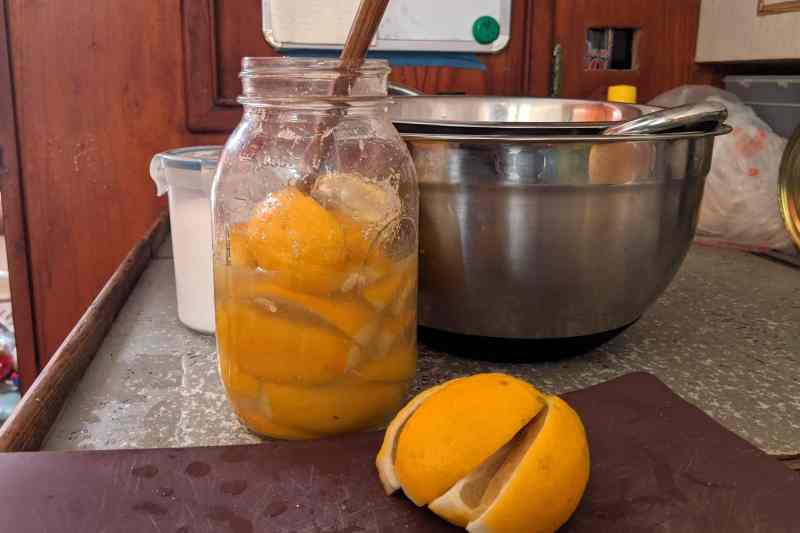
Salt-preserved lemons
As imports, lemons are a rare treat in Mexico (delicious inexpensive limes are everywhere, however). When I saw bags of lemons at a good price, I couldn’t resist! This preservation method is the perfect way to have lemony goodness in recipes for MONTHS after purchasing the fruit. It’s also remarkably easy!
- Have a clean (sterilized is prob a good idea) glass jar with a secure lid. Doesn’t have to be a canning jar. I used a quart jar, and it holds about 6 med/large lemons. I’m eyeing an emptied spaghetti sauce jar to try salting limes next.
- Wash (scrub) lemons, then cut lengthwise into quarters (you can cut all the way through, or leave the ‘petals’ attached at the base)
- Put a teaspoon of salt into the bottom of your jar.
- Hold one lemon (here’s where it’s a little easier if you didn’t cut through the bottom), cut sides up, and sprinkle another teaspoon into the cavity/flesh.
- Place lemon in jar, flesh side down, and squish it so it’s juicing up a little.
- Repeat with the rest of the lemons, salting each one and pressing flesh-down on top of prior lemon(s) in jar.
- Goal: lemons are submerged in their own juice. You might need to top the jar up a little with water, or additional lemon juice, for this to work.
- Secure lid and store jar somewhere accessible; you want to give it a shake at least daily for a while.
Lemons take 2-4 weeks to be ready. Recipes online recommend refrigerating at that point, something not done traditionally, thank you USDA. I don’t plan to refrigerate ours, but will try to find a cooler place on board to store them. The primary recommendation I have heard on using them later is to rinse them really well so that they aren’t too salty. So far, we’ve not rinsed them at all, but have used their savory tang to replace added salt in a recipe.
Speaking of recipes: what on earth do you do with them? First – DISCARD THE FLESH. You only use the rind! Rinse if desired. Then, mince it up, then add to… anything you want to have a lemony punch. We’ve put it in creamy pasta sauce, in salmon cakes (thank you Avalon crew for the PNW hit of home-canned salmon!), in aioli… it will be really good with all the fish I hope we start catching up in the Sea. Other great ideas for using preserved lemons on NPR, at Daring Gourmet, and a bunch at New York Times Cooking as well.
Sourdough starter
Holy confinement baking explosion batman! Has everyone suddenly gotten into homemade bread? Sounds like yeast is hard to find, and flour too. Can’t help with the flour. You don’t need no stinkin’ yeast. When you make a sourdough starter – you are making yeast. Or, rather, you are capturing the wild yeast from the air and harnessing it to fuel your bread-baking purposes. Cool, right?! All you need are flour and water.
- Mix flour and water to the consistency of a thin batter. Let us sit at room temp. A mason jar is good for this. Bowls are fine, or a plastic storage container, or re-purposed jam jar, etc. Allow room for it to grow a little.
- Wait about 24 hours.
- Throw half away. I know, it feels wasteful! Do it. Then, add NEW flour and water to recreate the same volume as before, at the same consistency.
- After another 24 hours, repeat #3.
- Continue the cycle of feeding, waiting, dividing/tossing, and feeding again until you see signs of the ‘batter’ fermenting: little bubbles, some separation, yeasty aroma. When you have this – you’re FINISHED. You have a sourdough starter. Well done!
Now what?
- Use it to, well, do whatever you’d do with yeast. It makes wonderful bread. We have a delicious English muffin recipe. Pancakes can be made from sourdough starter.
- Whenever you use some of the starter, don’t use it all. Save some, and “feed” it with flour/water as before to grow and keep it going.
- Need to park the starter for a while? Stash it in the fridge, and it should be dormant.
Making bread: allow more time than usual, as sourdough rises more slowly than commercial yeast.
Take about a cup of sourdough starter; put in bowl with a couple teaspoons of sugar (this helps make your wild, wily yeast get all fired up), a little salt, a glug of olive oil. Gradually stir in flour; a cup of starter will take about a cup and a half of flour. Knead, rise, punch down, shape into loaf pan, rise again, bake. Easy.
Mairen’s been cranking the baguettes out of our GoSun solar oven lately. They are SO GOOD!
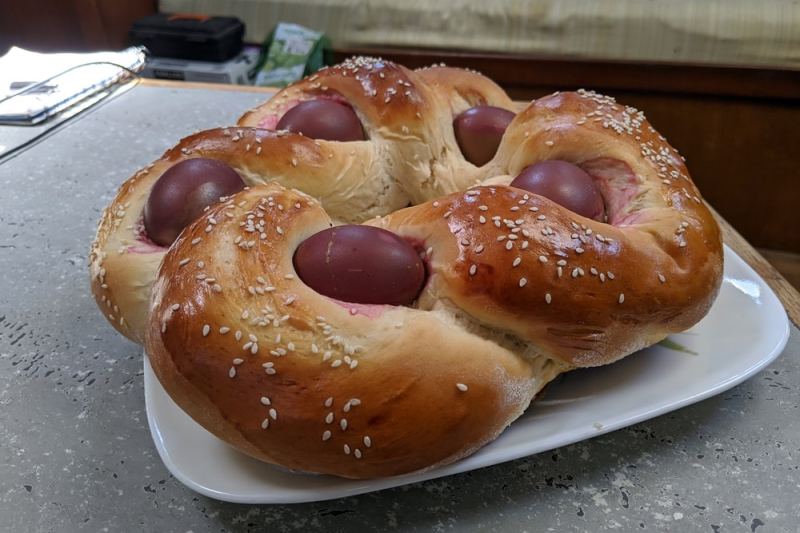
Egg bread
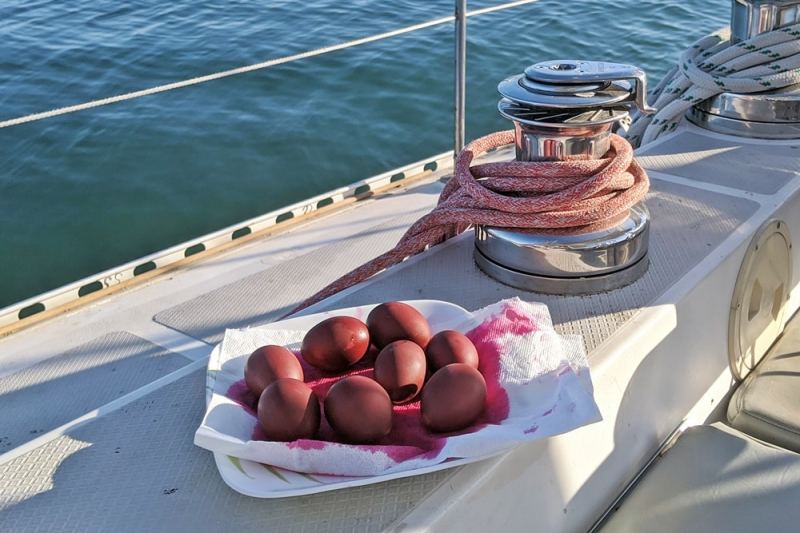
OK, not an old school skill but the other recipe I’ve been asked for several times this last week! It also dovetails with another food-preservation trick: the grated beets that I cooked up to make red dye for the eggs were turned into a South African-style pickle. Two-fer, delicious, and lovely!
The gorgeous bread is our secular Easter tradition; it made a quick appearance on our Totem Talk last Sunday and smelled soooo good while we were on the Zoom chat.
- 2/3 cup milk
- 2 tablespoons butter
- 1 package yeast
- 2 eggs for dough
- 1/4 cup white sugar
- 1 tsp salt
- 2.5 cups flour
- Additional 5 eggs, dyed if desired, for top
- Egg wash and sesame seeds, optional
Warm up milk with butter. Proof yeast; add milk/butter, eggs, salt and sugar; stir to mix. Gradually add flour (you may not need the full quantity). Knead, then set aside to rise until doubled. Divide dough in two parts; work each half into a long (about 3’/1m) snake. Weave the dough strands, alternately crossing one over the other, to make a braid-like circle. I nestle eggs into the curves between the dough as I go. Rise again; brush with egg wash and sprinkle with sesame seeds before baking.
This was a fuel splurge for us. We aren’t baking in the oven much to conserve propane, one of our most constrained resources for staying off-grid (we carry 3+ months worth).
UPDATES
Totem Talk: last Sunday’s virtual meetup was a LOT of fun! We enjoyed the dialogue and appreciate the participation. Sorry you missed? You can watch the replay on Zoom for now (it maxed our cloud storage on Zoom, so will have to come down before long). Use password N8=!d+I% for access. Look for the egg bread sneaky peek!
Sailing books! I like to think we’ve read a lot of what’s out there, but have read exactly NONE of the five sailing book recommendations in Herb McCormick’s recent article. Covid/cruiser bonus: four of those five are free to me – I can check them out to my kindle from our hometown Seattle Library. Minor Herb zeitgiest in this post, as he’s one of the featured sailors and narrators in Coyote, referenced above, which we did watch and moved me even more than I expected.
Ship’s Log. Julie Tijerina’s friendly voice welcomed us when we arrived in Jacksonville, FL, where she and Greg and pup Ginger live aboard. Star Stuff Books, named for their Whitby 42, grew from her disappointment with available options for logs on board. She’s offering the Comprehensive Ship’s Log for 19% off (use code TOTEM1 at checkout) until May 15. Cool! Two thumbs up for the content and format, I love the spiral binding!
The sailing documentary, One Simple Question, is ostensibly the story of a young couple’s search for an iceberg – but really, it’s about how to be a cruiser and a peek into what the life is like. I wrote about it a few years ago; it’s being offered free for a limited time. FREE! It’s normally $7.95 rental / $17.95 download. Get it here! It’s produced and stars friends Ben & Teresa of Morse Alpha, who run their sail training expeditions on a Norseman 447 out of the US east coast.
Indulging in the 100% non-traditional food prep technique of DALGONA COFFEE.

Heading north
Totem and crew are headed for Baja and the Sea of Cortez; today begins a multi-day passage that will weave us north, then west, towards less populated stretches of the peninsula. We’re hoping to sequester in uninhabited islands for a while, making the most of our time “alone together” in a beautiful part of the world. Wishing peace in place for all!


