For those of you with boats that have a gray-water sump that works, consider yourselves blessed. Servicing the tank and pump is akin to mucking out under an old diesel engine or rebuilding a head; the less time spent getting intimate with it, the better.
A surprising number of boats use the readily available sumps that can be found at your local marine store. I’ve found, though, that some of these units don’t hold up to the industrial use of living aboard, and others are prone to leaking around the lid when the boat is heeling. When retrofitting a gray-water system on an older boat, meanwhile, the off-the-shelf sumps often simply won’t fit in the small spaces available in the boat’s bilge. I recently installed a custom collection tank on a boat, and designed it to resemble the one I built aboard our Reliance 44 ketch, Lyra, using PVC pipe pieces, common plumbing fittings and an electric pump. This easy-to-build system still works well after four years of living aboard. In that time, I’ve opened the tank itself on our boat exactly once (to check the float switch — it was fine). I’ve cleaned the pump diaphragm twice, each time removing items such as zip ties and paper clips. In the more recent installation, described below, I added a pre-filter to keep such items out of the pump altogether.
The Concept
The sump needs to be robust, reliable and long lasting. It requires a tank that can be mounted vertically or horizontally, and that will fit into small spaces low in the bilge. I wanted to eliminate the pump cycling that was caused by backflow into the tank when the check valve in the old system got gunked up, and to locate the pump in a remote location where it would stay dry and be easy to service. It was also important to minimize standing water in the sump. In this last installation, less than a half gallon of antifreeze completely flushes the system, which consists of the tank, 14 feet of ¾-inch hose and the pump. Less than a half cup of liquid remained in the tank when I was done. Lastly, every component had to be easy to clean and service.
The Tank
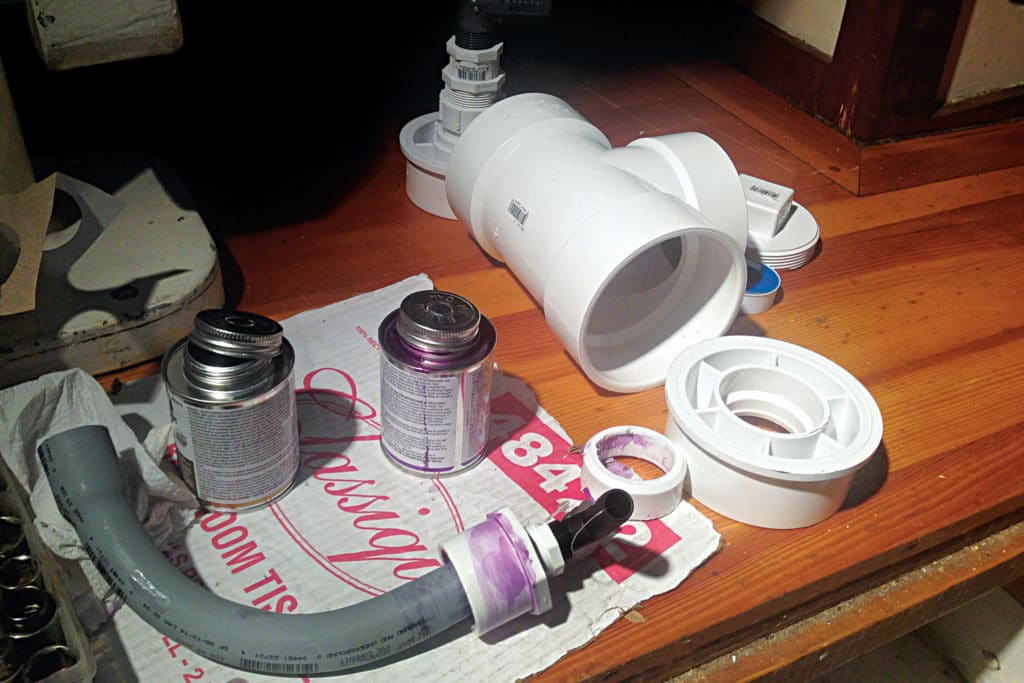
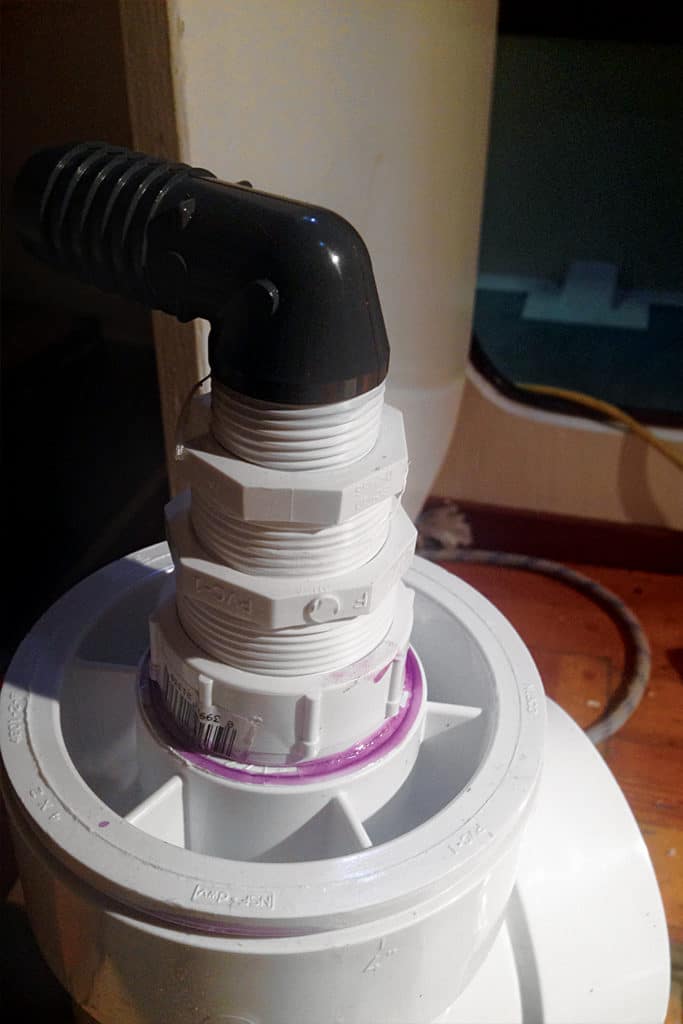
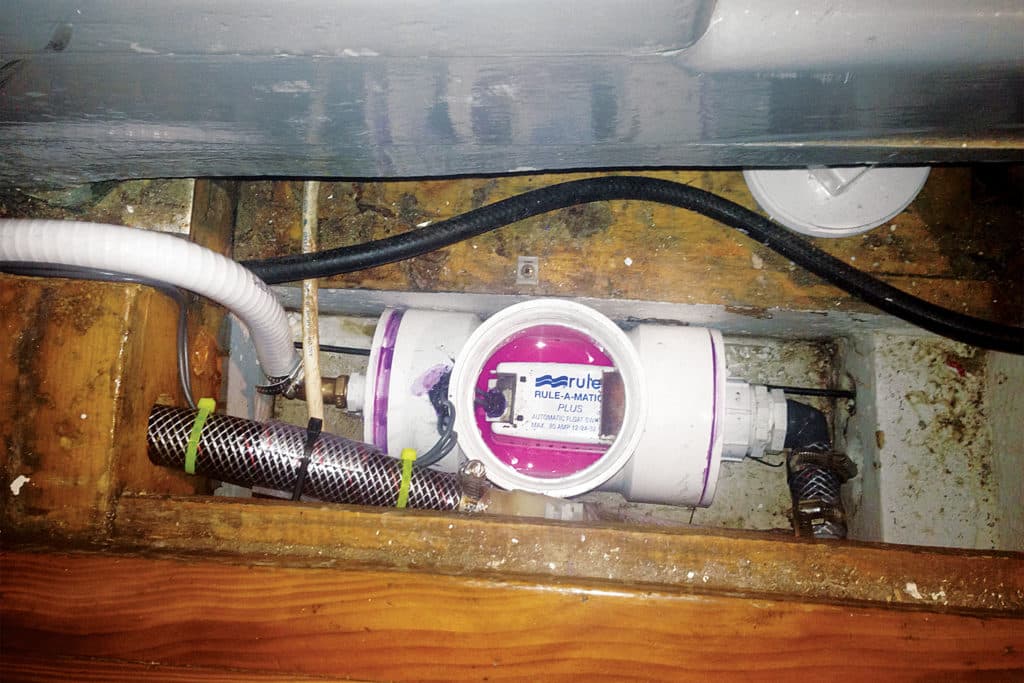
Your choice of tank will depend on the space available. On the large charter sailboat I worked on, the sump tank location had good access from above, and there was a space that measured 14 inches horizontally and 9 ½ inches deep. In this install, I used a 4-inch-diameter PVC tee for the tank. The most important thing in your measurements is to make sure you have enough room inside the tank for both a float switch and a pickup nozzle. The tee I used had a threaded center leg and plug that could be unscrewed for servicing or cleaning. On the two ends, I used a combination of fittings to reduce the diameter to accommodate right-angled hose connectors (threaded on one end, barbed on the other) that matched the intake and discharge lines. I secured the sump in place using zip-tie mounts and ties that could be tightened.
The Plumbing
For the pickup inside the sump, I threaded a right-angle nipple into the inside wall of the end-cap, and positioned it so it opened as low in the tank as possible. Then I mounted the barbed right-angle connector on the outside, where the discharge hose would be connected. All three of the boat’s gray-water drains were brought together via a manifold fashioned by teeing each new drain into the main line, so that there was just one hose running to the sump. This was connected to the other barbed fitting, which was threaded into the opposite end-cap.
The Wiring The old sump on the boat had a working float switch, which fit into the new tank with a little judicious trimming of its mounting feet. I secured it in place with a wooden wedge placed between the top of the switch housing and the inside top of the tank. The wedge allows for quick removal when the tank and switch need cleaning or servicing. I ran the switch’s wiring through a hole drilled in the top of the tank and sealed it with black silicone. (Be sure to leave a service loop of wire inside the tank so the switch can be pulled out enough for cleaning.)
The Pump
In the discharge hose, I mounted a strainer between the tank and the pump, a Whale Gulper 220. While the pump will self-prime at up to a 10-foot lift, it will have an easier time if it is mounted lower and closer to the tank. I mounted it vertically, with the diaphragm about 8 inches above and 36 inches from the tank. It is in a location where it is easy to service and where any water that spills during servicing ends up in the bilge. To finish the job, a vented loop was mounted 3 feet above the waterline and as nearly centerline as possible. From there, it was a straight shot to the through-hull. (Don’t forget to double-clamp any hose connections that are below the waterline.) Wiring for the pump was the same as that for a bilge pump. In this case, a dedicated breaker provided 12-volt current to a terminal strip next to the pump. The negative leg of the pump connected directly to the negative side of the terminal strip. The positive wire left the positive side of the terminal strip and was interrupted by the float switch and the in-line (supplied) fuse before connecting to the pump. Since this was by definition a wet environment and it was on a boat, heat-shrink connectors were mandatory.
The Bottom Line
This sump is more costly than the off-the-shelf model, at about $250 versus $180 installed. However, it is industrially robust, rarely needs service, and should never leak into the bilge unless you are actively working on it. Because it is round and modular, it fits into small spaces and can be set up either vertically or horizontally. In my view, the fact that this system “just works” more than makes up for the price difference.
Green Brett is a charter captain in Newport, Rhode Island. You can follow him at onwatchsailing.com.
Resources:
Sourcing Parts
Parts for the gray-water sump came from two locations.
Hardware store: $40
• 4-inch PVC tee, threaded middle leg
• Reduction bushings at each end to accommodate a ¾-inch thread fitting
• ¾-inch thread to 1-inch nipple (wastewater in)
• ¾-inch thread to ½-inch right-angle nipple (pickup in the tank)
• ¾-inch thread to ¾-inch nipple (tank discharge)
• PVC primer and cement
Marine Store: $210
• Box of stainless-steel hose clamps
• 14 feet of ¾-inch hose
• Whale Gulper 220 12V Gulper Diaphragm Pump ($154 online price match)
• ¾-inch vented loop
• Strainer
Tools, Tips and Tricks
• Screw gun with Phillips and flat-head bits
• A socket adapter for the screw gun that fits the hose clamps. (This makes adjusting the clamps fast and easy)
• Zip-tie mounts and zip ties
• Heat gun to warm tough plastic hosing so it fits over the hose barb fittings. (Heat gently or you can degrade the hose — stop if it starts to discolor)
• Heat-shrink electrical connectors
• Wiring/crimping tool
• Always leave service loops in wiring so the float switch and pump can be easily worked on, and so wires can be shortened if they degrade at the connections
• Prime and use lots of PVC cement, particularly on custom areas such as the pickup and output bushing threads
A Handy Two-fer The Whale Gulper 220 moves 200 gallons per hour, and can easily double as an emergency bilge pump. On Lyra, the hose from the tank to the pump is long enough to reach the bilge if pulled from the tank. The pump is wired to turn on either by the float switch or by a manual override switch. Installing a three-way valve in the line and a hose to the bilge would make it even easier to add another 200 gph water-clearing capacity to your emergency bilge-clearing system. G.B.