no chafe copyboats_8674.jpg
It’s spring, its in the low 50’s here in RI and that means its time to start getting the boat ready for the summer. The whole getting the boat ready thing has very different meaning to a lot of people. To one friend of mine Spring get ready means getting into every nook and cranny on the boat with a tooth brush to clean. To others it means pulling the cover off, slopping some anti-fouling bottom paint on and getting it launched. For me, it means a careful inspection of all systems to make sure everything is absolutely up to snuff and in top mechanical and electrical condition as well as a good cleaning, but without the tooth brush….
For people with older boats you need to spend some time looking for things that have worn or that perhaps were not done properly in the first place. But, the question becomes how do you know? That’s where I come in. My plan here is to offer up a series of things to look at or look for over the next few weeks to help you get a handle on the good and the bad and to offer up some advice on how to make things right. So this week let’s get a look at a photo a reader sent in of a battery charger install….and its not a very good one either.

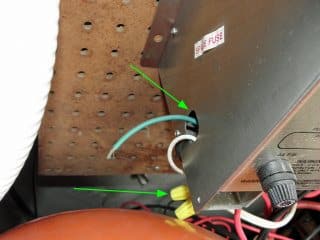
So today’s exercise is for you to get to your boat and access as much of your electrical gear as possible for a good visual inspection. In the photo above, we’re looking at a battery charger installed on aboat. The green arrows are pointing out two, no actually three major flaws in the installation. The top arrow is point to two wires pulled through the metal case on the charger. One is a grounding wire that does not appear to have ever been connected to anything. If a short circuit were to develop inside the battery charger case, it would go unnoticed until someone got zapped! Remember that the green wire in the boat’s AC electrical system is there to protect people against shock hazards. That only works if the green wires are actually attached to the boat’s grounding system. Missed that little nuance on this install.
The white wire is the AC neutral conductor for the shore-power supply to the charger. Its rubbing pretty hard against the nice sharp edge of the metal battery charger case, it’ll chafe through the insulation sooner or later, causing that short circuit I just mentioned. Touch the battery charger case when that happens and you;ll know exactly what I’m talking about here…..There should be a chafe bushing around the perimeter of that hole in the side of the charger case.
The bottom arrow is pointing to a pair of my favorite things, wire nuts. The kind used for residential and commercial land-based wiring that uses single strand solid copper wire, not multistrand boat cable. These are guaranteed to have damaged the stranding on the cables used and will eventually just fall off. You need to be looking for things like this on your boat as you get it ready this spring. If you are unsure or afraid to mess with electricity, get a trained individual to do it for you. Its just plain worth paying someone to correct things like this if you don’t have the skills to do it yourself. Make sure you use an ABYC certified technician for this kind of work.


