Painted Aluminum
When it comes to aluminum and paint, the best coating is—nothing. As a result of a process known as passivation, aluminum, when exposed to air, develops an extremely hard and resilient oxide coating. The reason aluminum spars, ports, and pedestals are painted or coated is simply to enhance their appearance. Anodizing is a popular alternative, but many feel it’s not as attractive as the high-gloss finish of polyurethane.
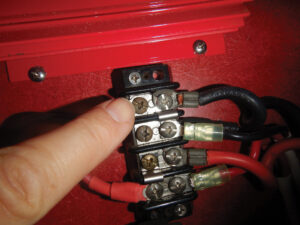
The weak link in painted aluminum hardware is its propensity to corrode when the coating is breached. A nick or scratch allows water to migrate under the coating, where air is in short supply. The aluminum remains active rather than passive, and the result is poultice corrosion, of which there are two types: dry, identifiable by a white powder, and wet, which produces a white goo.
Therefore, if you have painted aluminum hardware on board—and nearly every boat does—the best approach is to prevent damage to the paint; if damage does occur, make your repairs quickly. In terms of prevention, bed each and every piece of hardware, from individual fasteners to mast steps, tracks, and compass bases, where they interface with painted surfaces. Bedding reduces paint damage and seals that which occurs, preventing water from entering the breach.
For small nicks and scratches, first remove any loose paint or chips. Next, use a clean rag that’s been rinsed in fresh water and allowed to dry to dewax the surface by wiping it down with a solvent such as 3M General Purpose Adhesive Remover. Then, with an artist’s brush and a high-quality enamel or single-part epoxy paint that closely matches the existing pigment, simply fill the nick or scratch. A couple of coats will build up thickness. Priming is impractical for small areas, so don’t sweat it. If it’s a high-visibility area, let the repair fully cure, then lightly sand it using 600-grit sandpaper followed by paste polishing compound and wax.
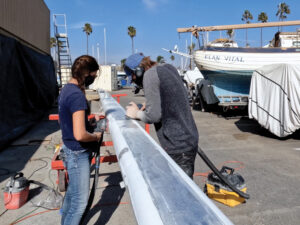
If you’re handy, repair larger areas, such as peeling ports or pedestals, using sandpaper, masking tape, and a brush. Remove all loose paint, then sand the hard edges where the sound paint remains using 220-grit sandpaper; sand so there’s a gradual transition between paint and bare metal.
Next, clean the surface with solvent (avoid touching it after) and mask the area (the tape should bisect the area on the existing, sanded paint). Then, using a good brush that won’t shed, apply an aluminum-compatible primer, preferably from the same manufacturer as the paint you intend to use. Follow the directions, which may call for sanding between primer and topcoat. Then apply the topcoat; use either a high-quality brush that’s designed for the type of paint you’re using or a one-time spray bottle, such as those from Preval. If you use the latter, masking will be much more important and will need to cover a larger area; never attempt this job on a breezy day. Depending on coverage, several coats may be required.
Once the paint is cured, carefully remove the masking tape by pulling it parallel with the surface, not perpendicular. Use the same sanding and polishing techniques described above. Some might ponder the use of a two-part paint for such repairs. While more durable, it’s not for the inexperienced; be prepared to use a respirator and other protective gear. If you’re experienced with such paints and use the necessary gear, the finish is more durable.
Steve D’Antonio offers services for boat owners and buyers through Steve D’Antonio Marine Consulting (http://www.stevedmarineconsulting.com).
Also planning to paint your decks? Click here to learn how.