Hardly a month goes by that I don’t have a paintbrush in my hand. Whether it’s the house, barn, car or motorcycle, it seems something always needs painting. For boat owners, that’s especially true. In preparation for writing this piece, I took stock of my paint arsenal. The roundup: 32 cans of various brush-on paints, coatings and varnishes; 19 cans of spray paint; and 44 brushes, ranging from broad house-painter’s specials and my beloved badger-hair varnish brushes to pinpoint artist’s brushes and the throwaway foam variety. I like painting, but more importantly, I want to be satisfied with and proud of the paint projects I undertake. Success often boils down to three things: choosing the right paint for the job, good preparation and solid application technique.
Paint Type
For the purposes of this article, the focus will be brush-on paint jobs that are applicable to a range of do-it-yourself skills.
Enamel-based paint is among the most popular of brush-on coatings; however, its name is misleading, as it has little to do with the familiar baked-on enamel coatings. These paints are typically single-part oil-based products that don’t require a catalyst or the mixing of two components. Instead, a solvent is used as the vehicle that allows the paint to be applied as a liquid, after which the solvent evaporates, leaving behind a relatively hard, durable, enamellike finish.
Enamel paints are by far the easiest of all common marine paints to apply; they flow easily and are often thick enough to fill in small surface imperfections. Their fumes are typically tolerable. If thinning is necessary, that’s easy too: Simply use whatever is recommended by the paint’s manufacturer, often lacquer thinner or mineral spirits. Cleanup is also straightforward; again, common thinner or mineral spirits are all that’s required.
Enamel paints can be applied to virtually any surface — wood, fiberglass or metal — provided that proper preparation is carried out. A high-quality enamel paint is the least expensive of the brush-on options, but the price you pay for all of these attributes is offset by enamel’s moderate longevity and gloss retention. Think of it this way: Under harsh marine conditions (sun, salt and varying temperatures), depending on the latitude and climate, a good-quality enamel paint can be expected to hold up for three to five years. So give careful consideration to where this paint is used, because chances are high you’ll be reapplying it every few years.
Two-part paints (sometimes called two-packs) are vastly different from their distant enamel cousins. The most common varieties utilize a polyester-based linear polyurethane (LPU) formula. Rather than relying on a thinning agent or vehicle that evaporates and allows the pigmented base to harden, two-part LPU paints utilize a process not dissimilar from that of fiberglass resin and gelcoat, whereby a catalyzing agent reacts with a base resin, causing a molecular cross-linking to occur. The result is a hard, ultradurable, abrasion-resistant plasticlike coating that retains its gloss many times longer than does standard single-part enamel paint.
Here too, however, there are trade-offs. LPU paints are more difficult to apply (some versions use an acrylic base that can only be sprayed). They tend to magnify every imperfection, making meticulous preparation all the more important. Those applying them must take special precautions to prevent skin contact, and a respirator is required (safety glasses should also be used when applying any marine paint).
Additionally, in my experience, two-part paints are ill suited to application over wood. The expansion and contraction caused by varying moisture content can wreak havoc on two-part paint’s hard consistency, leading to cracking, water migration and release. (To some extent, the same fate may befall enamel paint. However, it’s far easier to repair and less expensive, and its life expectancy is admittedly shorter, making failure somewhat expected rather than a heartache and wallet-buster.)
Two-part paints fall squarely into the advanced DIY and professional category; not surprisingly, they cost more than single-part enamel paints. But based on their extended longevity, which could be a decade or more, the added expense can be amortized over time, ultimately making it more economical and the logical choice for painting fiberglass hulls and decks.
Somewhere between conventional enamel and linear polyurethane lies a hybrid option, often referred to as a modified urethane enamel. A single-part paint that embodies attributes from both camps — including extended durability and ease of application — it’s often a reasonable compromise for those who lack the skill or willingness to work with two-part paints but desire some degree of added longevity, once again with an increase in cost.
Preparation and Application
What do you intend to paint, and what is its condition? The answers to those questions drive some element of the preparation process. Wood, steel, aluminum, gelcoat or an existing coating each requires a different type of preparation (and more detail than can be covered here). Fortunately, paint manufacturers want satisfied customers and go to great lengths to provide detailed instructions for both preparation and application for all types of surfaces. Before picking up a brush or stirrer, read the literature provided by the manufacturer of the paint you are preparing to use.
In general, though, begin by cleaning the surface and removing all traces of dirt, debris, dust, previous loose coatings and, above all else, wax and oil. Where failed paint applications are concerned, the latter two contaminants are likely the most culpable; they steadfastly repel coatings, leaving behind the dreaded “fish eye,” a small oval “paint desert” that’s guaranteed to ruin any painter’s day.
Surfaces should be washed with fresh, soft water and mild detergent (detergent and diluted ammonia is an effective cleaning agent, and bleach should be used if mildew is present, but never mix the two). Next, de-wax the surface using a clean rag that has been rinsed in fresh water to remove any trace of detergent or surfactant, allow it to dry, and then dampen it with solvent such as denatured alcohol (again, following the paint manufacturer’s instructions) or mineral spirits. The rag should be frequently turned to expose a new face and discarded as soon as it’s completely soiled.
A tack rag, a proprietary product that looks and feels like a slightly sticky gauze bandage, should then be used to wipe down the entire surface to remove all traces of dust. Some applicators use compressed air to blow dust off the surface. But beware: Compressors can contaminate the air supply with trace amounts of oil, which, as mentioned above, can wreak havoc on a finish. Compressed-air oil filters are available and should be used if you intend to blow off a surface at any point during the painting process.
An adhesion test should be carried out before applying two-part paint over an existing two-part coating. Nobody wants to expend significant effort to apply as perfect a finish as possible, only to have the original coating release from the substrate, which often occurs when masking tape is removed. A visual inspection will be your first indicator; if paint is flaking in any way, then it probably should be condemned.
The next test is more definitive and should be carried out after cleaning and de-waxing. Deeply score the surface (down to the substrate) with a sharp razor blade in a small checkerboard pattern (six vertical and six horizontal lines, approximately 2 inches square). Apply filament-type packing tape diagonally across the box, and then abruptly yank it off parallel to the surface. If any of the squares remain stuck to the tape, the test has failed, and all of the existing paint down to the sound substrate or the virgin surface should be removed.
If the coating passes the initial tests, the next evaluation involves solvent compatibility to ensure the new paint does not cause an adverse reaction by lifting, bubbling and so on. Saturate a cotton ball with the reducer that will be used to thin the applicable paint, apply the cotton to the scribed area, tape it in place, and leave it for 30 minutes. Remove the cotton. If the reducer dissolves or markedly softens the existing coating, all of the paint must be removed before the new two-part paint is applied.
Paint primer — the coating applied after the surface has been prepared but before applying a final or topcoat — is a science unto itself. Primers primarily fall into two categories: oil or enamel, and epoxy-based. The overarching rule where primer is concerned is compatibility with both the surface over which it is applied and, most importantly, with the topcoat that will be applied over it. With very rare exceptions, primer should be sourced from the same manufacturer as the topcoat, and even in those instances, you must still ensure compatibility.
Epoxy has a reputation for adhering tenaciously to virtually anything except oil and wax. It has poor UV resistance, which makes it ideally suited as a primer, as the topcoat will cover and protect it from the sun’s damaging rays. Most epoxy primers are two-part, adding complexity to the application process; they remain the primer of choice, however, particularly with two-part topcoats.
While it’s not absolutely necessary to use a primer for every paint application, you should once again defer to the coating manufacturer’s instructions. Most paint companies recommend the use of a primer for virgin wood, gelcoat, fiberglass and bare metal. The latter typically requires what’s known as an etching primer; it’s slightly acidic and primes the surface as well as chemically profiling it, improving adhesion.
Nearly all paint manufacturers also establish protocols regarding temperature, prohibiting application if the air or substrate temperature is too low (40 degrees F is a typical low threshold). All LPU and many enamel paints cannot be used in areas where they will be continually submerged, such as below the waterline or in wet bilges. Doing so will result in osmotic plastering and general adhesion failure. For those applications, an epoxy-based paint, ideally one designed especially for bilges, should be used.
The Painter’s Tools
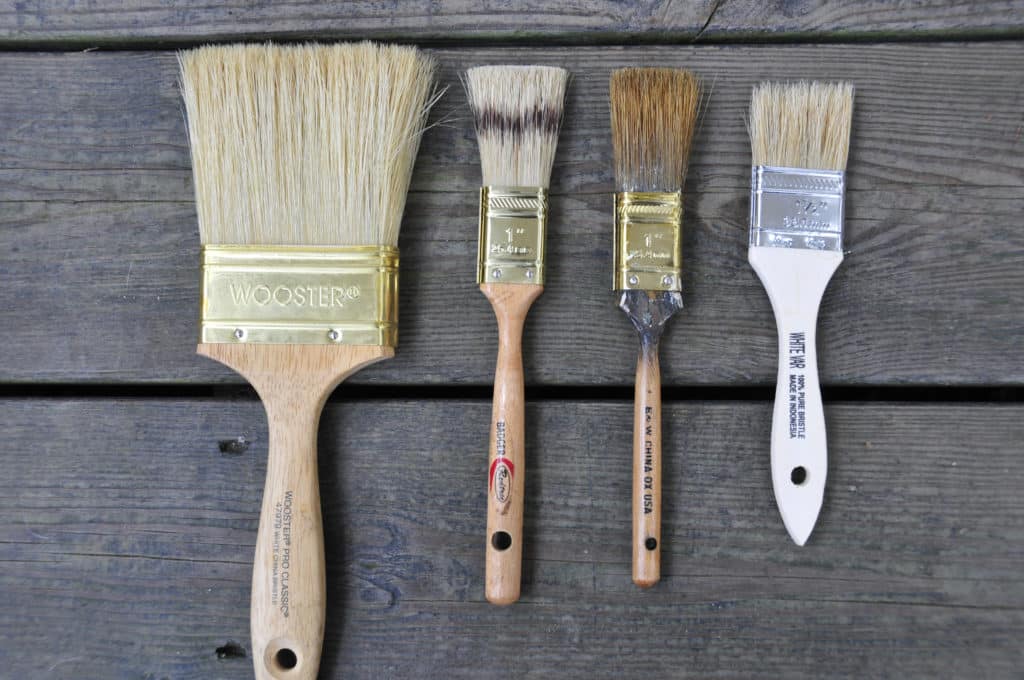
Quality hand tools, sockets, wrenches, cutters and strippers make engine and electrical work go more smoothly and yield professional results, and the same can be said of paintbrushes. Walk into any chandlery, and it’s easy to be confused by the selection: synthetic versus natural fiber; square, angled, chiseled (or not); and round or paddle handles.
Where enamel and two-part topcoats are concerned, my preference is for natural-bristle brushes with a chisel-shaped tip. Unlike synthetic fibers, which can melt if exposed to the wrong materials, natural bristles are immune to solvents, acids and other chemicals. Synthetic-fiber brushes are typically used with water-based paints, where natural bristles become sodden and perform poorly. The chisel-shaped tip (as opposed to a round tip) is designed to leave behind a smooth finish while minimizing stroke marks.
Natural brushes are frequently known as “China bristle” because the vast majority are made from Chinese hog hair. These have a desirable feature known as a “flagged tip”; a bit like a human hair’s split ends, these tips are flatter and wider than the remainder of the bristle, helping them retain more paint. The brush cross-section should be oval; it too retains more paint and is well suited to broad application surfaces. Make certain that the brush’s ferrule — the metal band that retains bristles — is tight and made of stainless steel. Quality brushes should rarely shed. Inexpensive, disposable China-bristle brushes, often known as “chip brushes,” are fine for bottom paint or other nontopcoat applications, but they are notorious for dropping bristles.
If you seek the highest possible quality for your brushes, and the finish they deliver, then move up to ox and badger hair. The latter is my preference for varnishing and when “rolling and tipping” — the practice of applying paint first with a roller and then brushing it out, a commonly used technique for two-part paint applications on hulls and other large surfaces. These natural-bristle brushes yield the smoothest flow and hold paint exceptionally well. Rollers, if used for rolling and tipping, must of course be compatible with the paint, and must be of the short-nap variety to minimize irregularity in the coating application.
Paint is an area where a do-it-yourselfer can achieve high-quality results, provided he or she follows the aforementioned tips as well as the coating manufacturer’s instructions. Practice, of course, is always recommended; the more time you spend with a brush in hand, the better the results.
Steve D’Antonio offers services for boat owners and buyers through Steve D’Antonio Marine Consulting (stevedmarineconsulting.com).