Whether you’re buying a used sailboat that’s new to you or you’ve owned your boat for decades, the standing rigging is what keeps the mast in place, and thus requires particular attention. How do you know when it’s time to re-rig? There are some obvious answers to this one — for instance, if your wire rigging has broken strands or if it’s suffering from “candy-striping,” i.e., rust-colored streaks swirling down the wire. The latter may indicate two things: one, that it’s simply surface rust, which you should be able to polish off, or two, that as the wire was being manufactured, a strand might have picked up some contamination during the process and is compromised, which is cause for concern. A third visual indicator are cracks in swaged fittings, some of the most common end fittings for wire. Cracks are hard to see (use a magnifying glass), and sometimes marks that look like cracks can be left by the machine used to create the swage. Then there’s just age, and this factor as a reason to re-rig is more subject to a boat’s history than anything else.
“There’s a rule of thumb, but it varies rigger to rigger,” says Steve Madden, co-owner of M Yacht Services in Annapolis and the head of its M Rigging division. “My belief is that you should be replacing your sailboat’s standing rigging every 10 to 15 years.” But this time frame also is variable, depending on the boat’s purpose and use. For instance, for an offshore bluewater boat, Madden recommends 10 years, and for a serious coastal cruiser, more like 12.
“The biggest thing we like to have is the history of the boat: what kind of boat it is, how it’s been sailed and where has it been sailed,” says Jay Herman, owner of Annapolis Rigging. “That history will affect what kind of life you get out of your standing rigging.” Some insurance companies, he says, will require a re-rig if you’re purchasing a used boat that has standing rigging older than 15 years.
Either way, Jimmie Cockerill, co-owner of the Rigging Company in Annapolis, recommends that for a sailboat with wire rigging, the mast should be pulled and all fittings and wire visually inspected every five to six years. And although rod rigging may be able to last longer than wire, it too needs to be serviced every five to six years to get the most life out of it. Sticking to the 10-year rule, Madden says, means that for the most part, any corrosion or failure points will be eliminated with a re-rig.
How the rigging has been tuned is also part of a boat’s story. For instance, Madden says, he recently had a customer whose 46-foot cutter had a rigging failure at six years. The customer had had the boat re-rigged, and during a trip to the BVI, the new wire stretched. The owner didn’t adjust the rigging to compensate for the stretch for several seasons. “That was a case of not knowing that the worst thing you can do to standing rigging is have it loose on the leeward side,” he says. “Sailboat rigging very rarely fails from being overloaded. There’s such a safety margin in rigging. So you’re sailing offshore and you’re looking at the windward shroud that’s taut, and that’s not the one to worry about. It’s when the leeward side starts flopping around that you’re asking for trouble.”
Stainless steel has a finite number of cycles — essentially, movements, whether fore and aft or side to side. “The theory is that it can take 10 to 15 years of cycling, but this continual motion when it’s unloaded is what fatigues the wire,” Madden says. “There’s no real way of measuring that. Die testing won’t pick it up, and it’s rare that a wire will give you warning before breaking.”
So how often should standing rigging be replaced? For all of these reasons, most riggers agree that when your sailboat’s standing rigging approaches 15 years old, it’s a good time to consider replacing it.
Wire or Rod Sailboat Rigging?
Riggers say the question of whether to rig with wire or rod is usually fairly easily answered: Run what you brung. In other words, if your boat already has rod rigging, with all of the end fittings to terminate the rods both on deck and in or on the mast, then sticking with rod will ultimately be less expensive than making the switch to wire. Likewise, if you already have wire with fittings that accommodate your boat and mast, stick with wire. Aside from the relative cost differences between rod and wire (rod is more expensive), what also makes a switch pricey is having to significantly modify the mast to accept the different rigging.
Although rod rigging is more common on racing boats, many well-known cruising-boat builders, such as Valiant, Bristol, J/Boats and Hinckley, have rod-rigged models. The benefits of rod are less stretch, less weight, less windage, and arguably longer life than wire, because there’s less possibility for corrosion of the rod itself.
That said, some sailors prefer wire over rod for a number of reasons. First, it’s easier to fix in remote places and on your own. With a spare mechanical end fitting, wire and the proper tools, you can replace a stay pretty much anywhere. Similarly, it’s easier to find usable replacement parts far from busy ports. Wire rigging is generally less expensive and easier to handle. Finally, rod rigging requires a particular type of terminus — called a cold head — that can be fabricated only with a purpose-built machine, which only a rigging shop will have. You cannot use a mechanical fitting on rod rigging.
In the past, long-distance cruisers typically chose wire rigging with mechanical fittings for all of these reasons. They also would carry a piece of wire as long as the longest stay on the boat — coiled and stowed, which undeniably was sometimes easier said than done — as well as spare end fittings and the tools needed to replace a broken shroud or stay. Today, with the advent of super-strong synthetic line such as AmSteel and Dyneema, the need for that extra wire and gear is eliminated. For instance, the Rigging Company makes a spare-stay kit that can accommodate either wire or rod rigging repairs, Cockerill says. It has a synthetic stay with an eye splice, a toolless turnbuckle (the Handy Lock, made by C. Sherman Johnson), quick-release fast pins with an attached lanyard, several high-strength Dyneema loops, and even a heavy-duty zip tie to fish loops in and out of holes in a mast.
“The idea is you come on deck with this small canvas bag and make it happen,” Cockerill says. “Let’s say you ripped a tang out of the mast; you can use a Dyneema loop to create another attachment point. A smaller loop is a makeshift chainplate attachment — you can attach it to a neighboring chainplate and attach the stay to it. It’s good enough to get you to safety and someplace you can make a more permanent repair.” Riggers say very few sailors re-rig from wire to rod or the reverse, but if switching is on your mind, have a professional make a full assessment first.
There are so many variables in the system — types of end fittings, types of masts, types of attachment points — that each boat will have its own specific requirements that can affect cost. For that reason, it’s difficult to give an accurate estimate of the cost of making the switch, even for an average 40-footer.
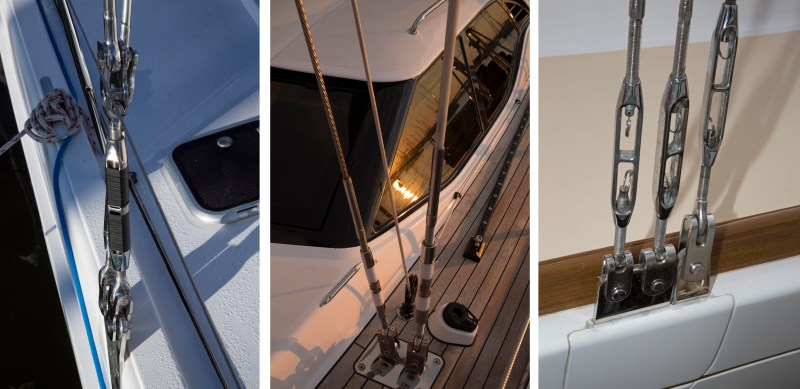
End Fittings for Sailboat Rigging
All standing rigging, whether rod or wire, has to end in a fitting that attaches to the deck and mast. The three most commonly used types of attachments are swaged and mechanical fittings for wire, and cold heads for rod. Generally, end fittings fall into a few classes: studs, eyes, forks and hooks, each of which comes in a dizzying array of sizes and configurations. There are multiple combinations and variations: For instance, if your mast has double tangs, most likely the end fitting will be an eye — although it can be a marine eye or an aircraft eye, which differ primarily in shape. All rod rigging terminates in a cold head, which accommodates the end fitting or is encapsulated by the end fitting. This could be a marine eye, a marine fork, a T-head or a J-hook, among others.
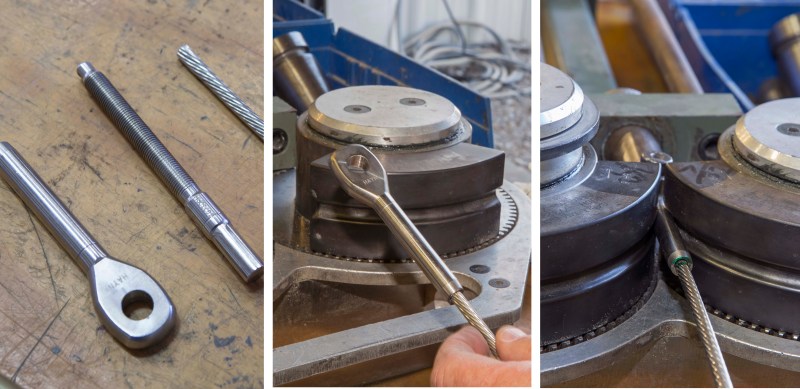
A swaged fitting is a terminus that’s attached using a machine called a swager. It rolls the end fitting through two opposing dies and compresses the fitting on the wire so tightly that it can’t pull out. “The theory is that you’ve crushed it so tightly that all the wires inside have just merged into one solid piece of stainless,” Madden says. Swaging must be professionally done, and the result is extremely strong and generally has a long life. Top manufacturers of swaged fittings are Hayn Marine Rigging Products, Alexander Roberts and C. Sherman Johnson.
Mechanical fittings can be applied using a few common hand tools by the mechanically handy DIY sailor, which is one reason they’re popular. The two primary manufacturers of mechanical fittings presently are Sta-Lok and Petersen Stainless, which produces Hi-MOD. Both are located in the U.K., and the products are distributed in the U.S. through vendors like Hayn, West Marine, Defender, and local chandleries and riggers. Generally, they consist of either three or four parts (Sta-Lok has three; Hi-MOD has four), including a sleeve; a cone; in Hi-MOD’s case, a crown wheel; and the terminal (an eye, fork, stud, etc.). If you follow directions, they are fairly straightforward to install, although not especially easy. “The mechanical fasteners are great in that you can terminate and then look inside to be sure it’s formed correctly, so you do have a way of inspecting your work,” Madden says.
However, they generally cost more than a swaged fitting; Herman says while Hi-MOD’s newer mechanical fittings are “definitely more user-friendly to assemble, they’re twice the cost of a swaged fitting.” Some riggers will recommend swaged fittings for the mast end of the rigging and mechanical fittings at the deck level: Corrosion is less prevalent at the top of the mast, and you can more easily and regularly inspect mechanical fittings at deck level, where they’re frequently subjected to salt water
Should You Replace Your Sailboat’s Rigging Yourself?
So you’ve determined your sailboat’s standing rigging needs work. Do you hire a pro or go it alone? Good question. Yes, doing it yourself will theoretically save money. For an average 40-foot boat, Cockerill estimates about $100 per foot to re-rig with wire rigging ($4,000), as well as the round-trip cost to haul and launch the boat and unstep and step the rig (an additional $2,500 or so). By taking on the labor yourself, you’ll probably save as much as $2,000 on the re-rigging cost, he says. Madden says that cost isn’t linear, though; as you go up in size (a bigger boat needs heavier wire and larger fittings), you’ll spend more. He’d estimate more like $4,600 for a 40-foot boat, but all of these numbers depend on how much is involved: Are there furlers? What kind of end fittings? Are the chainplates sound? Depending on the answers to those questions and others, a professionally done re-rig for a 40-footer could be closer to $6,000 or more.
If you go DIY, you will be limited to mechanical end fittings unless you hire a rigger to swage your end fittings. The Rigging Company gears much of its sales to DIY sailors and is beginning an e-commerce site to cater specifically to handy individuals. But Cockerill says it quickly becomes evident whether an owner feels comfortable enough to do the work. “You should be mechanically inclined,” he says, “and the way to find that out is if I start talking all this technical jargon and you decide whether you’re suited to handle that at all.”
Additionally, a DIY sailor needs to do plenty of research, particularly when it comes to wire quality, which is something professional sailboat rigging companies watch like hawks. Although anyone can walk into a local chandlery and buy wire, that doesn’t mean the wire is of the highest quality. Marine-suitable stainless wire is called 316 grade, but even that doesn’t mean you’re necessarily getting high-quality wire. Much depends on where it is manufactured; Herman and other riggers say the best wire today is coming from South Korea through a manufacturer called KOS, making wire to military specifications. It’s imported and sold through distributors like Alps Wire Rope.
“We only sell guaranteed-content, guaranteed-process wire,” Herman says. “There are other wires out there that are cheaper, but they’re not guaranteed.”
As for sources of wire and fittings, there are many, including major chandleries and vendors, like West Marine and Defender, as well as some private riggers, like Annapolis Rigging and the Rigging Company, which will work with you to define what you need and help you source parts and materials.
One thing all the riggers I spoke with expressed emphatically was that stainless steel needs oxygen to create a fine film of oxidation that protects the metal. The fastest route to crevice corrosion is to cover the metal with plastic or leather turnbuckle covers or to coat the fittings in tape. Enough tape to cover a cotter pin suffices; otherwise, leave the metal open to the air. Likewise, if you are re-rigging your sailboatboat, use the opportunity to check your chainplates (easily the subject of another article entirely), since that’s one of the most common points of rigging failure.
Another factor in your DIY decision-making process is simple: peace of mind. “Most of my clients say to me without any prompting, ‘This is one area I feel should be done by a professional,’’’ Madden says. “You’re out there offshore and there’s a squall coming and you start worrying about the craziest of things, and you don’t want to have any unknowns.” That’s especially true of the system that keeps the mast and sails up.
Wendy Mitman Clarke is currently between passages. She’s the director of media relations at Washington College in Chestertown, Maryland, and she and her family continue to pine and plan for the day they can return to the cruising life.


