
Having fiberglassing skills is a powerful do-it-yourself tool for customizing and repairing sailboats. Recent examples of fiberglass work we’ve done on our Stevens 47, Totem, include creating a custom gray water tank, building the new swim steps into our reverse transom, and filling in holes from decommissioned through-hulls.
And occasionally, fiberglassing skills fill a more critical need: saving a boat.
A squall raged in the dark over Totem’s Indian Ocean anchorage when Jamie heard a plea for help over the VHF radio. One of the cruising boats within the uninhabited atoll had gone against a reef. We were in Salomon Atoll, the British Indian Ocean Territory of Chagos. Strained by high winds, the boat’s mooring line chafed through on the sharp edges of a coral head. Far from any help or official options for rescue, a handful of crews rallied to aid the distressed Wauquiez 48 Pipistrelle, and prevent it from becoming a wreck in this pristine, remote location.
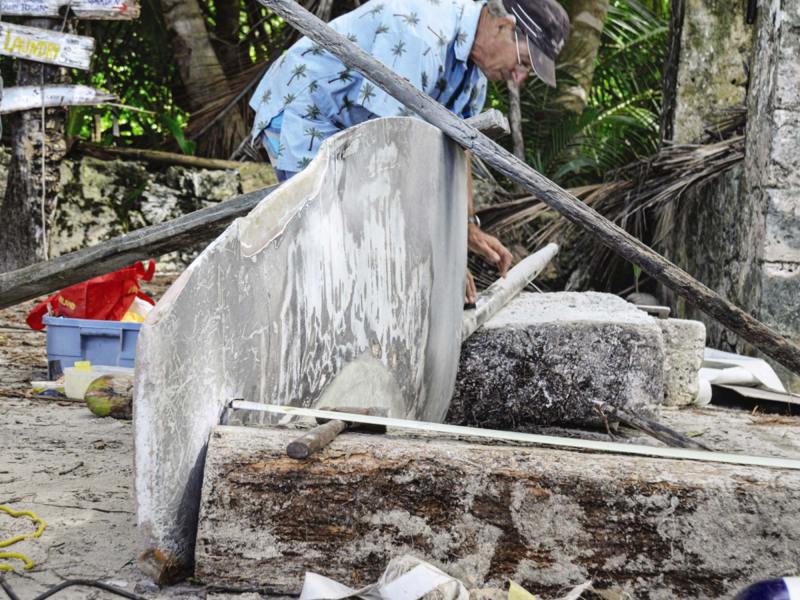
After the vessel was kedged to safety, assessment revealed that the hull and keel had only superficial scratches, but the prop shaft was bent and the rudder severely damaged. For Pipistrelle to sail to the nearest haulout facility in the Seychelles, some 1,200 nautical miles away, the large chunk missing from the leading edge of the rudder needed significant fiberglass repair. Without fiberglassing materials and know-how, the crew would have to use the wreck-removal insurance that we all needed for a permit to the territory.
The band of cruisers pooled their knowledge and resources to tackle the repair. Materials were in adequate supply except for one key part: the fiberglass.
On a remote, tropical, uninhabited coconut island, what could possibly substitute for glass fibers to combine with resin to form a structural composite? Coconut fibers, of course!
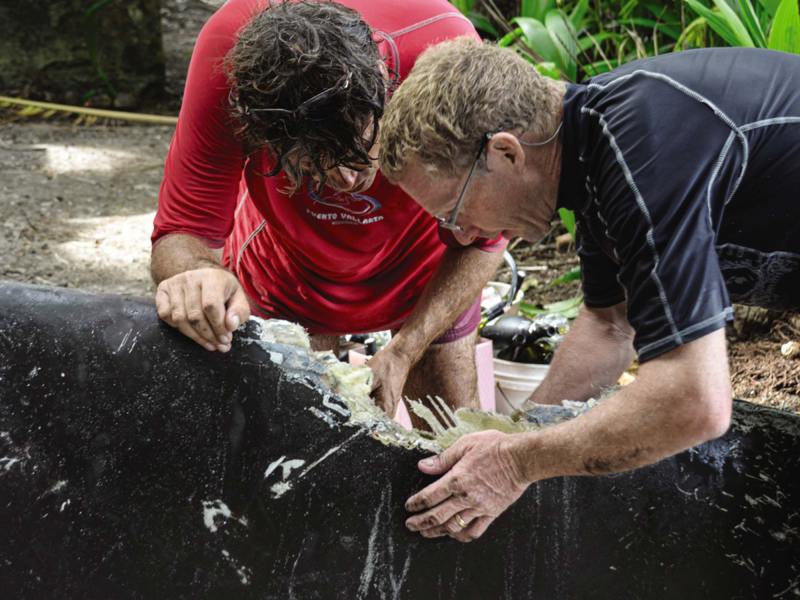
Junior crew from several kid boats were sent to collect and shred the fibrous coir that clings to a coconut’s husk. Fiberglass repairs commenced. When done, the repair was so sound, Jamie said that Coconut Composites should be a going venture.
Before we went cruising, our fiberglassing skills were thin. Jamie had repaired bulkhead tabbing and approximately a billion osmotic blisters in the bottom of Dogwatch, his 1964 Sailmaster 22. In the process, toxic vapors from fiberglass resin confirmed that his marine-industry interests leaned to sailmaking and design rather than boatbuilding.
Over the course of 25 years, we’ve developed fiberglassing skills out of necessity, as self-sufficient cruisers who seek remote destinations. Safety and frugality from DIY fiberglassing know-how is an asset.
Fundamentals
The coconut composite we used to repair that rudder had an unusual ingredient but was fundamentally the same as other composites that form boats, bathtubs, giant wind-turbine blades and myriad strong, noncorrosive, relatively lightweight items. Liquid resin mixed with liquid hardener, in correct proportions, heats up in what’s called an exothermic chemical reaction. This toasty mix cures into a very solid state with perfectly mediocre properties. Unless, that is, once mixed and before curing starts, the liquid saturates reinforcing fibers. Combined correctly and cured, these three components form composites with remarkable properties.
Resin comes in three types: polyester, vinylester and epoxy. The first two are most common in fiberglass boatbuilding, while epoxy has superior qualities and a cost that’s high enough to make it less financially appealing in boatbuilding. Epoxy is a common choice for fiberglass repairs, aftermarket projects and some new-boat construction.
For basic fiberglassing projects, choosing which resin type to use has two important considerations: compatibility and toxicity.
Epoxy bonds well when applied to the other resins, but the opposite isn’t true. Polyester and vinylester resins (including polyester gelcoat) form weak bonds when applied to epoxy. CW technical editor Steve D’Antonio notes that epoxy is not compatible with a gelcoat top coat. Epoxy resin is nonflammable and is not UV resistant.
As for toxicity: The vapor issue that turned Jamie off has been mitigated. Today we can choose resin with reduced volatile organic compounds, referred to as low-VOC. This type of resin costs more, stinks less, and is much less toxic to humans and the environment.
The hardener (also called catalyst and curing agent) that creates an exothermic reaction for polyester and vinylester resin is methyl ethyl ketone peroxide. Commonly called MEKP, this clear liquid is highly toxic and explosive. For this reason, we prefer epoxy resin, with hardeners that are less volatile. Always follow the manufacturer’s safety guidance.
“The majority of industry professionals look to vinylester resin’s near-epoxy-like qualities, at a lower price, easier wet-out, and chopped-strand-mat compatibility, albeit with the unpleasant fumes, when it comes to repairs and achieving tenacious secondary bonds,” D’Antonio adds.
“Vinylester and epoxy are generally accepted as osmotic blister-proof; polyester isn’t.
Thin layers or coats of epoxy can be used; not so for polyester and vinylester. They require the thickness for proper curing.”
The difference in shelf life is important to consider, especially in the context of cruising. Vinylester and polyester are reliable for about six months, while epoxy is reliable for a year or longer depending on storage conditions.
Factors and outcomes
Creating the right exothermic reaction for the resin to cure properly is more nuanced than perfect sail trim to a sail tweaker. It’s not as simple as mixing resin and hardener quantities as per the manufacturer’s instructions. For example, instructions might read: For every 1 ounce of resin, add four to eight drops of MEKP. Which is it? Four? Six? Eight? Or instructions might give you a concentration ratio by weight, ranging from 0.5 percent to 2 percent of MEKP-to-resin.
With polyester and vinylester resins, the MEKP quantity fluctuates because of other variables to ensure that the resulting heat isn’t too much or too little to cure properly. The hardener for epoxy is different. The ratio of resin and hardener doesn’t change. That’s why West System epoxy is intuitively named fast, slow and extra-slow cure. West System epoxy has a nice option for smaller fiberglassing jobs: hand pumps with an appropriate, measured amount of resin and hardeners. The benefit is that one pump of resin to one pump of hardener ensures a good mix ratio.
As for those other variables, there are a few to learn.
Working Time: Sometimes referred to as pot life, this is the time between when resin is thoroughly mixed and curing starts (when liquids starts getting viscous). On a hot day or when adding a few additional drops of MEKP for extra kick, you could end up with five minutes of working time for a 10-minute application. Once the mixed resin starts to kick, the application part is over whether you’re finished or not.
Air Temperature: Ambient air and resin/hardener container temperatures affect the exothermic reaction time. Hotter temperatures require less hardener or slower cure epoxy hardener, and the opposite for colder conditions. Containers in direct sun on a hot day will cause a hotter reaction and a shorter pot life, as will narrow, deep containers, rather than wide, shallow containers. Less MEKP or slower-curing epoxy hardener helps, but always start with a small batch to gauge how the ambient temperatures affect cure time.
Volume: The greater the total mixed volume of resin and hardener is, the higher potential heat and working time drops off quickly. Too much heat is dangerous. Jamie recounted a project on Dogwatch when he tried to save time by mixing a larger batch of resin. Big mistake! Quickly, the container got warm, then hot. He knew it wasn’t right and quickly got the bucket off the boat and onto the ground, where it smoked until the reaction finished. Oops. When a larger mix quantity is necessary, use a larger container so that the mixed volume spreads over a larger area. Larger, in this context, meaning wider and shallower. Overcatalyzed resin can do more than heat up; it can spontaneously combust.
Mixing: It’s important to combine the hardener and resin well. A mediocre mix won’t cure. With a stir stick, scrape the container perimeter and bottom. Then rotate the container and keep mixing. For a tiny batch—say, less than 1 cup combined—mix constantly for about 30 seconds. Longer mixing is needed as batch size increases.
Using fibers and fillers
Fibers and fillers are reinforcements that make resin strong, similar to how concrete is so much stronger with the addition of rebar. Glass fibers (where fiberglass gets the name) are sold as woven fibers (cloth), bonded fibers (mat) or stitched fibers (biaxial). The material comes in varying weights and widths. Research to choose the most appropriate for your repair or project. Note that, according to D’Antonio, with few exceptions, fiberglass mat, with a random arrangement of strands held together by a chemical binder, is not compatible with epoxy resin. The binding agent doesn’t dissolve or bond to epoxy.
Some fiberglassing jobs are suited not to fibers but instead to fillers, which are particulate matter mixed into the resin. Fillers are best for projects that need a smooth, faired surface, or when bonding parts together, or to fill voids. To meet this array of applications, fillers vary from dense powders for structural applications to lighter-than-air microballoons that make an easy job of sanding to a fair finish. Other fillers include cotton fluff, or one-sixth-inch milled glass. Each has different properties, so research is again needed to know what’s most appropriate for your project.
In addition to selecting an appropriate filler, mixing that filler-and-resin soup to the right consistency for a given job is important. The mixture might be very runny, to saturate and toughen a wood surface. It could be mayonnaise-thick so that it won’t sag on a vertical application. Jamie says that some applications are best when combining filler types, such as microballoons (for fairing) and colloidal silica (for a consistency that prevents sagging on a vertical or overheard surface).
In 2019, we replaced Totem’s 37-year-old deck hatches. Unfortunately, the deck cutouts for the new hatches were vastly different. It took creative fiberglassing skills, especially for the corners, to seat them properly. After much pondering, Jamie made a mold from cheap polycarbonate pieces. He used epoxy resin with quarter-inch chopped fiberglass and colloidal silica to form easy-to-make, strong corner pieces.
Preparation
Fiberglass repair is all about the surface being repaired. Is it also fiberglass? Polyester, vinylester and epoxy are compatible with all three types of resin if they are fully cured. Is the surface uncoated or painted? Fiberglass resins do not bond well to plastic, metal, dirty or painted surfaces. Compatible surfaces should be cleaned with acetone (following precautions). On fiberglass surfaces, acetone cleans and also reactivates the surface for better bonding.
Bonding surface area is important. For example, filling an old through-hull presents very little surface area for bonding. Hull flex could pop out a simple plug like the cork from a Champagne bottle. A better way to patch such a hole requires increasing the bonding surface area. This is done by grinding the to-be-repaired edges to a smooth taper that is seven to 12 times wider than the fiberglass thickness being repaired. For a half-inch hull thickness, a smooth taper of 2 to 3 inches around the hole radius should ensure enough surface-area bonding for a strong repair. Similar work to increase bonding surface area is necessary for projects such as repairing a hull fracture.
Voids are another gotcha to consider. These are unbonded pockets between layers of fiberglass. Boats made before vacuum-bagging systems, like Totem, have many small voids from air bubbles or contaminants that prevented the surfaces from bonding. We can’t change those now, but when applying new fiberglass layers, we have to consider how they might affect the project overall. Tight and complex corners, air bubbles, and contaminants can result in voids that weaken overall strength, and can be compensated for in the project design.
Execution
Whether filling screw holes from a decommissioned deck fitting or repairing a critical part in a remote anchorage, mixed resin and fiber/filler (including coconut coir!) reinforcements make versatile composites with easy-to-moderate DIY complexity. It’s not magic, and practice helps.
Start in small batches, learning how ambient temperature, mix volume and hardener choices affect working time. Two liquids and added reinforcement can steer cruisers to repairable peace, after adversity.
Safety First
While fiberglass is wondrous in many ways, it’s terrible in others. Working with it safely requires particular care.
Particles are irritants to any exposed skin; inhaled particles can cause permanent lung damage and be a factor in lung cancer. Covering up and using proper protective equipment is important.
Direct contact with resin can irritate skin, but fumes are the bigger risk. It’s why we choose epoxy over other types; epoxy is less volatile and less toxic. If polyester or vinylester is used, a properly fitting respirator is a must, as well as eye protection.
Acetone is the solvent most of us rely upon during preparation for fiberglass work. Its vapors are also dangerous, and can cause permanent lung damage, as well as liver damage if absorbed through the skin. Non-permeable gloves must be worn. Be aware of and take all necessary precautions for fire risk from any possible combustible reactions.
Over time, exposure might make an individual highly reactive and unable to work with a substance again.
Ensure that the space you are in is well-ventilated, or add ventilation. Wear gloves and clothing to reduce contact with glass fibers. Protective eyewear can prevent eye irritation. Use a respirator that’s appropriate to the type of fiberglass particles in your workspace.
CW contributors Behan and Jamie Gifford have progressively maintained their fiberglass Stevens 47, Totem, while sailing around the world. To follow their journey, visit sailingtotem.com
For more on fiberglass repair, check out CW technical editor Steve D’Antonio’s column at cruisingworld.com/story/how-to/fiberglass-repairs


