I have been messing about on boats for more years than I care to remember, but it still never ceases to amaze me how many new things you learn when you restore an old boat. One example: Who knew that the ceiling on a boat is not the ceiling at all? “Ceilings” are those wooden slats often fitted by manufacturers on cabin sides, most frequently in a fo’c’sle. The correct nautical term for the actual roof (i.e., ceiling) of the cabin is “overhead.”
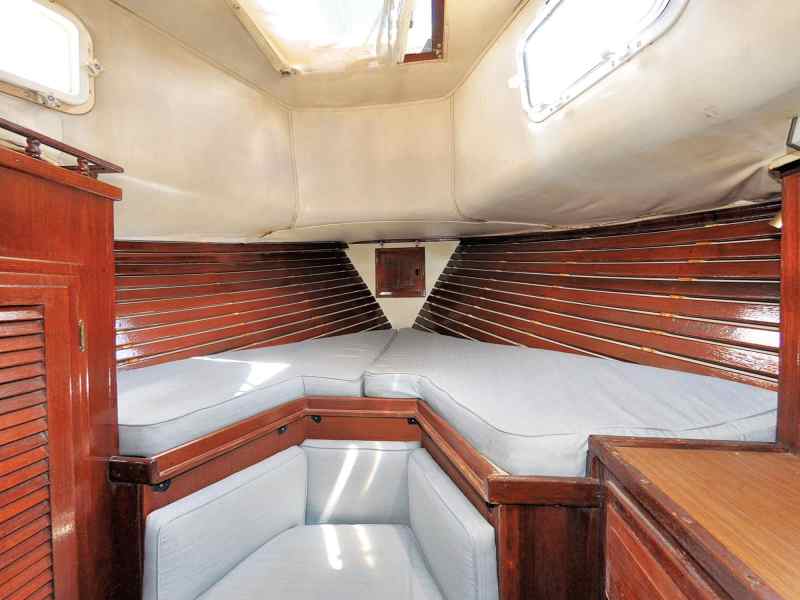
I learned these archaic snippets (whose only value are in impressing fellow mariners) when I decided to renovate the forward cabin of my 1977 Down East 45 schooner, Britannia. The cabin was still covered with 40-year-old faded foam-backed vinyl, much of it in rotten, smelly condition, and all the woodwork needed revarnishing, if not a complete replacement.
Nautical expressions can get somewhat confusing when referring to ceilings, which are really slats, and roofs, which are overheads. So for this article I decided to use common terms. “Roof” means the underside of the fiberglass deck that forms the actual roof of the cabin, and also includes the underside of the lower deck, forward of the bunks. “Slats” are the teak strips on the sides of the hull. “Side” means the sides of the cabin, both the lower sloping sides with the slats, and also the upper sides with the port lights in them.
Teak slats might look nice, but they are extremely difficult to clean behind and can trap dust and mildew. I therefore decided to remove all 22 of these 2-by-½-inch-thick strips from the sides, and replace them with easy-to-clean hygienic plastic sheeting. With six plugged screws securing each slat to the hull ribs, that was a lot of unscrewing—132 screws, to be precise! After the sides had been washed, an immediate improvement was that the cabin appeared larger, even though it had actually been widened by only a little over an inch.
I then cut out all the dirty vinyl covering on the sides and roof, which was glued and stapled to the fiberglass deck. I removed three port lights—two on the starboard side and one to port—then temporarily sealed the outside with duct tape to try to keep any rain out until I could reinstall them after I had fitted the new plastic side coverings.
Anyone who works on boats knows it is usually much easier to strip things out than to rebuild them, and this project was no exception. After cutting out all the dirty vinyl, I then made templates by taping sheets of foam art board together, then cutting and adding bits to form the exact shape of each side. Then I traced the template on a plastic sheet on the marina dock. Plas-Tex plastic sheet comes in 4-by-8-foot panels about 1/16-inch thick. It is very pliable, waterproof and washable, yet easily trimmed with scissors and a box cutter. It is sold by Lowe’s hardware store at $20 per sheet. I used a total of five sheets.
I glued the panels to each side of the hull using contact adhesive on the side ribs and battens that run along the top of the cabin. I used gel-type adhesive because it is not stringy and doesn’t drip like the regular sort. This is particularly important when applying glue upside down. I screwed a teak batten along the bottom of the sheet, which stopped it from sagging between the ribs.
With the lower panels in place, I then made templates for the upper sides, which curve around the shape of the deck. These were larger than the lower sides and more difficult to glue underneath. Reinstalling the port lights helped to keep the large side panels in place.
The largest and final piece of Plas-Tex had to be glued to the forward underside of the roof. I made the template by taping the art boards to the roof with masking tape to hold them in place while I trimmed and added pieces where required.
RELATED: Restoring Your Gelcoat
After cutting a plastic sheet to shape, I pre-glued the fiberglass roof and the plastic. Sticking it up after about 10 minutes was a delicate once-off operation because contact adhesive sticks—as its name suggests—on contact. I lay on my back while my wife slid the large sticky sheet over me, and I carefully placed it where I had made marks from the template. It was became a question of “push it up and hope,” and then pressing it in place with arms and legs while the glue made contact. I then made props to hold the sheet in place while the glue hardened.
I had originally trimmed the sheets to overlap each other by about half an inch. This enabled me to score through both overlapping layers at the same time, using a box cutter with a sharp new blade. I then stripped off the top layer and peeled away the inside layer, leaving a perfect butt joint between the two pieces. It was just a matter of cleaning excess glue with solvent.
I cut other teak trim pieces from the slats I had removed, varnished them, then glued them to cover the joints between the sides and roof.
There were also two sections that needed covering in the roof of the cabin, between the deck beams and around the hatch. For this I used the same tongue-and-groove plastic boards I had used throughout the rest of the boat. It is called plank paneling and is PVC planking used as wainscot panels on house walls. Each board is 7 inches wide and ¼-inch thick and comes in a pack of three boards, each 8 feet long, for $20 from Lowe’s. It’s reversible; one is molded with two strips and the other with three thinner strips. I decided to use the two-strip side. An important benefit, particularly on a boat, is the rot- and mildew-free lifetime guarantee, along with the ability to wash it with soap and water. I had also found that the thickness gave better thermal insulation from the hot deck compared with thin vinyl. I measured and trimmed these panels individually to accommodate any unevenness between the deck beams, then slotted them into the previous panel, and discreetly nailed them to the wooden beads that had supported the original vinyl. I needed only one pack to complete this small area.
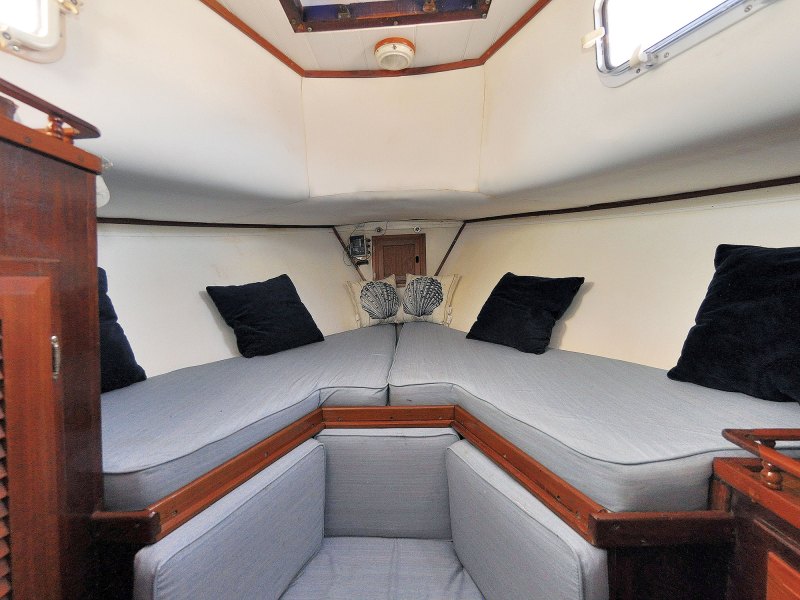
These improvements made the cabin appear much larger than before because the dark wood slats tended to bring the sides inward. It is also brighter and much easier to clean.
I added a second 12-volt dome light to provide better light into this cabin. I also wired two 120-volt sconce lights and connected both systems to a double switch mounted near the door. This is a much more practical method than groping in the dark for the tiny overhead dome-light switches.
There are two hanging lockers, one to each side, that had been varnished with multiple layers over the years. I removed both locker doors, along with the pin rails around the shelf tops. I also removed the cabin door and the chain locker door and framework, along with four sliding drawers. I took them home to restore in my garage. The locker sides and tops had to be stripped in situ with varnish remover, then scraped down to the original teak. This was then cleaned with teak cleaner and given two coats of satin varnish, which brought out the beautiful golden tones of the wood. The inside of the lockers was then painted white.
As part of the renovation, I wondered what to do about the imitation-teak laminate shelf covering on top of the lockers. These were not scratched or damaged because Formica laminate is very resilient, but they had lost their luster over time. After experimenting with a small section, I decided to varnish them with clear gloss varnish. I cleaned the laminate with soap and water, then slapped on a liberal coat of clear gloss with a 2-inch brush. I then left the tops untouched for a week so the varnish could thoroughly dry to a hard finish. It set to a fine, smooth, shiny finish with the advantage that when it gets scratched—which it undoubtedly will—it will be easy to retouch with a dab of new varnish.
I then reinstalled the freshly varnished pin rails around the edges of the shelves. But instead of the square corners, which the original pin rail had, I made rounded corners out of spare wood. These look much nicer, but more important, they are not as painful when you bump your arm against them as the boat rolls.
We had taken the foam bunks to our home to wash the covers. When everything was replaced, we found ourselves with a pristine new double cabin. It had not cost a lot of money, if you don’t count the effort—but it was all worth it.
Costs
| Five sheets of Plas-Tex sheeting | Lowe’s $100.00 |
| One tin of contact adhesive | Lowe’s $14.60 |
| Plank paneling for overhead | Lowe’s $19.99 |
| Dome light | Defender $32.99 |
| TOTAL | $177.58 |
Serial DIYer Roger Hughes is a frequent contributor to Cruising World. See more of Britannia’s renovation projects at schooner-britannia.com.


