
Fresh water is one of the few things the human body cannot do without. A person can survive several weeks without food but only three or four days without water. This is why the logs of explorers such as James Cook are filled with references to anchorages where rivers were found, descriptions of long days working to replenish the ship’s water supply and worried remarks about the number of casks found sour in the hold midocean. The tales of voyaging yachts, such as John Guzzwell’s Trekka and Frank Wightman’s Wylo, also devote paragraphs to rain catchment and refilling the tanks in port. This was our situation when my husband, Seth, and I set off as cash-strapped college kids to circumnavigate aboard a vessel much more akin to the home-built Wylo than anything on the market today. We tried catching rain, we took seawater showers and we spent long days in remote anchorages hauling buckets of fresh water from shore to our boat.
In spring 2014, however, as we were preparing for our current voyage to the Arctic on our new-to-us boat, Celeste, Seth and I learned of Katadyn’s PowerSurvivor 40E, an efficient, low-draw watermaker. We’d been worried about our water supply for this journey because Celeste carried only half the water capacity of the heavy-displacement vessel on which we’d circumnavigated and yet the Arctic is a desert — water would be expensive or even impossible to obtain there. We debated filling the bilge with gallon jugs, à la cruiser Annie Hill, but didn’t want the extra weight pushing down our waterline. So, we approached Katadyn (now called Katadyn Group, with watermakers branded under the name Spectra) with a sponsorship proposal for our Arctic voyage and were soon the owners of a new 4 amp, 1.5-gallon-per-hour desalinator that we could operate manually in the event of a power failure.
Compact and relatively lightweight, the PowerSurvivor was simple and straightforward to install. Seth and I decided to fit it in a locker in the head, and we found that we could still stow the locker’s previous contents (mostly toilet paper and paper towels) without any trouble. We chose the head locker for several reasons: It was a convenient location for installation and servicing; it provided easy access to a saltwater intake and a drain; and it was a dry area free of fuel vapors or excessive heat, as stipulated by the owner’s manual. Our classic cutter was on the hard when we performed the installation, although it would be simple enough to do in the water; the only difference is that you would have to close the seacocks.
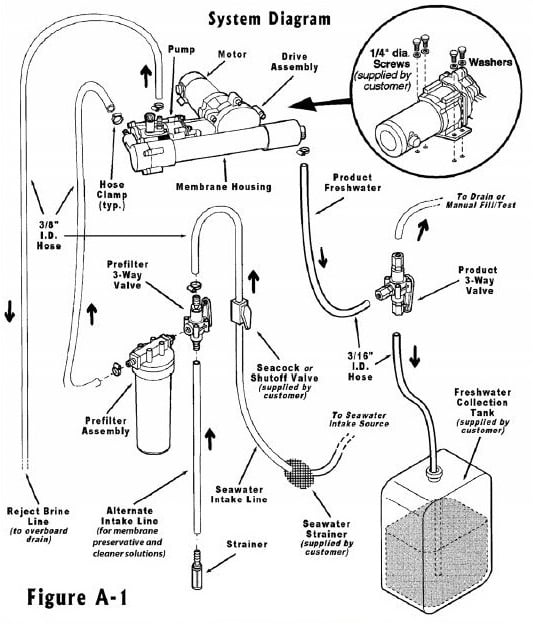
As with many boat projects, the key to a hassle-free installation is the preparation: It’s important to configure as many of the hoses and electrical connections as possible before affixing the watermaker itself. The PowerSurvivor came with everything we needed that was not specific to Celeste, including valves, hoses and hose clamps. Our first step was to fit a strainer and T-valve on the saltwater intake hose. This allowed us to use the intake either for its original function of flushing the head or for the reverse-osmosis system (though you wouldn’t want to do both at the same time!). The through-hull had the advantage of being at a low point on our hull, minimizing the chance of air intake while heeling or in rough conditions. It was also ¾ inch wide, satisfying the requirement of at least ½ inch for the desalinator, and of course, it had a seacock for safety.
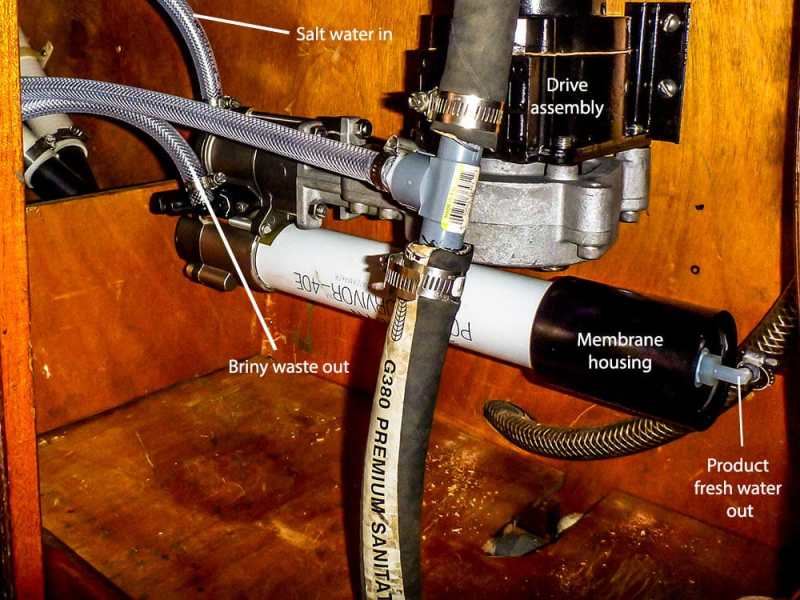
We then cut our sink’s drain hose and fit another T-valve for the briny waste to exit the boat. We also mounted a three-way valve for the fresh water coming out of the desalinator. This let us run the fresh water either through a ¼-inch-inner-diameter tube to test the water or to fill jerry jugs, or — once we’d tested the desalinated water’s quality — through a 3⁄8-inch reinforced plastic hose to a T-valve we inserted into our starboard tank’s vent.
Next came the electrical connections. Using 14-gauge tinned, stranded copper wire, we ran power from our main circuit-breaker panel to a terminal bar in the locker with the watermaker. Once we had hooked up the wires that came with the PowerSurvivor to that terminal bar, the watermaker had its own switch on the breaker panel to turn it on and off.
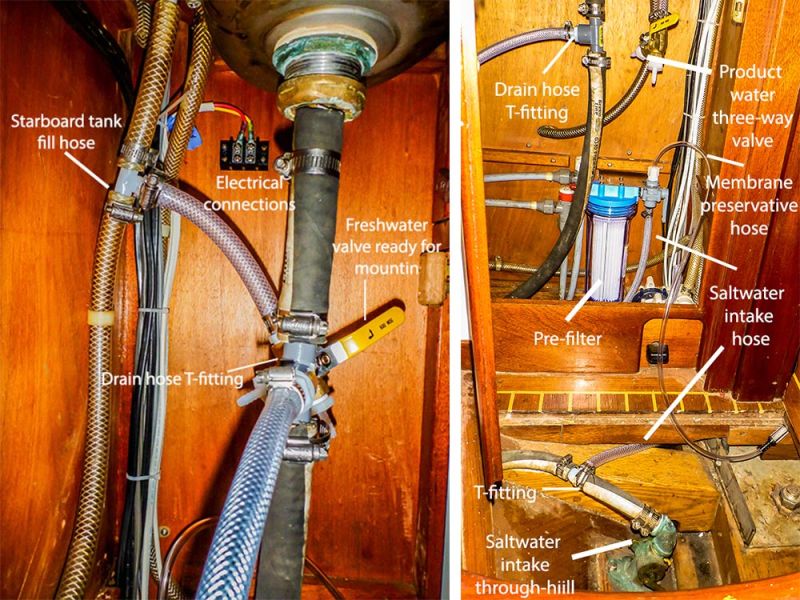
We then mounted the pre-filter below the pump intake, as recommended by Katadyn’s engineers, to allow air bubbles to pass easily. There was plenty of room for it alongside our pressure-water hoses, and even room to mount a silt-reduction filter if we needed it for brackish or shallow water, inland waterways or areas of glacial runoff, this last being the most likely on our present voyage. The pre-filter should be mounted vertically and through-bolted with stainless-steel hardware. Its three-way valve — which allows you to choose between seawater intake for regular operation and another hose for membrane-cleaning solution — should be sealed with nonhardening paste, such as Loctite 5331, for an airtight seal. We also mounted the pre-filter in a part of the locker that’s easily accessible for maintenance, which includes inspecting and emptying the housing, cleaning the filter regularly and treating the membrane any time we won’t be using it for a week or more. In the tropics, this time frame is closer to three days, but in higher latitudes, the cold water and air keep algae growth down a little longer.
With all that completed, it was time to mount the drive assembly/pump/membrane unit. The trickiest part was holding the 25-pound device in place while Seth marked its position. Seth then drilled the holes in the bulkhead, after which I held up the PowerSurvivor while he fitted the first two ¼-inch stainless-steel bolts. With the desalinator firmly in place, the second two bolts were easy. We made sure to mount the desalinator with the long axis of the membrane in a horizontal position; to do otherwise would risk ruining either the drive assembly (if the pump developed a seawater leak) or the pump (if the drive assembly developed an oil leak).
Because we had installed all the hoses in advance, the only thing that remained was to plug in the unit. We connected the 3⁄8-inch saltwater intake hose from the pre-filter, the 3⁄16-inch freshwater hose from the end of the membrane canister to its three-way valve, and the 3⁄8-inch briny-waste hose out to the T in the sink drain. Then, we attached the electrical wires from the drive unit to the terminal bar (with the breaker switched off, of course). The owner’s manual recommends either leaving enough hose coiled next to the desalinator so that you can pull it out for manual operation without undoing your installation, or assembling a separate set of hoses so you can move it to any location for manual operation. We originally left lots of hose coiled up but decided after the first operation to shorten our hoses to decrease the distance the intake water had to travel. We opted for assembling a separate set of hoses for emergencies.
Treating the membrane to prevent biological growth had been a mystery to Seth and me before owning a watermaker, but as it turns out, that too is easy. First, we lifted the lever on the pump’s cleaning valve. According to the manual, you are supposed to use 2 quarts of desalinated water from the PowerSurvivor for the preserving process in order to avoid using chlorinated (city) water that could damage the membrane. We had neglected to keep enough water from our last use of the desalinator (and were now in the marina where we planned to keep Celeste for the winter and where we didn’t want to run the unit), so we bought a gallon of distilled water. We prefer to use more than 2 quarts to ensure that plenty makes it through the unit, since some stays in the pre-filter. Into this we mixed — according to its instructions — the membrane preservative solution that had come with the PowerSurvivor. We positioned the three-way valve so that the product water would run through the testing hose rather than into our starboard tank. Then we turned the lever on the pre-filter’s three-way valve so that it would use the membrane cleaning intake hose rather than the saltwater intake. This intake hose has a small strainer attached at the end; we put this into our container of distilled water and membrane preservative. Then it was a simple matter of running the desalinator until all the preservative solution had been drawn through and foamy water was coming out the reject-brine hose. Because we were leaving Celeste in the Aleutian Islands, we continued to run the watermaker until air was coming through the brine hose as a precaution against freezing conditions.
The PowerSurvivor has been a big success for us so far. It takes up hardly any storage room, it’s easy to operate and maintain, the water is as pure as it should be and the desalinator produces its promised 1.5 gallons per hour at an average of 4 amps. The manufacturer warns that it might require more power upon first operation (we found that it did not) and that its output might decrease in water below 57 degrees Fahrenheit. The chart in the owner’s manual shows capacity dropping to about 90 percent at 55 degrees and 60 to 80 percent in water below 40 degrees. In our first summer with the desalinator — during which the coldest water temperature we experienced was 49 degrees, in the Bering Sea — we did not see any noticeable drop in output or increase in current draw, and thus found the watermaker to be very reliable in normal circumstances. In summer 2015, we tested the machine at the edge of the polar pack ice, at 71.4 degrees N in the Arctic Ocean above Barrow, Alaska. With the sea temperature at 37 degrees, we did find a modest decrease in output: 5 liters per hour instead of the usual 6, which equates to 83 percent of normal and thus better than the engineers’ predictions. In other words, the PowerSurvivor has more than lived up to our expectations.
Having sailed long distances both with and without a watermaker, I’m now convinced that the half-day project of installing the PowerSurvivor and the minor task of servicing it when needed is well worth it. We no longer spend our first day after a passage hefting buckets of water. During our summer in the Arctic, we didn’t refill our tanks from shore for seven weeks and yet we never rationed ourselves — in fact, we took frequent freshwater showers. Now, if we want to anchor and avoid tying up to a dock, we can. If we doubt the quality of the shore water, we don’t have to fill up with it. And all this with only the power produced by our solar panels. Capt. Cook would have loved it.
Ellen Massey Leonard and her husband, Seth, have circumnavigated the globe and cruised extensively in Alaska and the Arctic. Ellen chronicles her adventures at gonefloatabout.com.


