When we reached the South Pacific eight years ago, we were still newbies in coral-reef navigation. We’d had a few close encounters with rocks in murky water while cruising the Caribbean side of Panama and were nervous about dropping the hook near coral. We didn’t dare take our 1988 Sparkman & Stephens 41, Pitufa, with her 7-foot draft, anywhere near shallow water; we sought out deep blue anchorages, which we deemed safer. We’ve learned a lot over the past few years and know now that dark blue isn’t always synonymous with safety. Just because you can’t see coral reefs and other underwater obstacles doesn’t mean they’re not there. Unfortunately, many crews find this out the hard way, when an anchor gets stuck on a reef or chain wraps around a coral head.
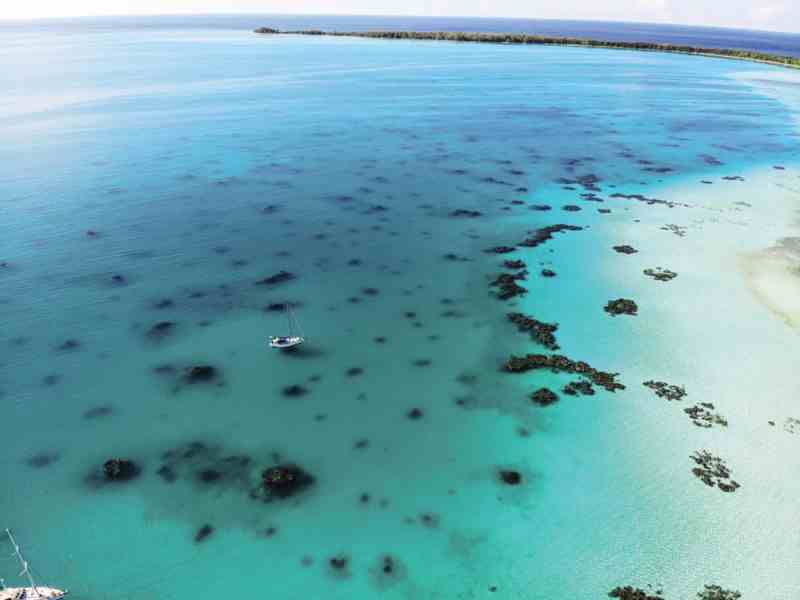
If you dive on your anchor and check its placement (and the set of your neighbor’s anchor), you’ll find that coral growth is abundant in 30 and even 60 feet of water in many areas of the South Pacific. Sadly, due to global warming and pollution, many coral reefs are damaged or dead. But some are very much alive and can easily be damaged. In deep anchorages, where letting out a lot scope is necessary, 200 feet of heavy chain can wipe out a large area of coral during an unexpected windshift. Damaging a reef can lead to resentment toward cruisers from the local populations and gives all sailboat crews a bad reputation. This resentment can grow into open hostility and ultimately lead to anchoring bans, such as the recently enacted ones in Tahiti, Moorea, Huahine and Bora Bora.
Safety Risk
Dropping a hook on or near coral is also, of course, a huge safety risk. During an unexpected windshift or rapidly deteriorating weather, if your chain is wrapped around a coral head, it can’t be cleared quickly. The result can be severe damage to both the vessel and the coral, and even the loss of the boat. We witnessed a neighboring boat in an anchorage on the outer reef of the Gambier Islands bend its bow roller when the wind shifted suddenly from east to north. The chain was wrapped, and the boat pitched violently on very short scope in rapidly increasing waves.
The fetch across lagoons should not be underestimated either, especially in large Pacific atolls such as Fakarava or Rangiroa, where the waves can build to 5 feet and higher surprisingly fast, even in light to moderate winds. Recently we were anchored in light easterly winds in Rotoava on the northeast side of Fakarava in calm waters when Pitufa suddenly started rolling. We wondered if a ship was passing by. Five minutes later, a squall reached us, packing 25 knots of wind from the south. In another example, we know of one boat that had its windlass ripped out of the deck during a northwesterly trough in the Tuamotus. And, in May 2020, several sailboats in Fakarava got trapped on a lee shore in front of the village on the eastern side of the lagoon when the wind shifted to the west. They could not get their hooks up quickly, and two boats ended up onshore and were total losses.
Prepare in Advance
Cruisers tend to tell the tales of wrapped chains and trapped anchors at sundowners and get-togethers, making light of the situation and tossing them into the this-happens-to-everyone pile. But fouled anchor gear can lead to major disasters. Fortunately, there are many ways to avoid damaging your boat and the environment if you prepare ahead and follow some general rules.
Anchors: Make sure you have a reliable, heavy anchor. Rocna and similar designs dig into sand quickly and are ideal for atoll anchorages. Plow anchors—such as a CQR or Delta—do just what their name suggests before they set. We love and trust our 55-pound German Bügelanker (similar to a Rocna), which we use in combination with 10-millimeter chain in basically all anchoring situations. Our Bügelanker sets in sand within a few inches and allows precision work when picking a spot. In fine sand or mud, the Bügelanker needs a while to settle in, so we don’t immediately set it under tension; once it has sunk in, it stays put. In addition, we carry a light Danforth to be used as a stern anchor or as a sacrificial anchor in an emergency situation when we are not sure whether the anchor will come back up.
Preparation: Prepare before arrival. We like to download and study satellite images before we depart on a crossing. That way we can plan ahead and mark large, sandy spots that look promising in our intended anchorage.
Use the daylight: Try to arrive with good light. Early in the morning and late in the afternoon, the sun turns the surface of the sea into a glittering veil, often making it impossible to make out the bottom.
Have a lookout: Post a lookout on the bow; they can direct the helmsperson and give feedback during reconnaissance circles around the anchorage.
Anchor where you can see the bottom: When possible, drop the hook where you can see the bottom. The shallower it is, the easier it is to judge where a sandy spot is actually located. Refraction fools the eye in deeper water.
Take your time: We often do a dozen spins around an anchorage before we decide on a spot. It took us a lot of willpower to anchor in shallow water the first few times we attempted it. We’d watch the depth sounder rapidly dropping as we edged toward a sandy shelf, while our heart rates accelerated upward at the same pace! We quickly learned to associate the shades of blue—from dark blue to light turquoise—with water depth, even though we still get fooled when the water is so crystal-clear that you believe you can touch the bottom in 15 feet.
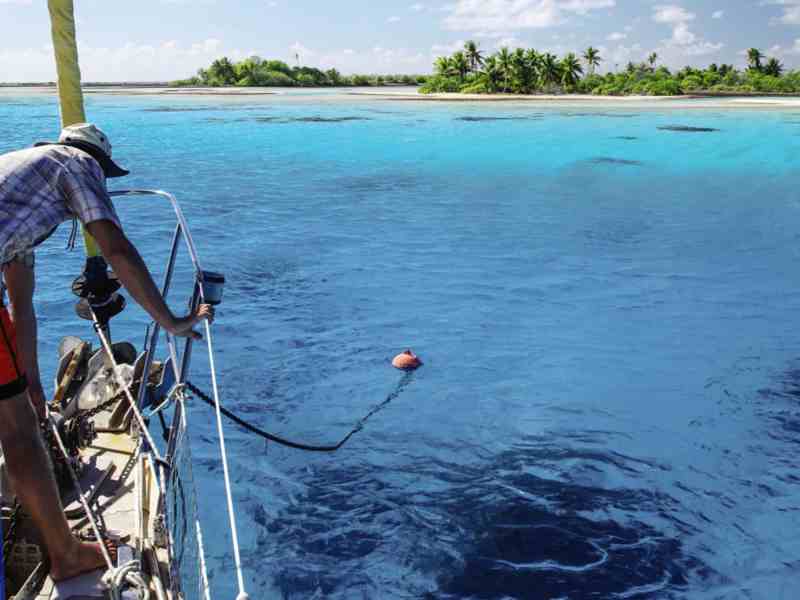
If in doubt, I stay at the helm and circle with Pitufa in deep water while my partner, Christian, takes the dinghy and scouts ahead with a portable depth sounder, or just jumps into the water and tries to touch the bottom with his toes. If only the tips of his fingers stick out above the water’s surface when his toes strike sand, we know that Pitufa fits in the spot as well—but only just. We try to anchor in depths between 8 and 15 feet, taking into account both tide and elevated lagoon levels due to swell. Generally speaking, fewer coral heads grow on shallow reef shelves, and we need only about 60 feet of chain to have substantial scope.
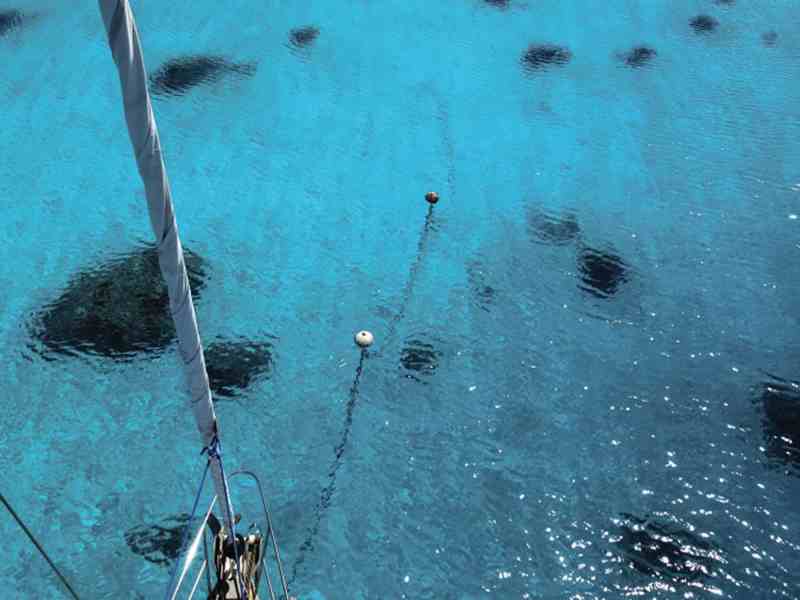
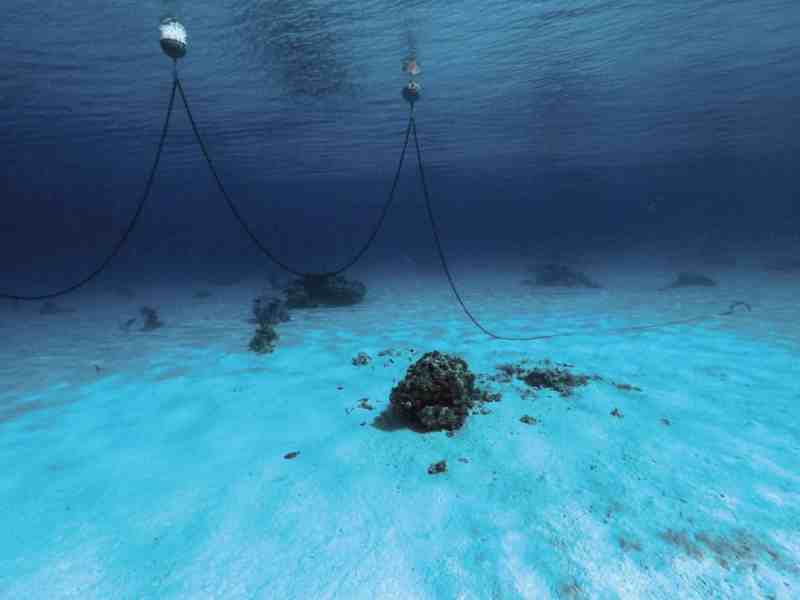
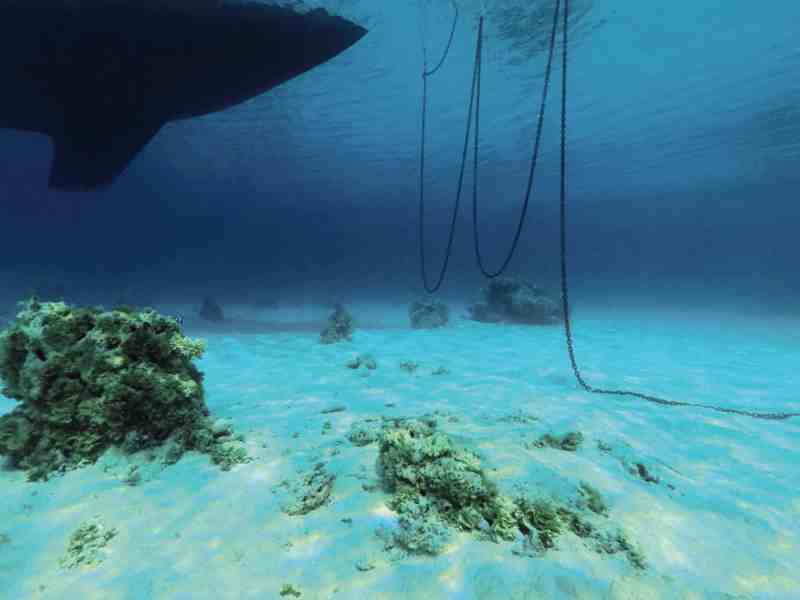
Float the chain: Quite often, we don’t find that picture-perfect, large sandy spot we wished for, but we can make do with a smaller, sandy spot near coral heads if it’s deep enough to allow us to swing over the top of the surrounding coral. In these cases, we make sure that the boat will clear any coral heads, and we drop the hook in the middle of the sandy area and slowly pay out chain. As we do so along the sandy bottom, we assess at which point the chain would contact any coral heads if we were to swing. When we reach that point, we snap in a float and add more chain. We find that it’s best to have multiple fenders or buoys individually tied to a very short line, each with carabiners attached to them that snap into the chain. If the scope is still not enough, we add another float, followed by more chain. During calms, the chain forms loops between the floats without touching bottom, so it’s impossible to get wrapped around obstacles. When the wind picks up, the chain stretches out and the buoys get submerged. Although some might argue that floats nullify the weight advantage of the chain and therefore reduce the overall holding power, we find that with a reliable anchor and enough chain on the bottom before the first float, a floated chain can be compared to chain followed by rope. In shallow water, it’s easy to have ample scope and therefore a flat, almost horizontal chain angle.
Buoying chains with pearl-farm buoys (where those buoys are readily available) has become a standard procedure throughout Polynesia, but unfortunately, we’ve seen several crews just anchor blindly in deep water and then busily add half a dozen floats. We call them feel-good floats, or alibi floats; the first ones can’t hold up the heavy chain and end up pinned to the bottom, while the last ones just bob decoratively on the surface off the bow. If there’s really no other choice but to anchor in the dark-blue deepwater areas where you can’t see coral heads, adding floats still reduces the risk of getting tangled up, but it is better if you tie two buoys together, or use one that’s a size bigger than the pearl-farm buoys so that it can actually support the weight of a longer chain section. It doesn’t make sense to keep threading floats onto the chain until it looks like a pearl necklace—such pretty designs only pose a hazard to local traffic.
Dropping the hook blindly is never a good idea. We dial up the patience, take our time, look around a little bit longer, and do our best to find a shallow, sandy spot—even if that means we’re a longer dinghy ride to our intended snorkel spot or to the pizza place ashore. Finding the ideal anchorage might take a bit longer, and using buoys on the chain takes practice and experience, but when you’re finally floating in a picture-perfect, light-turquoise swimming pool, you’ll find that it’s worth the effort.
Birgit Hackl and Christian Feldbauer have anchored their way across the Mediterranean, Caribbean and South Pacific since 2011. They’ve spent the past eight seasons in French Polynesia. Read more about anchoring, weather and other topics on their blog.


