tacktick
When we bought our used, late-1970s Sabre 34 a few years ago, it still had the original factory-installed sailing instruments. As with many older cruising sailboats, these included Datamarine speed and depth displays but no wind-speed or apparent-wind indicator. On occasion—gusty days in particular—I missed the latter, but not so much as to unstep the mast and run the wires necessary to bring data down from the masthead.
Tacktick Instruments, now owned by Raymarine, solved that problem when representatives suggested that I try out a set of the company’s Micronet wireless instruments and see how easily they could be retrofitted.
It would be great to have the wireless masthead sensor for which Tacktick instruments have become known, but I jumped at their offer because the installation could be done without having to haul the boat to install new through-hull sensors. Instead, I could use the existing speed paddlewheel and depth sounder for now and feed that NMEA 0183 data into a wireless interface unit that converts the serial data to the Tacktick wireless Micronet network. When I next haul the boat, I can then replace that unit with the hull transmitter and install Tacktick’s transducer depth/speed/temperature sensor to take full advantage of the display capabilities of the system. With a GPS also attached, the wireless, solar-powered display units will serve up a banquet of information in addition to wind speed, speed through the water, and water depth: cross-track error, waypoint arrival, heading, and speed and course over ground, among others.
Though my project stretched over a few days, with proper planning and an assistant, the job could easily be completed in a morning. To give you an idea of what’s involved, here’s how we did it.
1. The bulkhead-mounted Datamarine instruments were removed by backing off their thumbscrews and then pushing the displays free. Before I did that, though, inside the bulkhead I cut and labeled the cables leading to the speed and depth displays, and I also labeled the 12-volt power supply feeding them. I used acetone to clean the area inside and out.
2. Next, I gathered the components—the wind sensor, the speed and depth displays, and the wireless-interface module—and set them next to each other in the cockpit. Then, per the instructions, I powered up one display to begin the auto-networking function that detects other system components. This was a key step in the installation and would need to be repeated whenever any additional Tacktick equipment is added.
3. To mount the brackets for the new instruments, I trimmed a piece of King StarBoard to cover the holes left by the old instruments, coated the edges with silicone sealant, then bolted the patch into place.
4. Inside, I used a two-part, quick-set epoxy to mount a plywood pad on the interior of the bulkhead, then screwed the wireless interface into place. I connected the power supply from the old instruments and then, using a razor knife, stripped the coverings off the speed and depth cables and matched the colored wires inside to the colored terminals on the interface.
5. The most time-consuming part of the job was to mount the wind sensor on the masthead. In our case, it took multiple trips up the mast. First, my helper, Brian, discovered that the universal mounting bracket had to be modified to accommodate a metal ridge that runs down the center of the masthead fitting. Back on the dock, we used a Fein MultiMaster tool to trim and flatten one side of the round, hard-plastic bracket.
Atop the stick again, Brian found that the self-tapping mounting screws supplied with the bracket weren’t up to piercing the pilot holes drilled in the thick aluminum masthead plate, so it was off in search of the proper tap and stainless-steel bolts to do the job correctly.
Once the bracket was in place, it was a simple matter to install the sensor and tighten the setscrew holding it in place.
Using the Tacktick Instruments
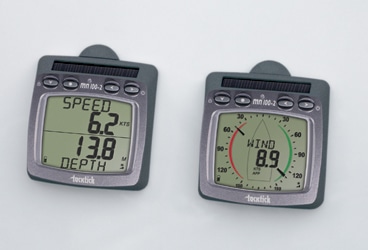
Powering up the instruments is simple. Start-up one display, and the other will come on automatically. Once installed, the instructions will walk you through several adjustments that let you customize what information you’re receiving and how you view it.
The first thing I tackled was the depth-sounder offset. The factory default is for a 3.5-foot keel. I prefer to know the depth from the waterline, so that it’s more in tune to what I’m seeing on the chart or GPS. To make the adjustment I used a heavy shackle and line, lowering the weight just to the point where the rope went slack. Then, it was an easy task to measure the wet portion of the line and apply the necessary adjustment. For things like wind speed, wind angles, and boat speed, you need to be underway, which gives you a good excuse to head down to the boat some early morning and go for a ride. Nice work, when you can get it. An added benefit of the wireless displays is that they can be removed from their cockpit mounts and taken below. On a windy winter night, just fire up the wind display and you’ll know right away how strong the gust was that set the shrink wrap shaking.
Mark Pillsbury is CW‘s editor.


