I’m a geek, and I’m an extrovert. That means that I talk with a lot of people about my shipboard electronics. And most of those people, in my experience, tend to focus their interest pretty sharply on my iPad navigation setup.
It’s hard not to love the iPad—desire seems to be designed directly into those things. My intent here, though, is to present an overview of how I use iNavX iPad navigation in my day-to-day cruising and to tell you why I think you should, too.
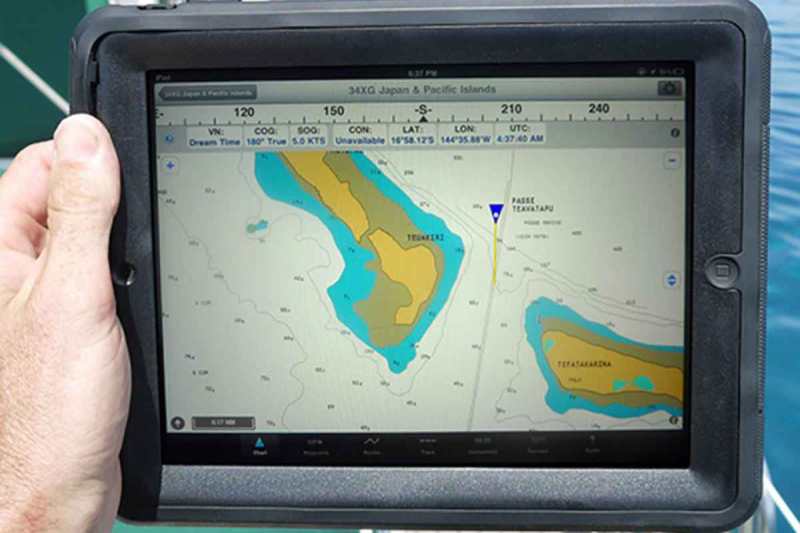
iNavX is a chart-plotter app ($50) that’s available for the iPad, iPhone, and iPod Touch. It’s a powerful tool that supports charts from NOAA, Navionics, NV, and more.
I have the iPad 2; Victoria, my wife, has a first-generation unit. iNavX works like a charm on both, but my iPad is our primary. My iPad has the white bezel, which I prefer to the black because it helps the device to stay cooler in direct sunlight.
NMEA and SeaTalk are boat-wide network protocols that allow instruments to share data, and I use a Brookhouse iMux-ST multiplexer to take NMEA and SeaTalk information—my ship’s speed/depth/wind/AIS/GPS info—and send it out over a WiFi network that the multiplexer creates. This iPad navigation setup is by and large what we’ve used to cross 5,000 nautical miles of ocean.We use the Navionics Gold charts, and they’ve worked out well for us. Navionics allows two copies per paid license, which is great for our redundancy solution—there’s one license for each of our two onboard iPads.
I’ve tried other options, including openCPN, MacENC, and MaxSea, and I find that iNavX is just simpler to use and more intuitive. The primary reason that iNavX on the iPad stands out is the facility of the touchscreen interface and the ability to quickly create, alter, and visualize routes. I won’t bore you with the details of specifically how I do all of this, but let me walk you through the workflow for our 500-mile passage from Tonga to Fiji to illustrate how iNavX helped us to adapt to changing weather and unusually complicated obstacles.
Planning Our Passage
We always start planning well in advance of a passage. First we use the “Port Search” feature to locate our destination. Then we drop in a few waypoints for our start and any obvious obstacles. This lets me know about how long the trip will be and—with a quick weather-GRIB overlay—which way the wind will be blowing relative to my rhumb line.
As soon as I’ve settled on the destination and am ready to get serious, I plot my way out of my starting harbor and into the destination harbor by dropping consistently named waypoints (for example, TNGFI 1 and TNGFI 2 for our Tonga-to-Fiji passage) along the route. After each waypoint is set, a simple tap allows me to add the next one to the end of the current route.
I download GRIB files twice a day, and iNavX has a passable GRIB overlay so that you can see the wind and swell direction and strength right on the charts. It’s also one of the features that iNavX could improve. Nevertheless, I make it part of every planning workflow.
| |Step by step: With cached satellite images, you can check out reefs and other obstructions along your planned route.|
Just Before the Passage
First, I export old tracks. iNavX has a maximum size of memory cache for tracks that’s just big enough for an 800-mile passage on low-resolution settings. If you remember to clear it before a passage, it also provides useful average-speed and miles-traveled statistics. In cases where there’s a tricky pass at the start of a passage, I don’t clear the memory until we’re under way because I might want to follow my old track out.
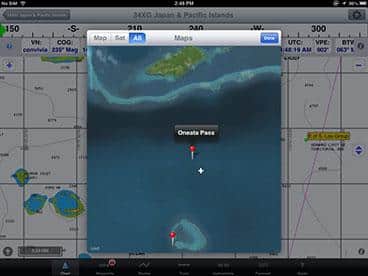
I then download and cache satellite images for passes and obstacles and compare them to the chart to ensure accuracy. I do this by going to an area that I want to verify, then dropping in a waypoint. Then I tap that area and select “Map” from the menu. iNavx then downloads the satellite image and shows my waypoint as a pushpin. When I want to verify that a pass was where I expected it to be, I drop a pin on either side of the pass, then check to see if the satellite image showed the reef in the same spot.
During the Passage
I expect to start changing my route as soon as we get under way. Once I know the reality of the wind direction and speed, I can make fine adjustments to our course, which leads to my favorite pastime: tack planning. iNavX makes it almost too easy to draw angles and measure distance right over your route. As a result, I tend to plot two, three, and even four tacks with a fairly high degree of accuracy. In addition to giving me much more accurate trip-time and time-to-waypoint data, it’s been a great tool for illustrating my intentions to the crew. I do a lot of this planning during night watches, and when she comes up, all my wife has to do is glance at the screen and ask me any questions. Having this visual aid really facilitates clear communication when I’m exhausted after a watch.
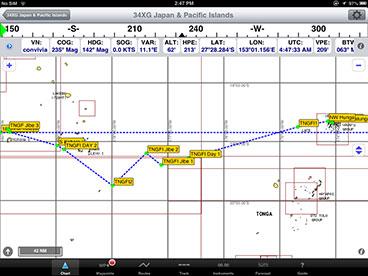
| |iNavX makes tack planning (above) simple and offers weather overlays (below).| |
|
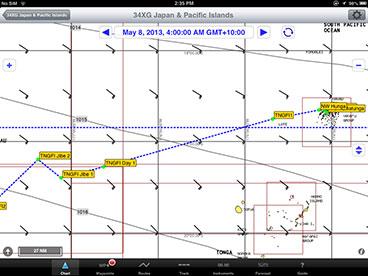
I drop in a waypoint every 24 hours and add that to my route. We love our stats, and our distance over 24 hours has been our favorite benchmark. iNavX takes all the sting out of this and actually makes it fun. I just scroll through the tracks, find the one that corresponds to my starting time (0100 UTC, for our passage to Fiji) and tap the Create Waypoint button. I also use the measure tool to figure a rough miles-made-good measurement.
For our Fiji passage, I had several possible routes from which to choose. I left port fairly certain that I’d take the Oneata Pass route, but as soon as the wind steadied, I changed my mind (several times) and decided on the southern route. Even then there were about three possible ways to weave among the islands and reefs. I was grateful to have a quick way to duplicate a route and make changes. Later, when I decided that the older route would work better, I just tap-tapped, and my route changed with my whim.
One huge benefit of this effort is super-accurate trip-time and time-to-waypoint estimates. iNavX does all the math for me—I get distance-to-waypoint, time-to-waypoint, and ETA-at-waypoint numbers, and the same for the destination. I can guess time of arrival to within half a day at the outset of our passage, assuming that the wind follows the forecast. By Mile 250 of a 500-mile passage, I can usually estimate our ETA to within three hours. This is awesome information to have under any circumstances, but it’s beyond awesome when you need to time your arrival at a pass, port, or other rendezvous.
I’ve also used iNavX for day and weekend sailing on San Francisco Bay, for the Banderas Bay Regatta, and for coastal cruising and gunkholing. I’ve come to rely heavily on my system, not only for its rich feature set but also for the ease of use that permits me quickly and confidently to make complicated decisions with an abundance of sophisticated information. Whether you’re a budget-minded cruiser who doesn’t want to compromise on features and quality or a geeky gearhead who wants to play around with technology that’s less inhibited by hardware-release cycles, this iNavX solution is well worth a try.
After sailing across the Pacific aboard their Cal 43, Convivia, Tucker and Victoria Bradford and their two daughters have settled—for now—in Australia. This article first appeared in the July 2013 issue of Cruising World.
To read more about how seasoned veterans used an Ipad to navigate Cape Horn, click here.