Upcycling is a bit of a buzzword these days, but the concept is nothing new to the cruising sailor. While traditional recycling involves breaking down used products to create new raw materials (think old water bottles made into a new fleece vest), upcycling refers to the creative reuse of an item without so much processing (more along the lines of a table made from an old door). To make it on the open ocean, you have to be creative and frugal. When time, space and resources are all under limitations, it is the “waste not, want not” attitude that often wins. We put the theory into practice after blowing out our mainsail, and before all was said and done, we had plenty of nifty new items — a boom tent, bug screen and tote bags — to show for it.
We ripped our main one dark and rainy night while heaved to off the Pacific island of Niue, waiting for enough light to make a safe approach. We jibed and I heard a soft tearing sound, like someone pulling apart well-worn Velcro. When I looked up, I found a small piece of the main hanging from the headboard, attached to the rest of the sail by only the leech line. It had ripped from leech to luff above the third reef point, and there was nothing to do but stow it until we were safely in port the next day. After we checked in, cleaned up and had a hot meal, I dug out my sewing machine and tackled the repair. I was able to fashion a patch out of Sunbrella, and our deeply scarred sail carried us another four months and 1,500 nautical miles until we stopped in Fiji for the season. Although my Band-Aid solution worked, it was obvious that it wasn’t a permanent fix; a new mainsail was definitely on the Christmas list.
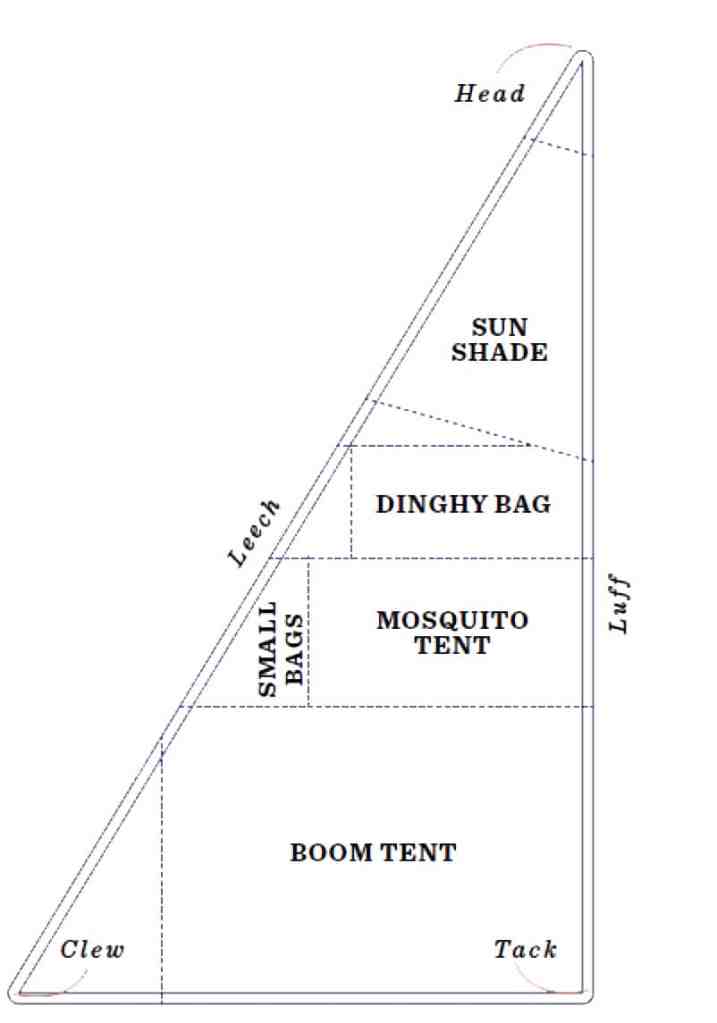
After we trialed our new main to make sure it fit properly, I looked for a spot to store the old one, planning to keep the damaged sail as an emergency backup. All I found was the settee in the main saloon. Keeping it as a spare was not an option. The majority of the sail was in good condition; in fact, besides the patch job, there was very little wear. As I sat looking at the great heap of sail that threatened to take over the cabin, it occurred to me that it had already been upcycled; a sailmaker had cut down and customized a much larger sail for the previous owner. It seemed like a waste to throw away all that sailcloth just because we didn’t have space to store it. My mind began to churn with possibilities. If it was no longer a sail, what could it be turned into?
At the time we were on the hard for the cyclone season, and I was living aboard. The season is full of glaringly sunny days punctuated with heavy rainfall. Without the cooling insulation of water surrounding the keel, the cabin was hot and humid. When it rained, I spent my days cooped up inside, all the hatches dogged and the air fetid and still. Enough material sat in front of me to sew a boom tent and an awning for the foredeck. I would have shade from the sun, and only during the heaviest rainfall would I have to close the hatches. Life on the hard was starting to look a little easier.
Sails, like all equipment, eventually need to be replaced, but major damage doesn’t have to take the wind out of your sails forever. With a little imagination, not only can you get a return on your investment, but, more important, you can save most of the material from ending up in the landfill. Next time you’re ready to change out your old sails, consider giving them a second chance by sewing new life into them.
Made for the Shade
A boom tent is a basic rectangle, an easy project to start with. Here’s how I went about it:
- To determine the width of the boom tent, I measured the distance between the center of the boom and the bottom wire on the lifelines and multiplied by two. The length was simply the length of the boom itself. We have an aluminum toerail that I planned to use to tie and tension the tent once I laid it over the boom, but I needed strong points in the boom tent to attach the tie-downs.
- Starting from the tack, I measured the needed length along the luff of the sail. By incorporating the grommets that were at regular intervals along the luff (and removing the slugs), I already had strong points on one side of the boom tent to use for tie-downs.
- I measured the width of the tent out from the luff and marked a dot every foot or so. By connecting the dots with a straight edge, I had a cut mark for the other side of the tent.
- After double-checking my measurements, I made the cut and hemmed the raw edge. This particular sail had a fairly flat cut, so I simply used the foot of the sail as the other short end, with the added bonus that the large grommet at the tack worked as a strong tie-down point.
- I now had three edges of my big rectangle complete. The clew had too much reinforcement to do much with (quite heavy and near impossible to sew), so I cut it off, effectively squaring off the fourth side.
- Instead of installing new grommets for tie-downs along this newly cut side, I simply cut off another length of luff from higher up on the sail, making sure the strip was wide enough that it would overlap by a few inches, and sewed it right along the edge, running three lines of stitches for strength and durability.
Playing the Angles
The awning for the foredeck was more of a triangle than a rectangle, but the theory was all the same. I planned to use the spinnaker pole as the support, and I needed tie-downs at the two outboard edges, as well as one fore and one aft on the centerline.
- Instead of working from a straight edge, this time I measured out from the center, drawing a capital I that was as tall as I wanted my awning long. This would be the centerline that ran along the pole.
- I measured and drew the top and bottom lines to the correct lengths, and then connected the four corners to create the outline of the awning.
- Since this was a much smaller piece of material, the tie-down attachments didn’t need to be quite as robust; a loop of strong webbing, well sewn at the corners, would be good enough.
Bug Off
We had been sleeping with a standard off-the-shelf mosquito net draped over the V-berth, but it wasn’t quite the right size. No matter how much tape I used to stick it up, the net came falling down after a few nights of tossing and turning. Instead of surrounding us with netting, I wanted to build a wall that enclosed the whole V-berth. It would have screen windows for airflow and a zipped door like a tent for easy access. Patterning and cutting the sailcloth was no problem, as I already had experience with dinghy chaps and the dodger/ bimini, but fitting the windows and zipper door so they fit tightly enough was a bit more challenging.
So I did what we all seem to do these days: I went online and watched a couple of how-to videos. I discovered the secret to sewing flawless windows in any project, and it made the whole endeavor much easier. The trick is to mark, tack and sew the screen and zipper on before making the cutout for the opening. It took a lot of double-sided tape; the sailcloth was just too heavy for pins, and tape kept everything in place as I moved it between my work surface and the sewing machine. After everything was sewn in place, I carefully cut the opening, being sure not to cut or tear the screen. The zipper door went in the same way, just with the extra layer of the two-way zipper between the screen and the facing. The result was neat and professional. To hang my new screen-and-sailcloth wall, I screwed awning track to the cabin top and attached two lines to the hatch above. The screen takes less than five minutes to put up, rolls away for storage when not needed, and makes for a comfortable night’s sleep in even the buggiest anchorages.
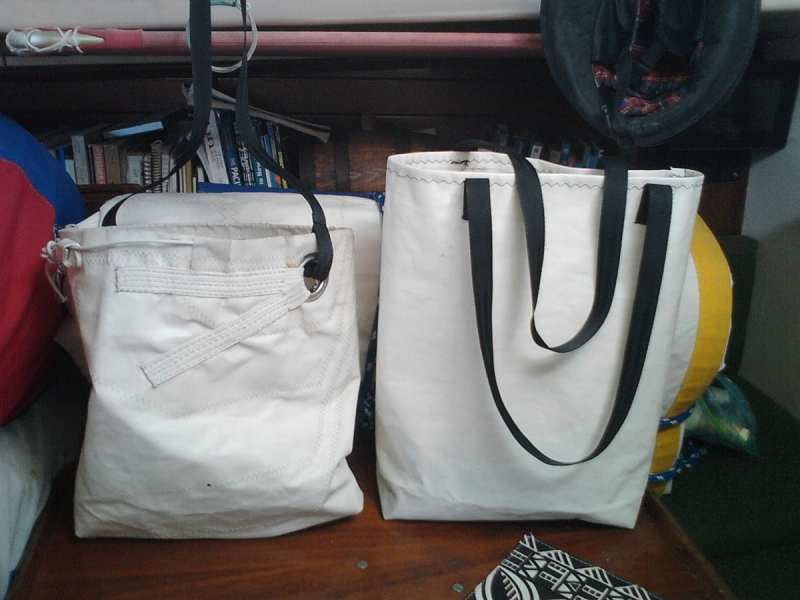
While the sewing machine was hot, I whipped up a storage bag for the dinghy, both for the offseason and to protect it when we store it on passage, rolled up and strapped down with ratchet straps.
Tools For the Job
Most industrial-strength sewing machines with a walking foot can handle sailcloth and other heavy fabrics. Sailrite, Juki and Adler machines are popular options, as are older Pfaff and Singer models. The sewing machine you choose will depend on your budget, the projects you have in mind, and your available storage space. According to Sailrite’s Matt Grant, a straight stitch is strong enough for sailcovers and boom tents, but a zigzag stitch is important if you also plan to mend sails, as it distributes the stress better across overlapping seams.
Sun exposure for a given project will inform your choice of thread. “We use a 200-denier PTFE or Teflon thread because it’s impervious to UV or any chemicals, and lasts the life of the fabric or even longer,” says Mark Hood of Hood Marine Canvas and Training. V-92 polyester thread is also a good option, adds Grant. Jeff Serrie of Island Marine Canvas notes that nylon thread is less expensive, but should be reserved for interior upholstery projects that won’t have any UV exposure.
You’ll need a sharp-point needle in the 20- to 23-gauge range to punch through sailcloth. Increase the gauge if you’re planning to sew through more than a few layers. Serrie says you should use a heavier thread and increase the tension on your sewing machine when switching to a larger needle.
Sailcloth is tough stuff, so you’ll need a large, sharp pair of scissors to cut patterns. To get through multiple layers and reinforced panels, try a razor blade.
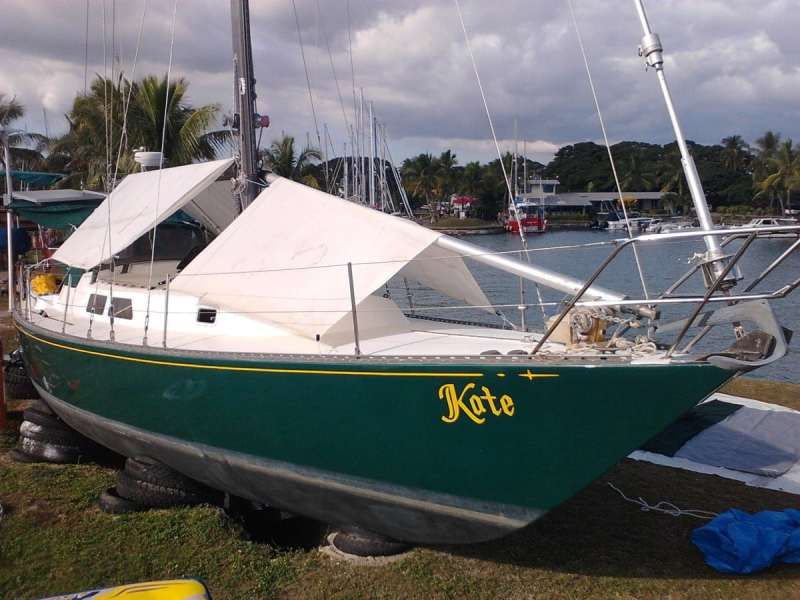
For over a decade Heather Francis traveled the world working on boats. She and her partner, Steve, have been sailing their Newport 41, Kate, full time since 2008. They are currently in the Solomon Islands. To follow their adventures, visit yachtkate.com.


