My 25-year-old Hunter 42 had aluminum tanks, which was very common across the boat and RV industries from the 1950s until well into the 1990s. Fortunately, the fuel tank was in great condition, which was confirmed after I added two inspection ports and cleaned that tank for the first time in 25 years, but that’s another story…
I had two aluminum water tanks: an 85-gallon one amidships and a 65-gallon one forward. Both, as one should expect, had some corrosion. My forward tank had been leaking very slightly, so I knew that needed replacement. However, replacing that tank would be a huge undertaking, requiring the removal (read: major deconstruction) of the entire guest bed and drawers, plus removal of the door and frame in the forward cabin. And then, after all that, the aluminum tank would need to be cut into two pieces in order to remove it from the boat. Obviously, this also means that the replacement plastic tank would need to be a little smaller capacity to be able to get it into the boat. I know well from sailboat owners forums online that this is a very common conundrum for many boat owners, so I set out to research if a refurbishment was both possible and practical. The main problem I had was to find a coating or sealant that was certified as food safe, or suitable for potable water. I finally came across a Norwegian specialist coatings firm called Jotun. Initially, my internet search had found “Jotun Tankguard DW,” but unfortunately, it was not certified for use on aluminum. This is where the technical guys at Jotun were very helpful. They researched their archives and found that another product called Jotacote 605 was indeed suitable for application onto aluminum and had been laboratory tested and certified as food safe by the NATA (Australian government certifiers) — therefore, perfect for my water tank.
The Job
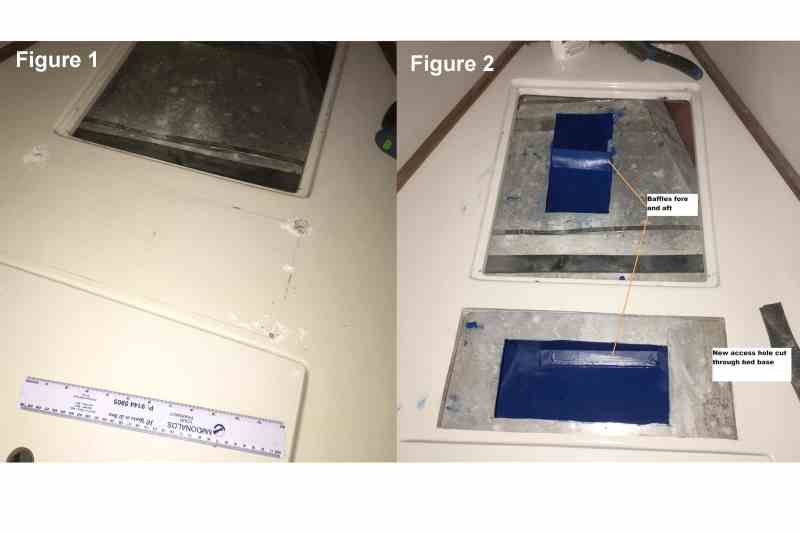
Step 1 — First, I had to cut a new access hole in the base of the V-berth in order to uncover the forward section of the tank (Figure 1). The tank has two full-width baffles, so I needed to cut two inspection ports in order to have enough access to the entire tank for preparation and coating (Figure 2).
Step 2 — I did a general inspection of the tank, and aside from some corrosion, it was in reasonable overall shape (Figure 3).
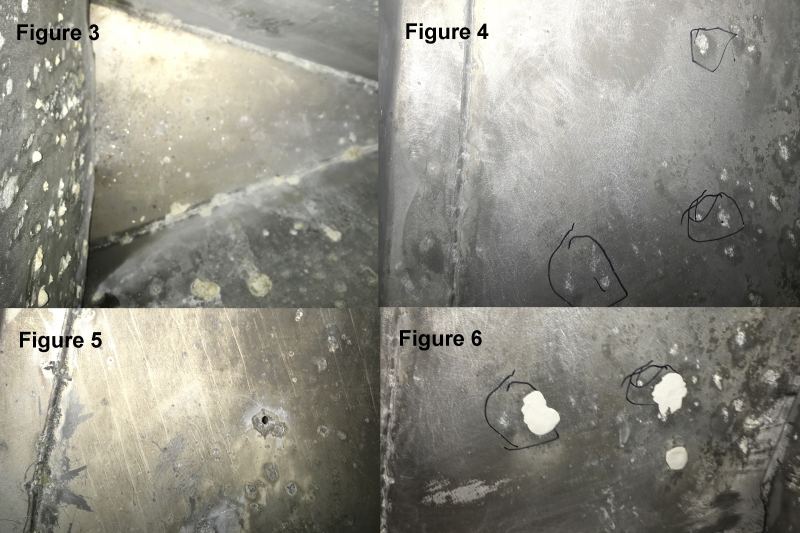
Step 3 — Next, I thoroughly cleaned all corrosion from all tank surfaces in order to assess the real condition (Figure 4). I was advised by the original tank manufacturer to use white vinegar to neutralize the corrosion.
Step 4 — After I decided that it was well worth a shot at refurbishing the tank, I started the prep work (Figure 5). Jotun advises that all surfaces must be rubbed with coarse-grit sandpaper to provide a good grip for proper adhesion of the Jotacote 605.
Step 5 — I found seven actual holes in my tank, ranging from pinholes to about 4 mm in diameter. I filled these with J-B WaterWeld epoxy putty (Figure 6). To do this, I pushed the WaterWeld well into each hole and in the deeper corrosion spots, then smoothed the top side.
Step 6 — Jotacote 605 is a two-part epoxy-based surface coating that can be mixed in various colors. I have blue because it was available off the shelf. I initially went over all the J-B WaterWeld patches and all welded seams throughout the tank with an initial Jotacote 605 coat. I let this dry and then applied a full surface coat throughout the entire tank (Figure 7). I left it well ventilated for 24 hours and then went back to do a second coat. After another 24 hours and a close inspection of all internal surfaces to ensure I was getting even coverage, I applied the third coat. (I utilized my iPhone to take pictures of all surfaces, which makes it simple to see all nooks and crannies.) By now, I had a beautiful, even and thick Jotacote 605 surface throughout. It really does look great.
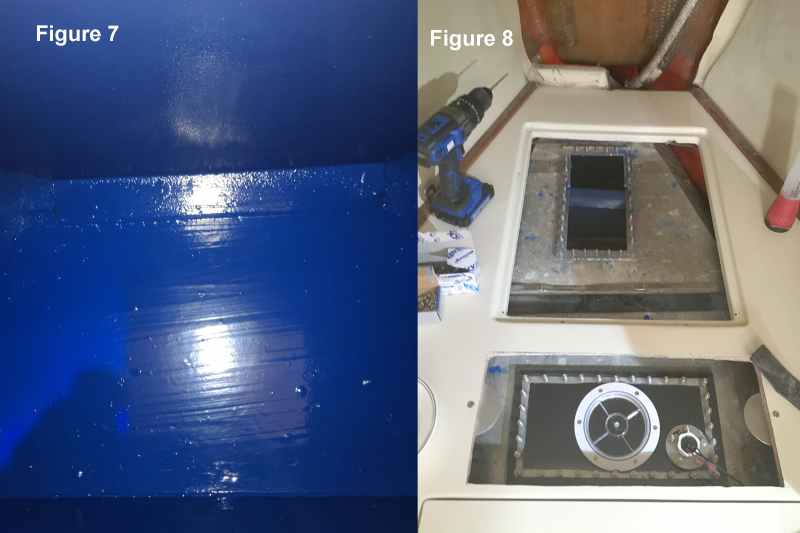
Step 7 — I made inspection panels to cover and seal the two 51⁄2-by-12-inch access holes I had cut into the top of the tank (Figure 8). I used 10 mm clear polycarbonate for the panels due to its absolute strength, and I used M6 stainless-steel bolts at 30 mm centers to secure them. I did this because the aluminum is only about 3 mm thick and was a little warped due to the new access holes, so I needed to be sure it would pull straight and form a tight seal. Because the tank material was too thin to tap a thread into, I had to come up with an alternative. For the new forward inspection panel, due to it straddling the front baffle, I used 5⁄8-inch-wide-by-1⁄8-inch-thick aluminum strips as backing plates, into which I drilled and tapped holes in line with the holes in my tank top and polycarbonate cover plate. This allowed me to put these strips with bolts inserted into the tank and then poke the bolts back up through pre-drilled holes in the tank. I could then use a thin rubber band strung between the first and last bolts to hold this in place. Next, I applied a thin bead of silicone as a gasket and lowered the polycarbonate cover plate down onto it, then secured with nuts and both flat and spring washers.
For the aft inspection panel, I added a screw-type deck plate manufactured by Beckson Marine as an access port (I happened to have a spare one). This allowed me to simply pass the bolts down through the Beckson and up through the pre-drilled holes from inside the tank to secure the polycarbonate cover plate with the same bead of silicone as a gasket. I filled the tank and left it for one week to confirm that there were no leaks. I then drained the tank to ensure that any residual taste from the Jotacote 605 was removed before refilling the tank with lovely fresh Australian water!
I invested about 12 hours of labor into this project. The total cost of the tank refurbishment was less than $200 all up, not including my labor, so I consider this a very successful endeavor. With a custom-made plastic replacement tank costing around $1,000, this was a no-brainer — not to mention actually a whole lot faster and much easier. In fact, I would now thoroughly recommend anyone with aluminum tanks to perform this project as a preventive measure, rather than wait until you have problems.


