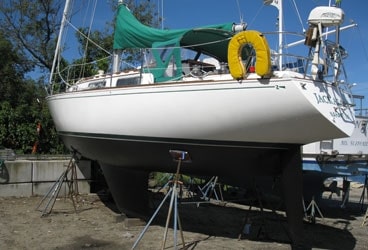
368 Jackalope
After a summer spent on a mooring in brackish, nutrient-rich tidal water, a winter at a dock near the commercial pier in Newport, Rhode Island, and most of the next summer in a harbor fed by floods of suburban runoff, Jackalope’s 34-foot waterline was a mess. Despite frequent boat hull cleaning, a brownish-black scum was etched into the dark-green boot stripe, and I’d long since given up trying to clean the strip of white gelcoat between the boot stripe and the boat’s black bottom paint. As I left for work each morning in the inflatable, I’d look back and wince at the once-white topsides whose color now more closely matched the teeth of a coffee-guzzling, three-packs-a-day smoker.
Yes, my family’s late-1970s Sabre looked ratty indeed, and my shoulder muscles ached just thinking about the coming date with a Travelift to take care of nearly a year-and-a-half’s worth of accumulated grime.
Luckily, though, I had a desk at Cruising World cluttered with product samples, and with a little trial and error, I found a few boat hull cleaners that would take at least some of the sting out of the inevitable scrubbing.
Prepping for the Job
When you’re in a yard with several months to get things ready for the season and lots of folks stopping by to offer advice, you don’t mind taking frequent breaks to move the stepladder or reposition the cooler that’s doing double duty as a step stool. Inefficiency around boats trumps time spent on housework any day.
But on my last couple of haulouts, the goal was to be back in the water by the end of one long weekend in order to minimize the liveaboard experience in the parking lot. So the key was to find ways to work more efficiently, and that started with making sure I had all of the gear I’d need so I wouldn’t waste time running errands.
First off, I made sure that I had enough garden hoses and extension cords to cover the distance from the faucet and outlets to all the areas around the boat. I also collected all of the other things that I knew from experience would come in handy: heavy rubber gloves that went nearly to my elbows; old foul-weather gear; old towels and sheets I could tear into rags; a couple of rolls of paper towel and the heavier, blue shop towels; an assortment of 3M scrub pads; a couple of buckets and large sponges; and some clean terrycloth shop towels that I’d need at the end to apply and buff out the wax.
Then I spent some time going over my collection of cleaning and maintenance supplies. Though unmanly, I’ve found that by actually reading the directions, it’s possible to match a particular product’s intended purpose to the job needing to get done. Not all cleaning products are equal, I’ve learned. Black-stain remover, for instance, might work fine for streaks by the instruments in the cockpit, but it’s nearly worthless for removing black scuffmarks from the deck. For that, Soft Scrub works just fine-in limited amounts. Remember, it’s the grit in the cleanser that gives it the turbo cleaning power. Used too often, you’ll eventually buff away whatever surface you’re determined to clean.
For that same reason, I’ve chosen to avoid using rubbing compound every season before waxing. It’s useful when restoring the luster to heavily oxidized areas of your hull or to go after a particularly tough stain, but there are other ways to clean away ordinary grime that won’t take the gelcoat with it.
Wash, Scrub, and Rinse
Once the boat’s out of the water and the bottom’s been powerwashed, sanded, and repainted, it’s time to go to work cleaning up for the relaunch. I started with a bucket of water and some boat soap; there are several good options, but since I had some on hand, I used Interlux’s All-Purpose Boat Soap. Beginning on deck with a scrub brush, I gave all surfaces a once-over, then rinsed them down with the hose.
Next, I set up on the ground a short length of staging using a plank-an 8- to 10-footer is ideal-and laid it between a stepladder and a folding aluminum ladder that I’d folded in half to form an “A.” The plank let me reach from the waterline to the rail and to move easily back and forth along the hull without having to stop to reposition a ladder.
Products abound at the chandlery for cleaning the hull, but the best I’ve found is Star Brite’s Sea Safe Hull Cleaner or a similar product that contains a mild solution of oxalic acid. When using this stuff, wear gloves that come well up your arms; if you have sensitive skin, you may want to wear an old foul-weather coat to keep the cleaner from dripping onto your arms. I found that mine weren’t bothered when small amounts of the hull cleaner dripped onto my skin.
To apply the cleaner, I used a sponge and clean rag. I started at one end of the plank and made my way forward as I wiped the cleaner onto the hull; I stopped to scrub briefly on any tough stains. After covering four or five feet, I switched to the hose and literally washed away the dirt. I went back then and recoated any remaining stains before moving on to the next 4-foot section, remembering also to rinse those areas the next time I had the hose in my hand.
For particularly nasty areas right along the waterline or on the stern, where exhaust smoke had smudged the transom, I found that the Sea Safe still left behind stains, even after repeated coatings. As I scrubbed away at them with a 3M pad and contemplated turning to rubbing compound to “grind” them away, one of the guys from the boatyard came by and, as if to say, “Why are you doing it that way, you idiot?,” recommended trying what he uses: Marykate On & Off Hull and Bottom Cleaner.
I’ll Never Scour Fiberglass Again
A little On & Off goes a long way. You pour some in a small container and apply it with a paintbrush. Wear gloves for this, and avoid dripping any of the cleaner on skin or clothes. It works fast, so keep the hose handy to flush the treated area, which will be clean as a whistle.
All told, it took me about three hours to make my way around the entire boat. Once the hull had been rinsed and dried a final time, I began where I’d started but applying wax this time. I’d work in the same 4- to 5-foot increments, giving the wax time to dry but not harden. Then I’d polish it with an electric buffer and fairly heavy nap pad. Along the boot stripe and near the rail, I also used a clean terrycloth towel to remove any leftover wax. I’ve used paste wax in the past, but this time I thought I’d try a liquid, Sea Power Super Poly Boat Polish, to see if it’d be easier to buff out.
It wasn’t. Though I’d found the “perfect” lazy man’s cleaner, I’m not sure there’s a shortcut to rubbing on the wax, letting it dry to a haze, then buffing it clean. Besides, it’s the hard wax finish that protects your hull, so why scrimp on the last step?
With the hull cleaned and waxed, it was time to move to the deck, where the clean-up job went lots faster. I skipped areas of nonskid that I didn’t want waxed and stuck to the small areas of smooth fiberglass on the cockpit sides, bulkhead, and cabin top. I attacked with the Sea Safe, rinsed, then moved on to the next area.
All told, I invested the better part of a day in cleaning up the topsides, time well spent in getting Jackalope back to looking her good ol’ self. The key was the prep work that I did beforehand and my decision to take my time to pick the correct cleaners for each chore.
Mark Pillsbury, the editor of Cruising World, is a reluctant swab.