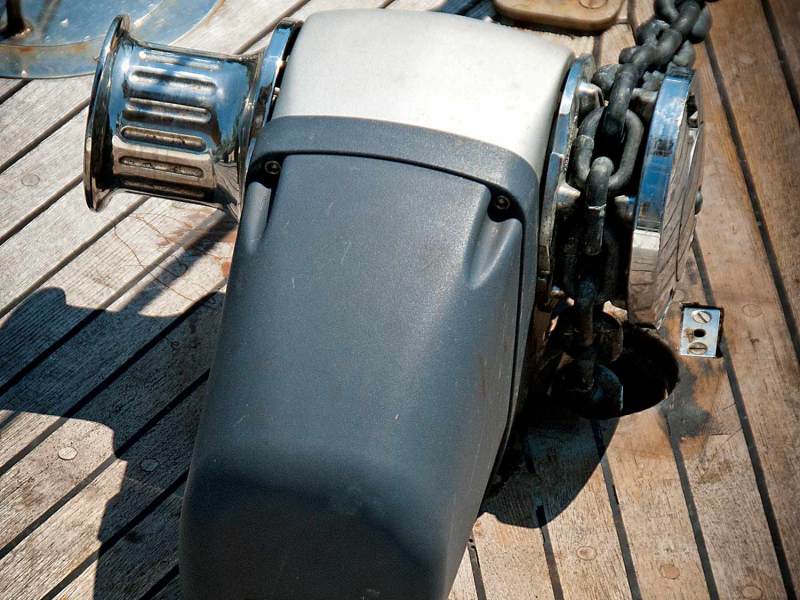
When it came time to replace the old and tired vertical windlass on Francis B, our Mason 44, I naturally opted for a horizontal windlass because it would free up space in the anchor locker and its motor would sit up on deck, where it could easily be maintained and repaired if needed (See “Choosing a Windlass,” at the bottom of this article).
Before I could bolt the new Maxwell HRC 10-10 into place, though, I first had to remove the old windlass and prepare the deck where it would sit — simple enough in theory, but as always, there were a few surprises along the way.
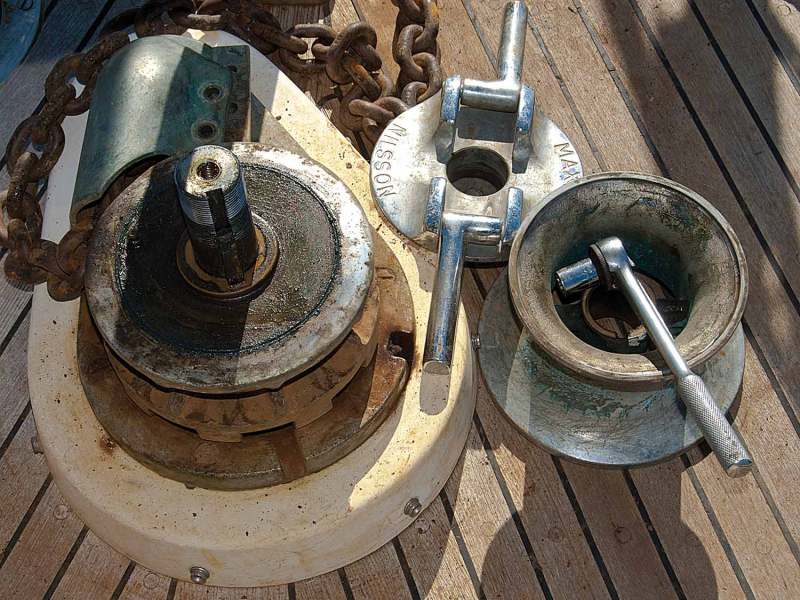
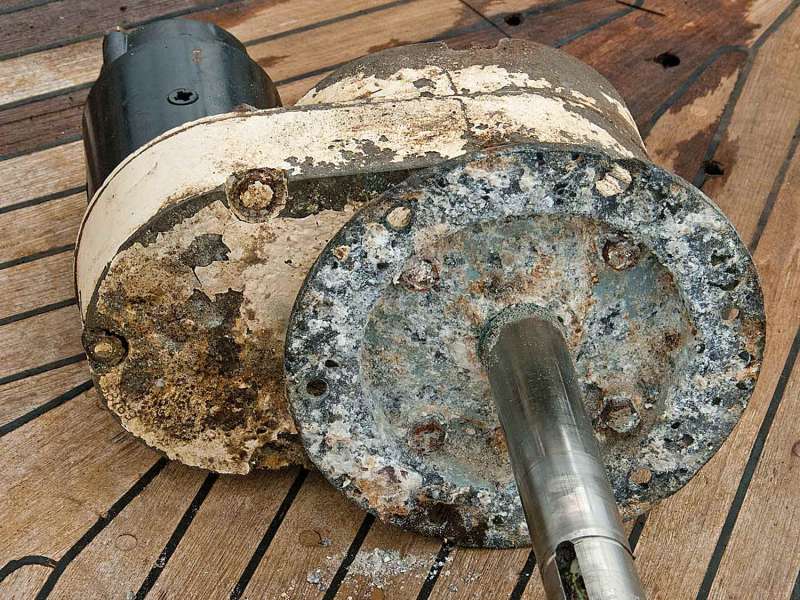
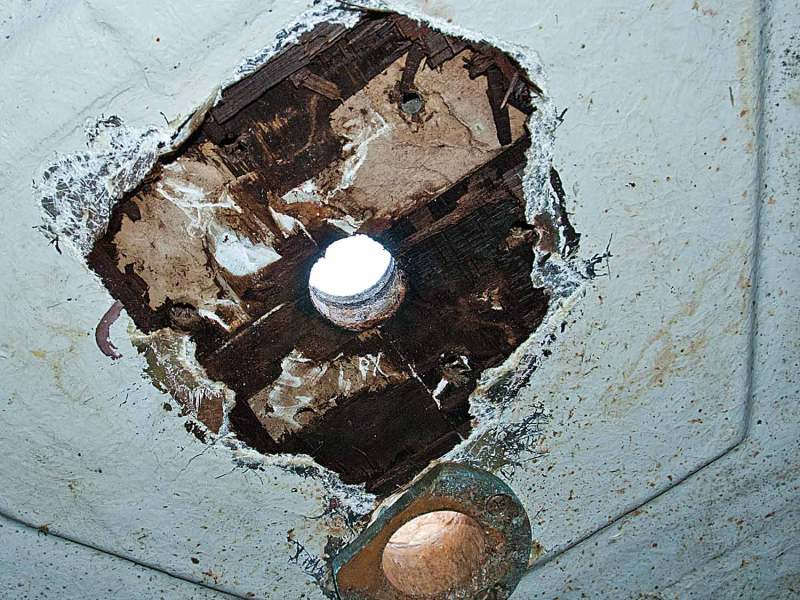
The line capstan and the chain wildcat, sometimes called a gypsy, slipped off easily from the drive shaft, revealing six bolts running through the bronze base of the windlass. These passed through the deck and supported the drive motor and gearbox below. The removal of the assembly revealed very severe corrosion around the bolt holes in the gearbox housing. Large washers under the nuts completely covered the problem. To make things worse, the gearbox housing was cast aluminum and the bolts were bronze. These are two metals that should never be mixed in a marine environment. The less noble aluminum will always be the loser.
On deck, the vertical windlass was mounted on a 2-inch-thick wood pad covered by gelcoated fiberglass. The builder put this down using 3M’s 5200. This powerful adhesive can usually be loosened up with a heat gun, which I didn’t want to use on our teak deck. Besides, the heat wouldn’t have penetrated the massive spacer block anyway.
After cutting through the spacer with a Sawzall reciprocating saw, I had to chisel the remains off the deck. The wood inside that base was rotten, which indicated that the backing piece under the deck — also gelcoated fiberglass over wood — likely would have to go too. I went at it with a cutting grinder and found out that the wood inside had turned to wet pulp. I replaced it with a solid chunk of teak glued in place with thickened epoxy.
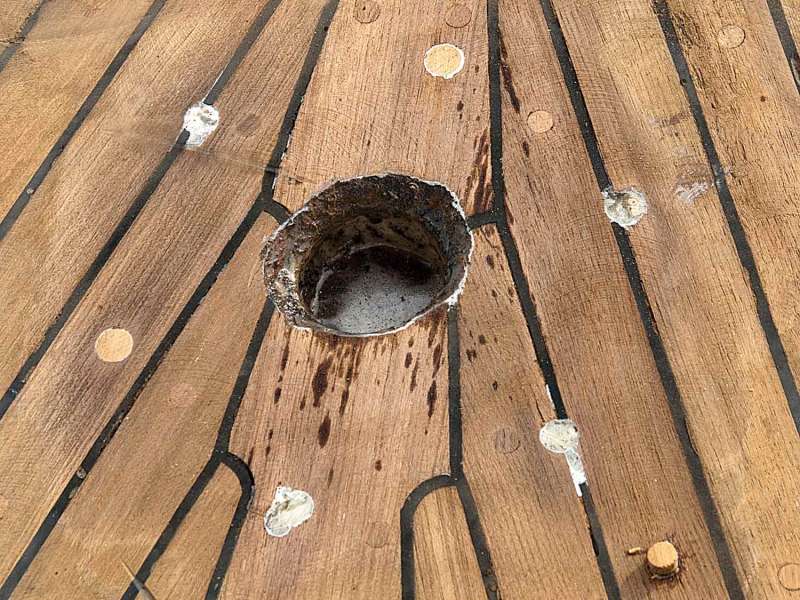
To prepare the deck for the new windlass, I reamed out the soft balsa core around the original holes for bolts, windlass shaft and chain drop. After drying these areas using fresh air, sunshine and a heat gun set on low, I filled the bolt holes with epoxy. The large chain-drop opening, which would be visible when the new windlass was fitted in place, was filled with a teak plug.
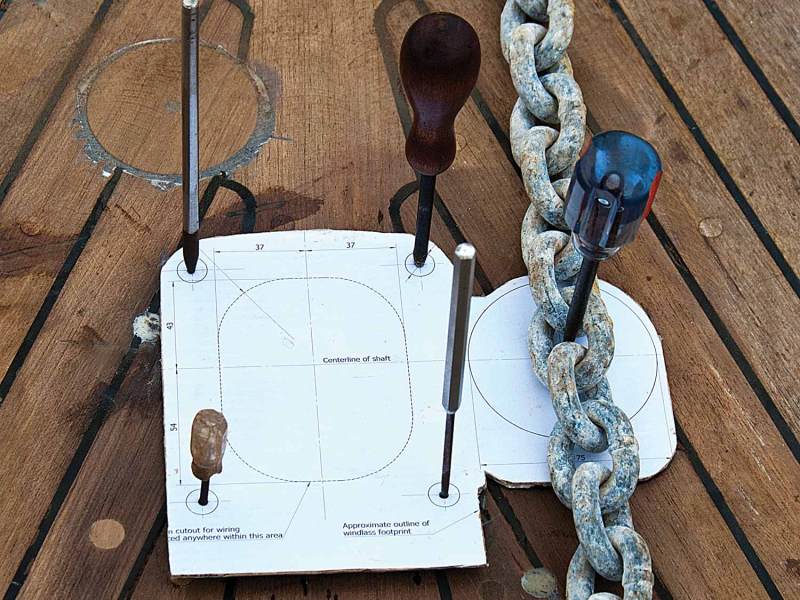
I glued the thin paper template onto stiff cardboard first and then used this to double-check the alignment of the base with the run of the chain coming from the bow roller.
I planned to keep the hole for the shaft of the old windlass open to accommodate the wiring for the new windlass and its above-deck motor, but to protect the exposed balsa core, I sealed the edges with thickened epoxy.
The deck on our Mason has a slight camber, so I sanded the area under the footprint of the new unit as flat as I could.
Then, I used the template supplied with the new windlass as my guide for drilling the necessary bolt holes and a larger hole for the chain to fall into its locker. I glued the thin paper template onto stiff cardboard first and then used this to double-check the alignment of the base with the run of the chain coming from the bow roller.
Five awls helped me mark bolt locations and the center for the chain-drop opening. After that I punched out the full-size bolt holes in the template — more on that in a moment.
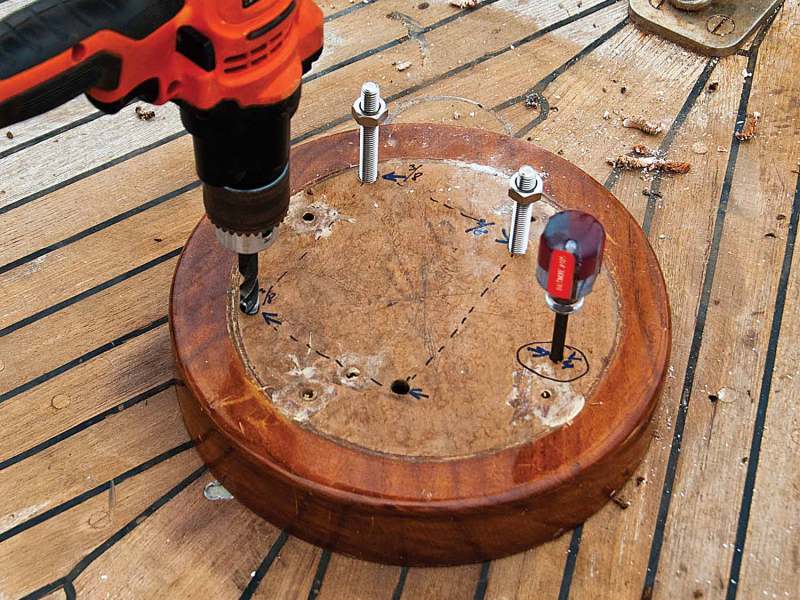
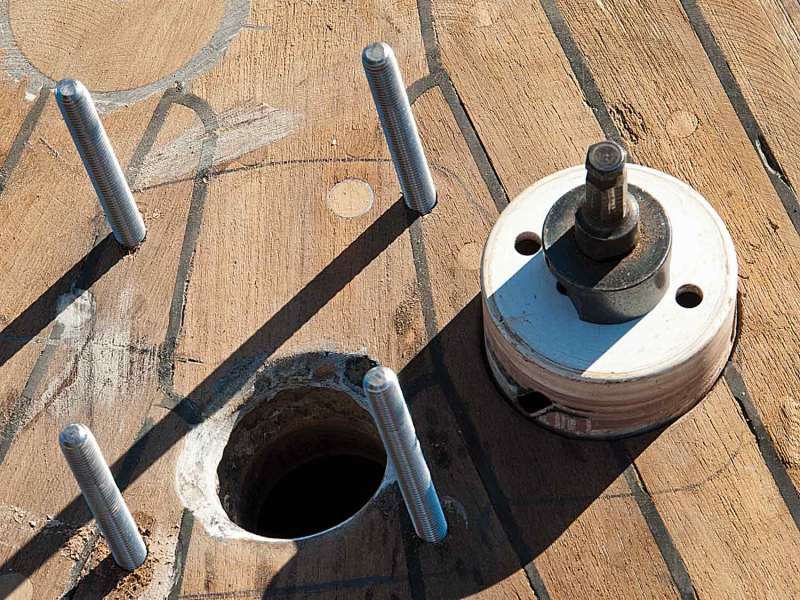
The new windlass is attached to the deck by studs threaded into its base. The bolt holes to accommodate them had to be drilled absolutely square — a challenge with a 2-inch-thick, slightly uneven deck. I needed to devise a jig. For this I used a piece of 3-inch-thick hardwood. Now guided by the template I put this wood on a drill press and cut four holes for the bolts. I also drilled a ¼-inch hole for the chain-drop center. My jig was ready.
I immobilized the jig on the deck with an awl through the ¼-inch center hole in the chain drop and checked the alignment with the chain once again. I drilled the first hole following the small prick the awl marked on the deck earlier. I put the bolt in, checked the alignment of the jig yet again and then went on drilling the remaining holes for the studs.
Next, I attached a hole saw to my ½-inch drill and cut out the chain drop. I sealed the raw edges of this opening with epoxy and slipped in a piece of bronze pipe, a bushing of sorts, to protect the balsa and teak from the chain when anchoring. With the studs screwed into the windlass base, I put the supplied gasket on. A little jiggling helped slip the bolts into the holes on deck and the whole windlass settled down easily — to my infinite surprise and relief!
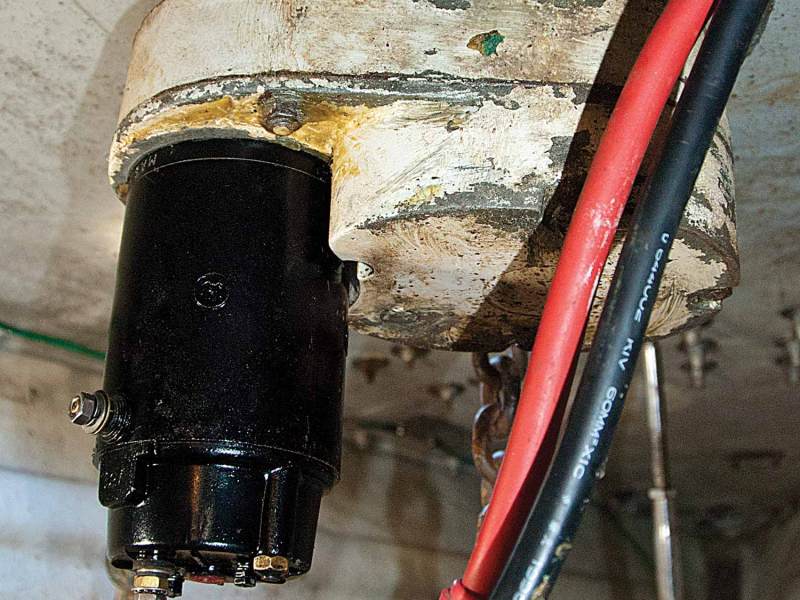
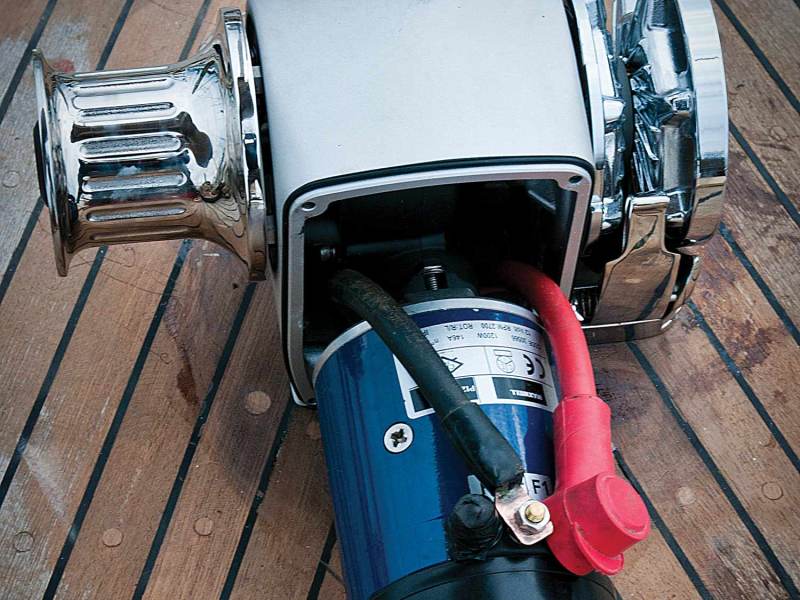
The electric control components from the old windlass were in excellent condition so I left them in place, keeping the new solenoid pack that came with the unit as a spare. The new windlass has a chain wildcat for 10 mm chain, and I was assured it would work with our existing 3/8-inch BBB chain. Perhaps because the links of our hardworking chain were rusting, the windlass worked but with some occasional hiccups. I splurged on a new G4 chain and it fits perfectly. Apparently the G4 is manufactured to much more precise specifications. Our chain wildcat is designed to handle a combination of chain and line spliced directly into the chain links. Because of abrasion, I don’t believe the splice will last very long, so we have never tried hauling the rode in this manner.
Rather than releasing the chain manually and letting it run out, our new Maxwell has the ability to reverse its motor in order to drop the anchor. In the past, I’ve found that to be slow, so that by the time the anchor finds the bottom the boat has drifted far away from the chosen spot. So to me, this feature wasn’t worth the labor and the cost of the extra wire needed to take advantage of it. With that decision made, my work was done.
Tom Zydler and his wife, Nancy, have been frequent Cruising World contributors for over two decades. In recent years, they’ve chased the seasons to the Canadian Maritimes and back on their Mason 44 Francis B.
Windlass Manufacturer Guide
- Ideal Windlass is now owned (and windlasses are serviced) by Schaefer Marine. See idealwindlass.com; 401-884-2550.
- Italwinch windlasses are imported to the U.S. by Bainbridge International. See bainbridgeintusa.com; 781-821-2600.
- Lighthouse is a U.S. maker of all stainless-steel horizontal windlasses with under-deck motors, with a wide choice of gypsy/capstan combinations. See lighthouse-mfg-usa.com or info@lighthouse-mfg-usa.com; 951-683-5078.
- Lewmar manufactures windlasses in a wide variety of types and sizes. See www.lewmar.com/products; 203-458-6200.
- Lofrans is an Italian maker of popular models of all types; they are distributed in the U.S. by IMTRA. See imtra.com; 508-995-7000.
- Maxwell, now owned by Vetus, builds models of all types in New Zealand. See maxwellmarine.com or salesamericas@maxwellmarine.com; 714-689-2900.
- Muir is an Australian company, handled in the U.S. by IMTRA. See imtra.com; 508-995-7000
- Quick windlasses are made in Italy and distributed in the U.S. by QuickUSA. See quickusastore.com; 410-636-5991
Choosing A Windlass
When replacing or installing either a manual or powered windlass, you need to factor in the size of your boat and the depth of the water where you’ll likely be anchoring. The larger the vessel and the deeper the harbors, the more likely it is that you’ll go the power route. And unless your boat already has a hydraulic system, an electric windlass drawing either 12 or 24 volts is the way to go.
When selecting a windlass, first consider how hard it may have to work. The popular idea that the windlass only has to lift the combined weights of the anchor and the submerged length of chain is dangerously wrong. When the wind begins to blow and the sea builds, the usual tactic of powering forward to ease the load on the chain may not work as expected. The boat moves forward, the chain slacks and, as soon as you slow down or shift the transmission into neutral, the wind catches the bow and throws it sideways. Now the windlass has to pull against the wind and seas, and there is additional friction from the chain dragging across the bow roller. Combined, that’s a lot of extra resistance.
If your windlass is wired with an overload system — and it should be to avoid melting power cables that can carry 100 amps or more of current — the electric motor will stall. It will restart when the load eases out. Therefore, when retrieving the anchor rode, work the windlass in lulls when the chain is straight and not bar tight. If there is a sea running, engage the windlass when the bow goes down and stop it when the bow rises.
To get an idea of what size windlass your boat needs, check out the specifications provided by the various manufacturers. These show the maximum pulling power in pounds or kilos, along with the range of boat length and displacement a specific windlass can handle. Maximum pull means the load at which the motor stalls. Work load usually is rated at 1/3 of the stall load. Also look at the amperage required. This indicates the motor’s size and power, as well the size of the electrical wire that will be required between the windlass and battery and breaker. In general, it’s better to have a windlass that’s bigger than what the specifications call for. There are basically two types of windlass: vertical and horizontal. The terms can be confusing because they refer to the orientation of the axle and not the gypsy or capstan around which the chain or rope rode runs.
On a vertical windlass, a notched chain wildcat, which is also called a gypsy or chain wheel, sits above deck. In a typical installation, the windlass motor is below in the anchor locker. In most cases, the windlass will be mounted on the boat’s centerline. The anchor chain feeds onto the gypsy and is pulled nearly all the way around it before it drops into a pipe or hole that leads it into the anchor locker. A benefit of this design is that nearly the entire gypsy is loaded with chain. This setup works fine with a single anchor rode, but cruisers often carry a spare anchor with a line and chain rode. To handle the additional tackle, a capstan is sometimes mounted above the gypsy.
On a horizontal windlass, the motor is often — though not always — mounted on deck, which is a plus for any boat with limited anchor-locker space. Depending on the model, it is possible to mount a gypsy on either end of the horizontal axle, making it possible to have two anchors and rodes in use at one time, or a gypsy on one side for a chain rode and a capstan on the other for a line rode. With a horizontal windlass, the chain is engaged by the gypsy, makes a 90-degree turn and drops directly into the anchor locker.
The preferable horizontal windlass design is for the on-deck motor to have its own gasketed cover, which makes it very easy to service. By contrast, horizontal and vertical windlasses that have their motors below deck are exposed to the damp environment of the chain locker. Sooner or later water may work its way past seals or down a vertical drive shaft and cause corrosion and electrical problems. This is usually very difficult to detect. For me, the horizontal windlass with an above-deck motor is the way to go if you want longevity, ease of operation and easy access for maintenance.
As an added benefit, should the electrical motor seize up, almost all horizontal windlasses have an easy-to-use manual backup system, while some vertical windlasses require partial dismantling to install a hand crank.
Handling Multiple Rodes
In addition to a primary all-chain or chain-and-line anchor rode, many bluewater cruisers will have a second anchor rode of line with a relatively short length of chain. When not in use, the two rodes are separated in the chain locker by a fore-and-aft divider or some other partition. In such a case, some device must lead the chain from the windlass’ wildcat to its own storage space. Using a pipe for this causes the chain to twist as it comes in, so that after a few anchorages it will hockle into an unmanageable mess just when you may need to drop it in a hurry. A flat ramp of some sort, mounted at an angle on top of the divider, solves this problem. Having a capstan on the windlass in addition to the chain gypsy lets the line rode be retrieved so it can then be stored in the other anchor locker compartment.
Put a Plug in it
On the Francis B, the chain from the horizontal windlass goes into a hole in the deck that will also let water into the chain locker. Make sure this water runs out of a drain hole or into the main bilge through clean limber holes. For long passages, make a tapered plug from wood or rubber that fits the deck hole. Screw an eyebolt in the bottom of the plug. Then disconnect the chain from the anchor, attach it to the eye and drop the plug into the hole — the weight of the chain will help keep the plug in place. You cannot do this on a vertical windlass because the chain disappears into a naval pipe that feeds it into the anchor locker. A bundle of rags stuffed in the mouth of that chain pipe helps some. On one boat, I used a fistful of something akin to silly putty and that worked reasonably well too.


