Gasoline-powered outboard engines have been in production for more than 100 years, and these days, they can be found aboard nearly every cruising sailboat afloat. Most often, they are used to zip around in a dinghy, although on smaller vessels, they can also be used as the main propulsion for the mothership. Relegated to the rail when not in use, the average outboard is usually a little neglected, if not slightly abused.
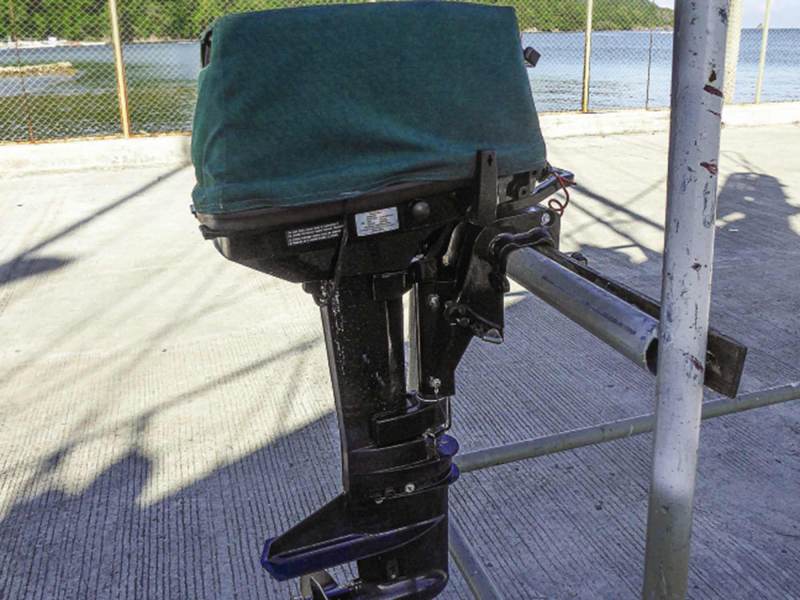
Whether you have a two-stroke or a four-stroke, a 2.5 hp or a 25 hp, all outboards consists of two main parts: the power head and the lower leg, sometimes called the lower unit. The power head, which is protected by a removable cowl, is the engine itself. The lower leg extends from the power head down into the water, and it contains a lower gearbox unit and propeller, as well as the water intake used to cool the motor.
The best way to service an outboard is to hang it on an outboard stand, giving full and easy access to all aspects of the engine. Trying to service an outboard while it hangs on the rail or on the back of a dinghy can be messy, if not downright difficult. In the boatyard, we made a rudimentary outboard stand by lashing a 2-by-4 to a piece of scaffolding.
Power-Head Service and Inspection
Removing the outboard cowl and confronting the power head can be daunting, but getting to know how your outboard functions is important. Doing regular inspections and being able to diagnose minor problems will extend the life of your outboard. Forget about this task being on the “blue list” of chores, every crewmember who uses the dinghy should have knowledge of how the motor runs and how to fix it. And your outboard will benefit from routine maintenance, either at regular intervals if cruising year-round, or at the end of each season when the sailboat is laid up.
Begin by draining the fuel. First, fill a large bucket with clean, fresh water, and place the lower leg in the bucket so that the water intake is submerged. By using fresh water, you are also cleaning salt residue from the water-cooling system while draining the fuel.
Next, remove the cowl and locate the fuel hose. Detach the fuel hose and drain any gas into a container.
If the outboard has a small inline fuel filter, either clean the screen or, for disposable filters, replace it completely.
Start the engine with the fuel hose detached, and run it until it stops. This will burn all the remaining fuel in the engine. Then loosen the fuel-bowl drain screws, and empty any remaining fuel from the carburetor bowl. Reattach the fuel hose and fuel bowl. With the power head emptied of fuel, it is time to inspect the engine for wear, rust and corrosion.
Clean and wipe any residual salt from the cowling. Carefully wipe the engine free of dirt, dust and salt. Make note of any corrosion on screw heads or wires, and replace as necessary.
Slowly pull the start cord all the way out, and check for chafe. If there are weak points close to the pull handle, shorten the cord by pulling the chafed cord through the handle and retying. Chafe farther up the pull cord might require replacing the cord completely. Remove the spark plugs, and inspect for carbon or oil buildup. Replace plugs that are fouled.
Lower-Leg Service
The first thing to do on the lower leg, once the engine is on a stand, is to inspect and remove the propeller. Check the prop for dings and bent blades. A minor bend can be straightened and dings can be filed out, but major damage will necessitate replacing your propeller.
To remove the propeller, first remove the cotter pin. If the outboard does not have a cotter pin, check to see if it is missing or if it is simply one of the few models that doesn’t include one.
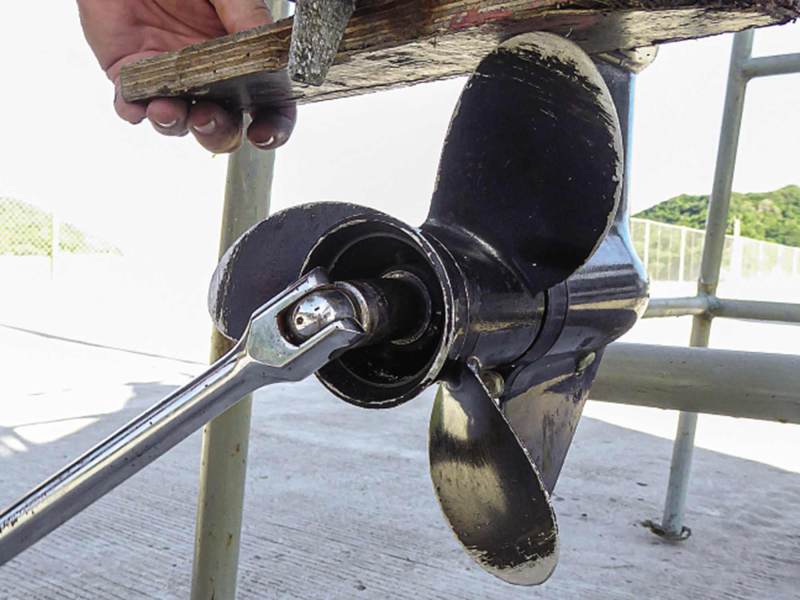
Unscrew the prop nut. It is usually a castellated nut, named so because it has several cutouts in the outside edge, making it look like the turret of a castle. The slots capture the cotter pin, which further prevents the prop nut and propeller from spinning off. If a bit more traction is needed to free the nut, block the prop with a piece of wood so there is something to push against.
Clean the old grease off the propeller hub, and inspect the splines for wear. Badly worn splines will cause slippage; replace if there is excessive wear. Inspect the rubber hub bushing in the center of the prop. Check for any deformities or signs that the rubber is beginning to deteriorate. This rubber bushing is what absorbs the shock when switching gears or when the prop hits something. Once the bushing is damaged, the propeller blades will no longer spin at the correct speed, if at all. It is no longer economical to install a new bushing in modern outboard propellers; any wear or damage found here requires fitting a new propeller.
Remove and inspect the shaft seal guard, if there is one. Things such as fishing line often get wrapped around the shaft seal and remain undetected during normal use. Any damage to the shaft guard will allow seawater into your gearbox and, if not found, could cause major damage. Replace the shaft seal if wear or damage is found.
Check the anodes and intake grates. Outboards are water-cooled, and grates need to be free of growth to allow maximum water flow. Try using an old toothbrush to free the fine grates of growth. Badly corroded anodes should be replaced. Clean and inspect bonding wires and the shift linkage for corrosion. Outboards under 3 hp might not have either of these components because they are often direct drive.
Changing Leg Oil
The next step is to drain and replace the leg oil. Have a container ready to catch the used oil, and make sure you dispose of it properly. Some manufacturers use different terms to mark the “Oil” and “Oil Level,” so check the owner’s manual for particulars.
Loosen the lower screw marked Oil, and empty the fluid into a container. To increase the flow, loosen the upper screw marked Oil Level. Depending on the brand, leg oil might be dyed or, after use, black. However, used oil should not be milky or cloudy. Milky oil indicates there is water leaking in through the shaft seal. Over time this can cause rust to form inside the lower leg. Replacing the shaft seal immediately will prevent possible irreparable damage.
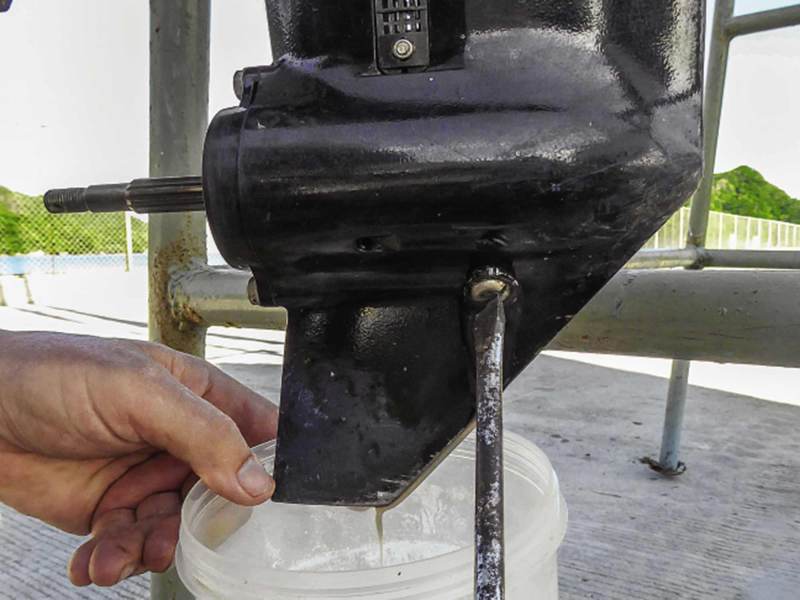
Filling the leg oil is usually done from the bottom, and leg-oil containers are specially designed to make this seemingly awkward task easy. Have a container and rag handy for overflow, and be ready to work quickly. Carefully insert the oil container nozzle into the Oil opening and squeeze gently, making sure the upper Oil Level screw is slightly loose. When the oil begins to flow out of the Oil Level opening, tighten the upper screw. Remove the leg-oil container and replace the lower Oil screw.
Assemble the Propeller
Reassembling the propeller is simply the opposite of the disassembly process. Grease the clean splines and seal guard with waterproof grease. We’ve found that Lanocote, an environmentally friendly grease made from sheep lanolin, is a popular choice.
Slide on the propeller and prop washer, and screw on the castellated nut, lining up a slot in the nut with the hole for the cotter pin. Insert a new cotter pin and bend the ends.
The final step in servicing the lower leg is to fill all grease points, also referred to as zerk fittings. Most outboards have one or two zerk fittings on the lower leg. Using a grease gun, fill grease points with outboard leg grease until the fittings start to overflow. Wipe up any excess grease.
Tank Care
If your engine doesn’t have a built-in fuel tank, take time to look at the external one and fuel line, including the bulb and connections. Inexpensive fuel hoses tend to harden with extended UV exposure, and the pressure bulb can split. Check hose clamps and connection for rust, tighten any loose fittings, and replace any clamps that are damaged. High-quality fuel-hose replacements can be very difficult to find outside the US, so carry a spare.
Inspect the fuel tank for sun damage, splits and brittle plastic. Also inspect the fill-cap gasket. Gasoline is corrosive, and a damaged gasket can let gasoline leak out while carrying the tank and allow water to enter when the tank is in the dinghy.
Long-Term Storage
Prepping an engine for long-term storage is something most sailors will have to do eventually. After preforming the basic service outlined above, there are a few more steps to take to properly prepare your outboard if it will be in storage for more than a few weeks.
The most important thing to do, especially when storing an outboard, is to remove all the fuel from the engine. Modern fuel is a complex mixture of refined petroleum and additives designed to lubricate and protect your engine while it runs. Unfortunately, those additives have a short shelf life—modern fuel starts to break down in approximately eight weeks.
Unused fuel left in an outboard is the No. 1 cause of engines acting up. As the fuel degrades, the additives separate, forming a lacquerlike substance that will quickly block small fittings and jets, causing an outboard to misfire, idle poorly or fail to start at all. There are fuel stabilizers on the market; however, they are just more additives and chemicals. The easiest way to ensure that an outboard will start when taken out of storage is simply to properly drain the fuel, as outlined above.
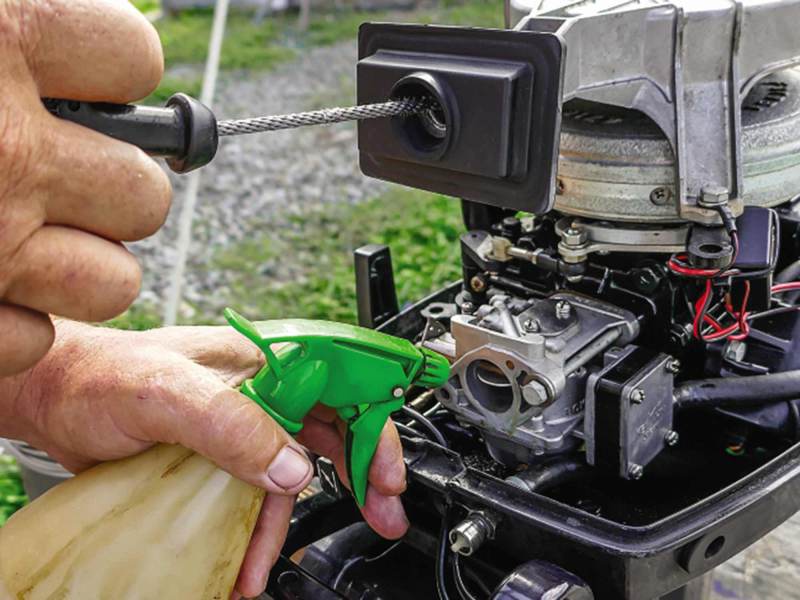
Next, it’s time to fog the engine. Fogging uses a water-repelling oil-based product to coat the internal working parts of the outboard. Sprayed as a heavy mist or fog into the air intake while the outboard is running, it prevents corrosion from forming inside the engine while it is out of service. There are purpose-designed products marketed for engine fogging, but for those of us down-island, an alternative appropriate for both two- and four-stroke engines is a spray bottle filled with two-stroke oil.
While running the engine to drain the fuel, spray the fogging mist or two-stroke oil into the air intake at the carburetor for five to seven seconds. As the engine runs, the oil is circulated through the interior parts of the power head, lubricating and protecting the outboard. Fogging sprays have a high oil content, so expect to see some smoke.
After the outboard has run out of fuel and cooled off, remove the spark plugs. Spray the fogging mist or oil directly into the spark-plug hole, slowly pulling the start cord a couple of times to make sure the oil is well-distributed on the pistons, rings and cylinder walls. Replace the spark plugs, making sure to put a dab of anti-seize grease on the threads. Spray the exterior of the engine lightly and wipe off any excess.
Outboards are best stored in an upright position, but when space is tight, they can be laid down for long-term storage. Usually outboards are stored with the tiller arm facing down so that no damage is done to the more-delicate gear-shift lever. Check the owner’s manual, or there might be a sticker on the side of the outboard indicating the manufacturer’s recommended position. Wrapping your outboard in an old piece of sail cloth or sail bag will prevent any cosmetic damage while moving it in and out of tight storage areas.
Like any piece of equipment, a little attention and regular care will extend the life of your engine. Performing a basic service to an outboard is not difficult, and properly preparing your engine for extended storage will ensure that you’ll be ready for your next adventure on the first pull.
Heather Francis is from Nova Scotia, Canada, and has lived and worked on boats around the world. Since 2008, she has been sailing on board Kate, a Newport 41, with her Aussie partner, Steve. They are currently in the Philippines. Follow them at yachtkate.com.
A Filter and a Meter
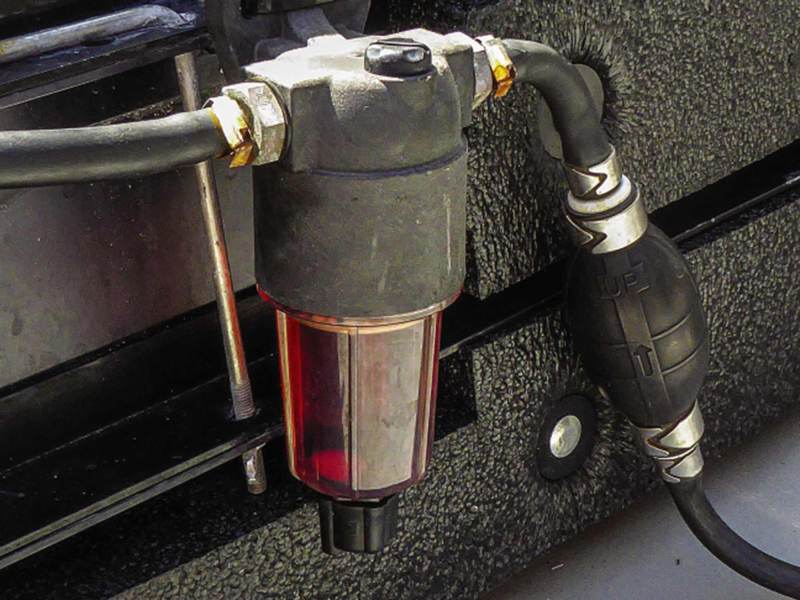
Bad gas is probably the No. 1 cause of outboard problems. Unfortunately, it can be difficult to get clean fuel in many countries outside the US. Filtering fuel through a Baja filter when filling the dinghy tank is the first line of defense, but installing an inline fuel filter/water trap will further guarantee that your outboard will run smoothly, no matter where you buy your gas.
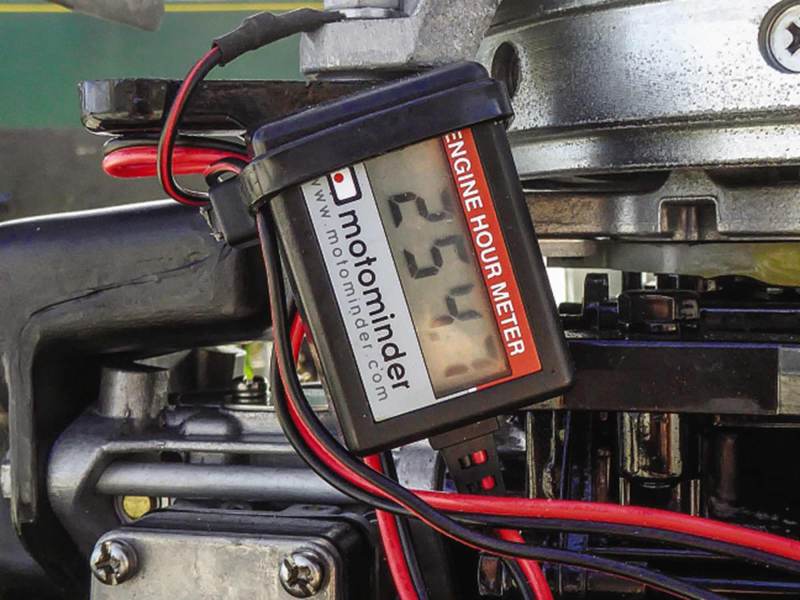
An hour meter is simple to install and is the most reliable way to record how long the engine has been run. Knowing engine hours makes service intervals easier to track, and when it comes time to sell up, there will be firm information about your engine’s use.
Tools for the Outboard
A new outboard comes equipped with a small toolkit, but if you don’t have the luxury of buying new, it’s a smart idea to put together a kit of your own for those unexpected breakdowns far from shore. Placed in a small waterproof bag, these tools may find a home in the dinghy or even fit under the cowl without disrupting the regular operation of the outboard, and will always be on hand when you need them.
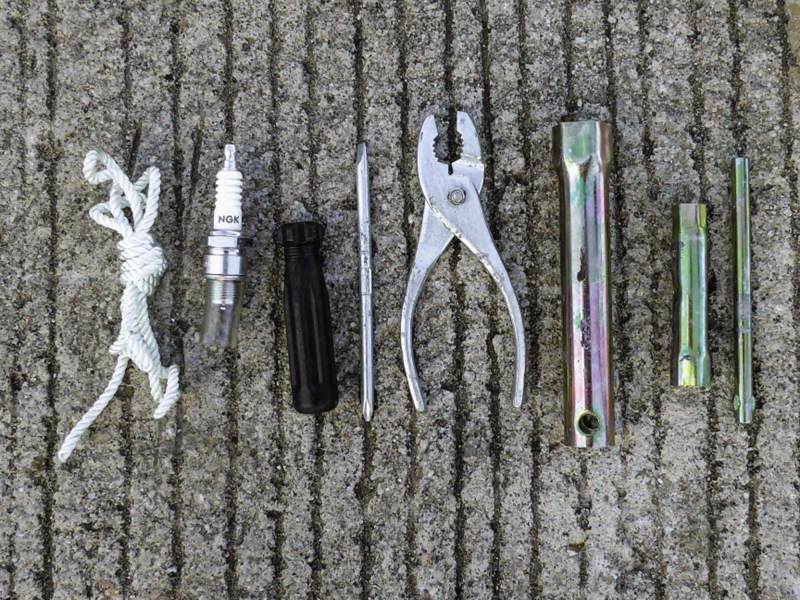
Essentials and a few handy extras include:
- Spark-plug wrench
- Extra spark plugs to suit your engine (check manufacturers’ recommendations for proper model number and gap measurements)
- Spare pull cord
- Ratchet and sockets to fit all nuts
- Combo screwdriver
- Spare cotter pin
- Pliers
- Electrical tape
- WD40, small can


